Switch between Outline, Preview and Pixel Preview
This page shows how to change the way the canvas draws your artwork: in full color (Preview), as outlines for the whole view or for single layers, or as the pixels it turns into. It also covers Trim View, the Anti-aliased Artwork preference, and where to find Overprint Preview and the proofing views.
These modes change only what you see on screen. They do not change what prints or exports.
Switch the whole view to Outline
Section titled “Switch the whole view to Outline”Outline draws every path as a thin black line, without fills, strokes or raster effects. Effects that reshape a path still change the outline you see. Paths that other art covers in Preview show in Outline, and you can select them there.
- Choose View → Outline (Ctrl+Y, or Cmd+Y on macOS). The document tab now ends in (RGB/Outline), or (CMYK/Outline) for a CMYK document.
- Work as usual. In Outline, a click selects a path on its outline. A click inside a shape does not select it. A click on the outline of a path behind a placed image selects that path, and a click on the image’s frame selects the image.
- To go back, choose View → Preview (Ctrl+Y, or Cmd+Y on macOS). The same menu item reads Outline in Preview and Preview in Outline.
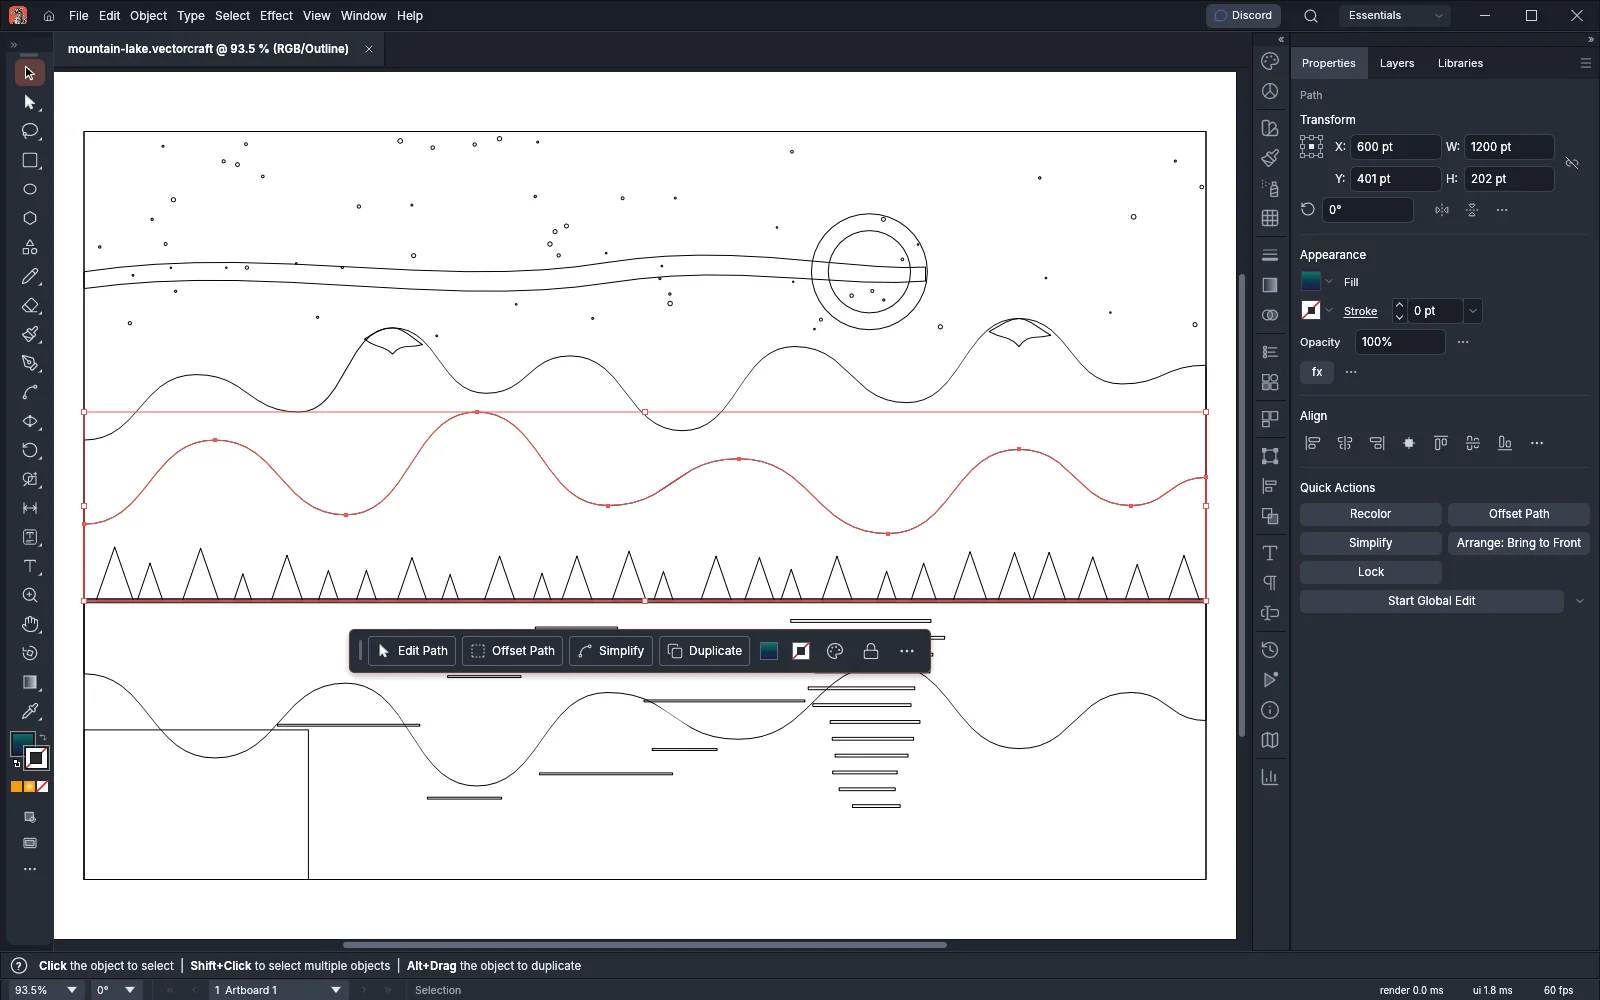
In Outline, a placed image shows as a box. A symbol instance shows the outlines of its art, type shows the outline of every character, and a gradient mesh shows its mesh lines. A template layer stays in Preview.
Each view of a document keeps its own mode. New documents and documents you open start in Preview, and switching one document to Outline leaves the other open documents as they are. When you open a second view with Window → New Window, one view can be in Outline while the other is in Preview. See Work in several windows.
Show one layer in Outline
Section titled “Show one layer in Outline”You can put single layers in Outline while the rest of the view stays in Preview.
- Open the Layers panel (Window → Layers).
- Ctrl-click (Cmd-click on macOS) the eye of a layer. The layer’s art draws as outlines, and its eye turns into a hollow eye with a ring around it.
- Ctrl-click (Cmd-click on macOS) the eye again to put the layer back in Preview.
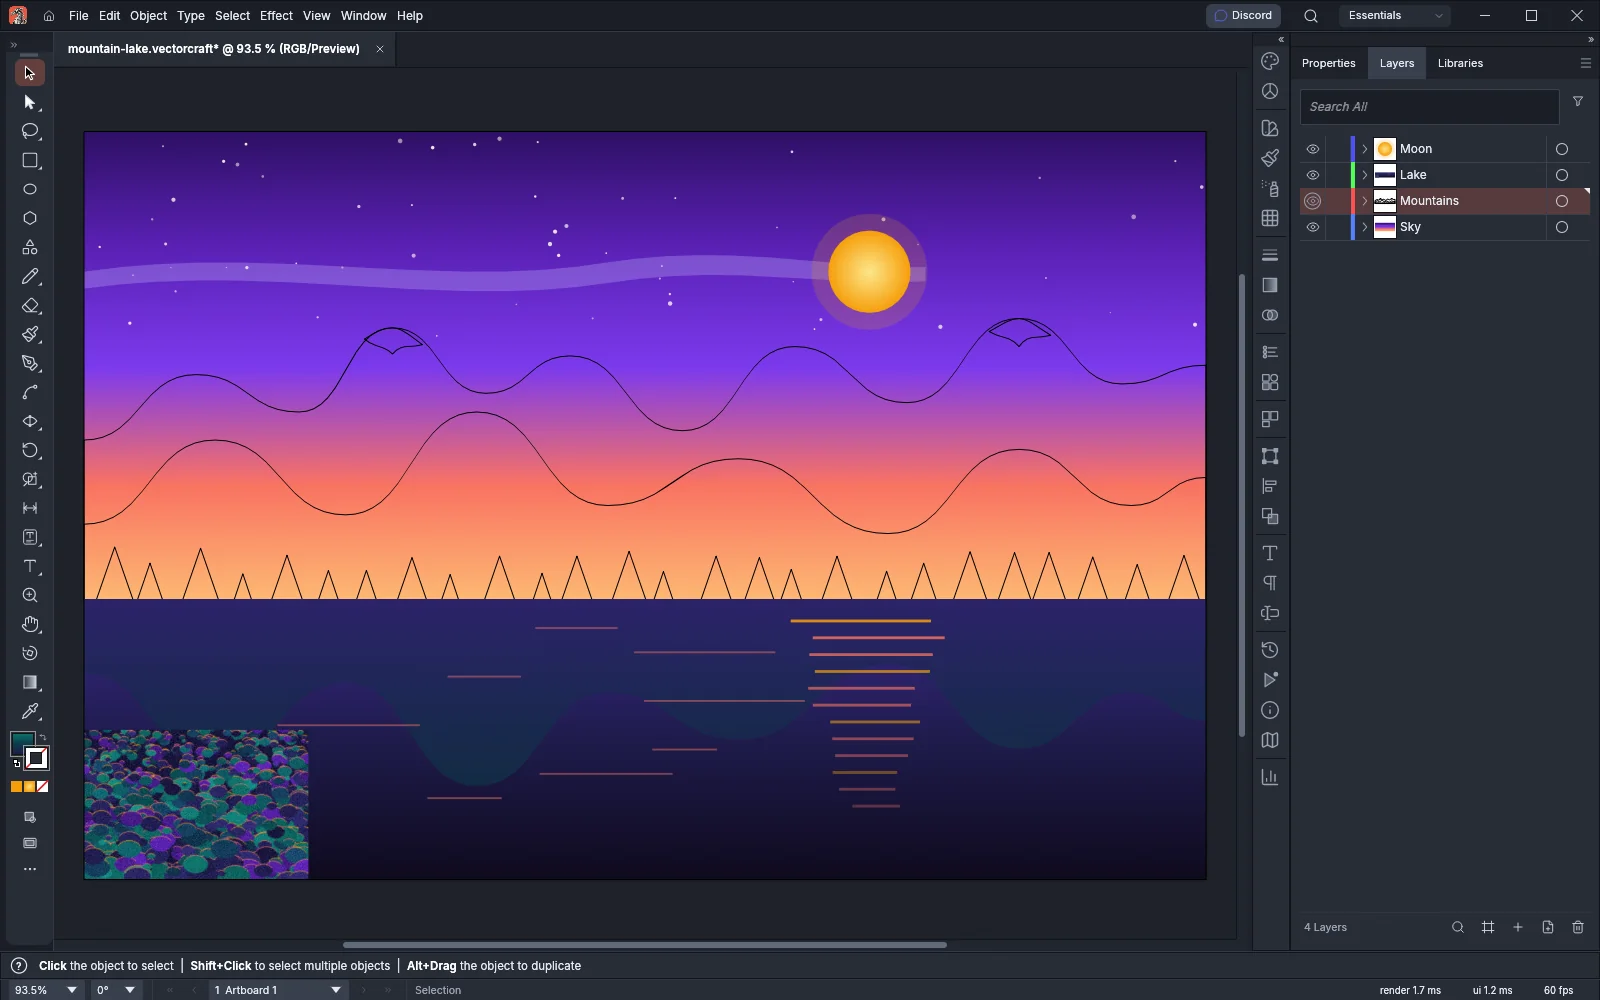
To work on one layer in color with the others as outlines, Ctrl+Alt-click (Cmd+Option-click on macOS) that layer’s eye. This runs Outline Others: every other top-level layer goes to Outline, and the layer you clicked goes to Preview. Do the same again while all the other layers are in Outline to run Preview All Layers, which puts every layer and sublayer back in Preview. Each of these is one undo step.
The same two commands are in the Layers panel menu. The menu shows Outline Others while another layer is in Preview, and Preview All Layers once every other layer is in Outline. You can also turn a layer’s Preview check box off in its Layer Options dialog. See Organize with layers and symbols.
A layer’s Preview setting is saved with the document. It changes only the screen, and exports draw the layer in full.
Show placed images in Outline
Section titled “Show placed images in Outline”By default, a placed image shows as an empty box in Outline. To see its picture while you trace or line up art with it:
- Choose File → Document Setup… (Ctrl+Alt+P, or Cmd+Option+P on macOS).
- On the General tab, turn on Show Images in Outline Mode.
- Click OK.
In Outline, images now draw their pixels in grayscale under their frame. Such an image covers the paths behind it again, so a click on a path’s outline inside the image selects the image. The setting belongs to the document and is off for new documents. See Set up a document and artboards.
Preview the pixels
Section titled “Preview the pixels”Pixel Preview shows the artwork as it will look when it is written to pixels, for example in a PNG or a web image, with one pixel for each point.
- Choose View → Pixel Preview (Ctrl+Alt+Y, or Cmd+Option+Y on macOS).
- Zoom in until each pixel shows as a square. At 600% and above, a line marks the edge of every pixel.
- Choose View → Pixel Preview again to turn it off.
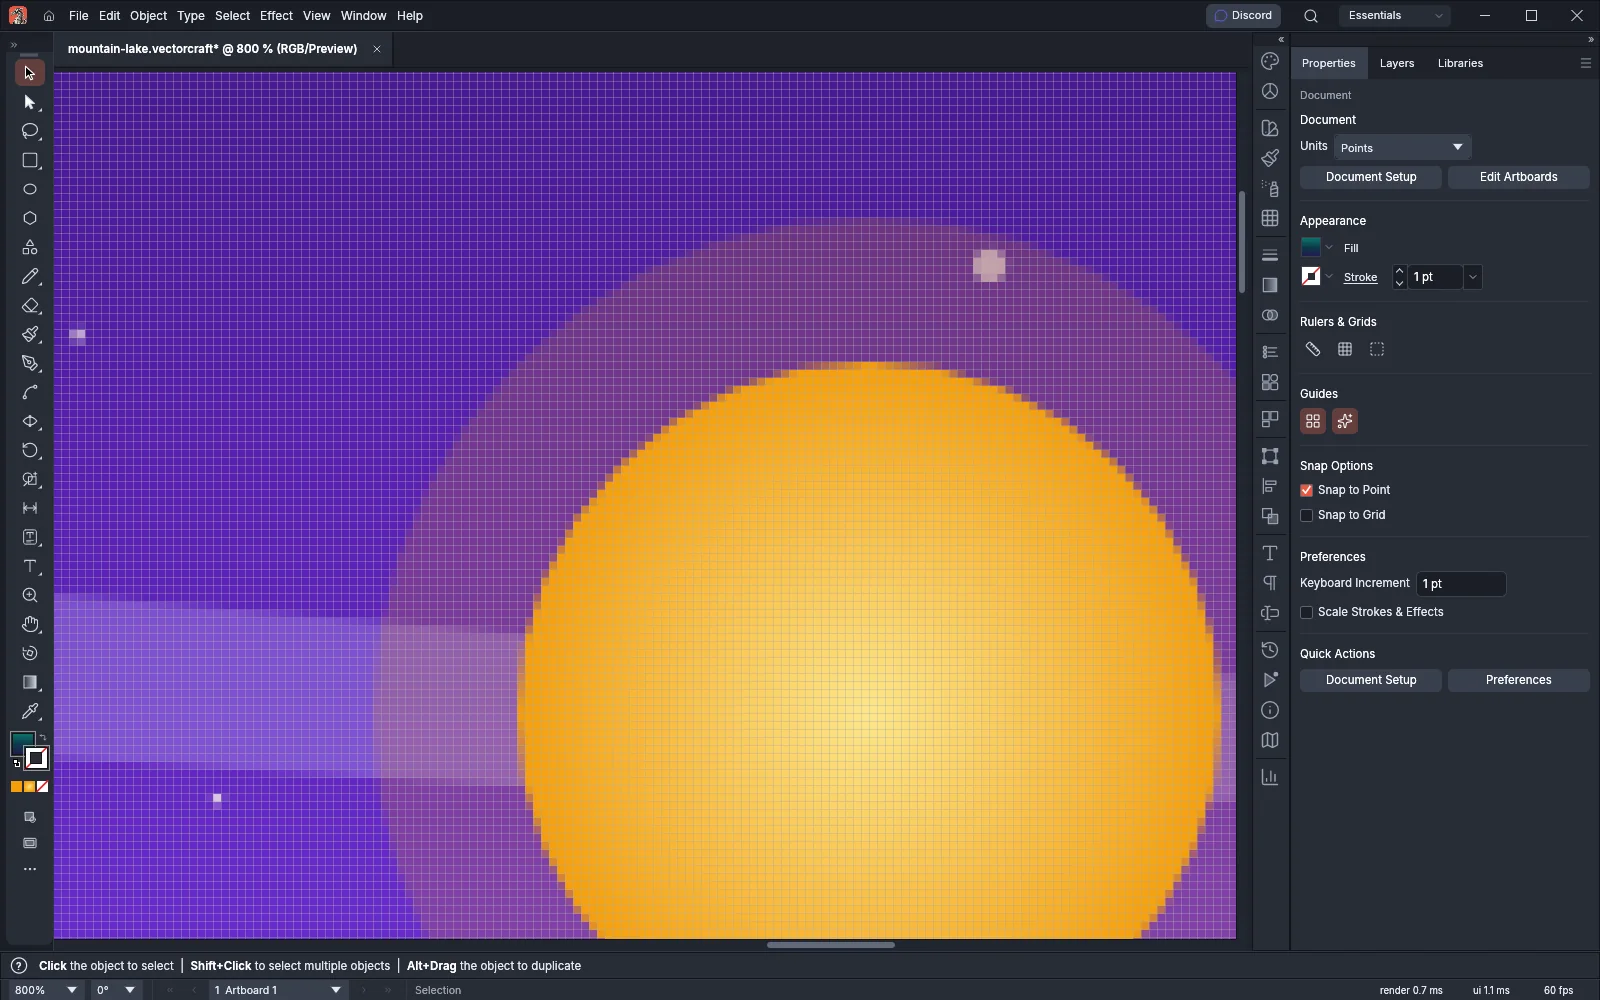
Pixel Preview applies to every open document and every view. While it is on, Smart Guides do not snap or highlight objects.
To start a new document with Pixel Preview on, open Advanced Options in the New Document dialog and set Preview Mode to Pixel. The other choices are Default and Overprint.
Two preferences change what Pixel Preview shows:
| Preference | Page | Default | What it does |
|---|---|---|---|
| Show Pixel Grid (Above 600% Zoom) | Guides & Grid | On | Draws the pixel grid in Pixel Preview at 600% zoom and above. Turn it off to see the pixels without the grid. |
| Display Bitmaps as Anti-aliased Images in Pixel Preview | File Handling | Off | Off, placed images draw with hard-edged pixels in Pixel Preview. On, they draw smoothed, as they do outside Pixel Preview. |
To change them, choose Edit → Preferences… (Ctrl+K) on Windows and Linux, or VectorCraft → Settings → General… (Cmd+K) on macOS, and open the page in the table. To make small art crisp in the exported file, see Export for screens and the web.
Hide what lies outside the artboards
Section titled “Hide what lies outside the artboards”Choose View → Trim View to draw only the parts of the artwork that lie inside the artboards. Art on the pasteboard and the parts of objects that reach past an artboard’s edge are hidden, so you see each page as it will look once it is trimmed. Choose View → Trim View again to show everything. Trim View has no shortcut and applies to every open document. In a document without artboards, Trim View does not hide anything.
To check bleed and trim marks for print, see Manage color and proof for print.
Turn anti-aliasing off
Section titled “Turn anti-aliasing off”VectorCraft smooths the edges of the artwork on screen. To see hard edges instead:
- Choose Edit → Preferences… (Ctrl+K) on Windows and Linux, or VectorCraft → Settings → General… (Cmd+K) on macOS.
- On the General page, under Options, turn off Anti-aliased Artwork. It is on by default.
- Click OK.
With the preference off, the canvas draws the edges of shapes and type without smoothing. Raster effects and pattern tiles stay smooth. The preference changes only the screen. Exported images use the anti-aliasing set in their export options. See Preferences.
Other view modes
Section titled “Other view modes”- Overprint Preview (Ctrl+Alt+Shift+Y, or Cmd+Option+Shift+Y on macOS), Proof Colors and Proof Setup show how inks and other devices will reproduce the colors. See Manage color and proof for print.
- Hide Edges, Hide Bounding Box and the other items in the lower part of the View menu hide the marks drawn over the artwork. See Customize the workspace.
- Window → New Window opens another view of the same document with its own zoom and mode. See Work in several windows.
Shortcuts
Section titled “Shortcuts”| Command | Windows and Linux | macOS |
|---|---|---|
| Outline or Preview | Ctrl+Y | Cmd+Y |
| Pixel Preview | Ctrl+Alt+Y | Cmd+Option+Y |
| Overprint Preview | Ctrl+Alt+Shift+Y | Cmd+Option+Shift+Y |
| Document Setup | Ctrl+Alt+P | Cmd+Option+P |
| One layer in Outline or Preview | Ctrl-click the layer’s eye | Cmd-click the layer’s eye |
| Outline Others or Preview All Layers | Ctrl+Alt-click the layer’s eye | Cmd+Option-click the layer’s eye |