Move, copy and merge layers
This page shows how to change the structure of a document in the Layers panel: you add layers in a chosen place, move and copy rows, and combine or split layers with the commands in the panel menu. To make layers, hide and lock them, and set their options, see Organize with layers and symbols.
Open the Layers panel with Window → Layers (F7). Each row in the panel is a layer, a sublayer, a group or an object.
Highlight rows in the Layers panel
Section titled “Highlight rows in the Layers panel”The commands in the Layers panel menu and the buttons at the bottom of the panel act on the highlighted rows. When no row is highlighted, they act on the current layer.
- Click a row to highlight it. Only that row is highlighted, and its layer becomes the current layer, where new art goes.
- Shift-click another row to highlight every row from the row you clicked last to this one.
- Ctrl-click (Cmd-click on macOS) a row to add it to the highlighted rows, or to take it out.
- To add a range to the rows already highlighted, Shift+Ctrl-click (Shift+Cmd-click on macOS) the end of the range.
The layer of the row you highlighted last becomes the current layer. A Shift-click range counts from the top down, so its bottom row is the one highlighted last.
Highlighting a row does not select its art on the canvas. To select the art of a layer, click the selection column at the right of its row, or Alt-click (Option-click on macOS) the layer’s name.
Add a layer or sublayer in a chosen place
Section titled “Add a layer or sublayer in a chosen place”The Create New Layer and Create New Sublayer buttons at the bottom of the panel put the new layer in a different place depending on the keys you hold.
| Click | Where the new layer goes |
|---|---|
| Create New Layer | Directly above the current layer, at the same level. When the current layer is a sublayer, the new layer is a sublayer beside it. |
| Ctrl-click (Cmd-click on macOS) Create New Layer | Above every other layer. |
| Ctrl+Alt-click (Cmd+Option-click on macOS) Create New Layer | Directly below the current layer, at the same level. |
| Alt-click (Option-click on macOS) Create New Layer | Directly above the current layer, after you set its name and options in Layer Options. |
| Create New Sublayer | Inside the highlighted row’s layer, or the current layer, on top of its contents. |
| Ctrl+Alt-click (Cmd+Option-click on macOS) Create New Sublayer | Inside the same layer, below its contents. In a layer with a clipping mask, the new sublayer goes just above the clipping path. |
| Alt-click (Option-click on macOS) Create New Sublayer | On top of the layer’s contents, after you set its options. |
The new layer becomes the current layer and is highlighted. You can also press Ctrl+L (Cmd+L on macOS) for a new layer. To set the options first, press Ctrl+Alt+L (Cmd+Option+L on macOS) for New Layer Options…, or choose New Layer… or New Sublayer… from the panel menu.
Move and copy rows by dragging
Section titled “Move and copy rows by dragging”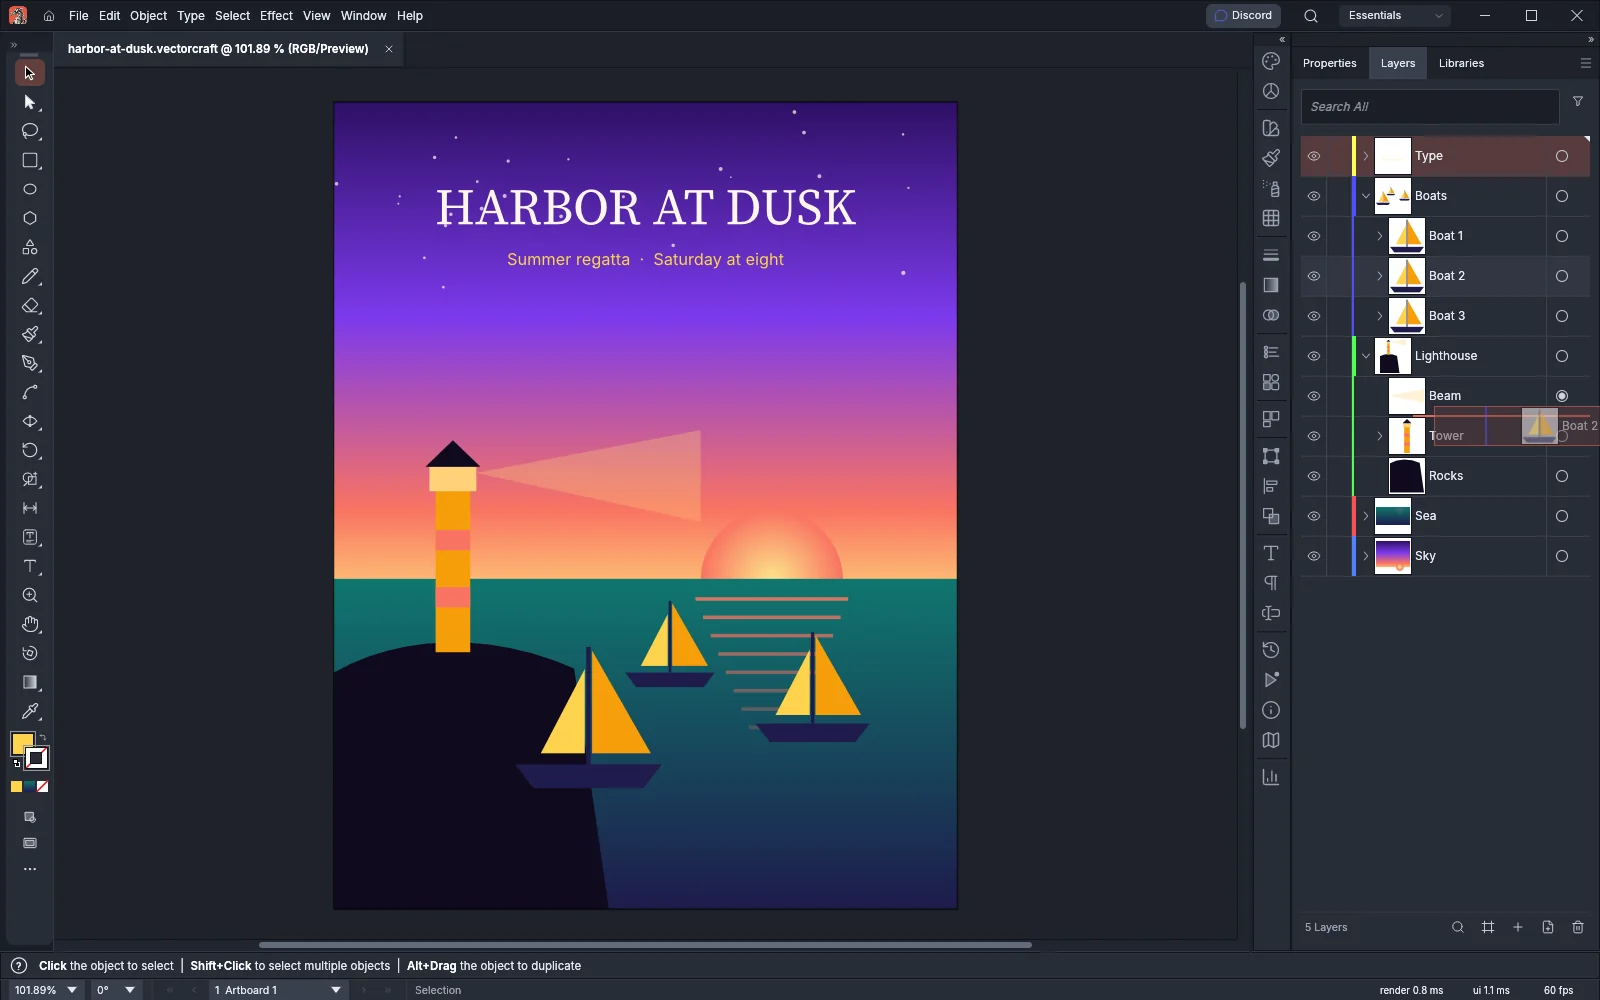
- Drag a row up or down the panel. If the row is highlighted, every highlighted row moves with it. A dimmed copy of the row follows the pointer.
- Watch the marker that shows where the rows will go:
- A line above or below a row puts the rows beside that row, in the same layer or group.
- A box around a layer or group puts the rows inside it, on top of its contents. Point at the middle of the row to get the box.
- Release the mouse button. To move copies and leave the originals where they are, hold Alt (Option on macOS) as you release.
The move is one undo step. The panel accepts a drop only where the rows can go:
- A layer goes only into another layer or to the top level. A group takes objects and groups, but not layers.
- An object dropped beside a top-level layer goes inside that layer.
- A row cannot go into itself or into a row inside it, and a locked layer or group does not take rows.
- Layers dropped in the empty space under the last row go below the bottom layer.
- Selected objects that end up hidden or locked, for example in a hidden layer, are deselected.
You can also drop rows on two of the buttons at the bottom of the panel. Rows dropped on Delete Selection are deleted, and rows dropped on Create New Layer are duplicated.
Move selected art to another layer
Section titled “Move selected art to another layer”When art in a row is selected, a small square in the layer’s color shows in the selection column at the right of that row.
- Select the art on the canvas.
- Drag the square from its row onto another row. Dropped on a layer or group, the art goes inside it, on top of its contents. Dropped on an object’s row, the art goes above that object.
- To copy the art instead of moving it, hold Alt (Option on macOS) as you release.
To send the selected art to the current layer without dragging, choose Object → Arrange → Send to Current Layer.
Duplicate and delete rows
Section titled “Duplicate and delete rows”- Highlight the rows you want to copy or remove.
- Choose Duplicate Selection or Delete Selection from the panel menu.
Duplicate Selection puts each copy just above its original and highlights the copies. A copied layer is named after the original with copy at the end, such as Boats copy, and its guides are copied with it.
Delete Selection deletes the rows with everything in them, guides included. A document keeps at least one layer, so you cannot delete every layer. When no row is highlighted and art is selected on the canvas, the Delete Selection button at the bottom of the panel deletes the selected art.
Merge layers and collect objects in a new layer
Section titled “Merge layers and collect objects in a new layer”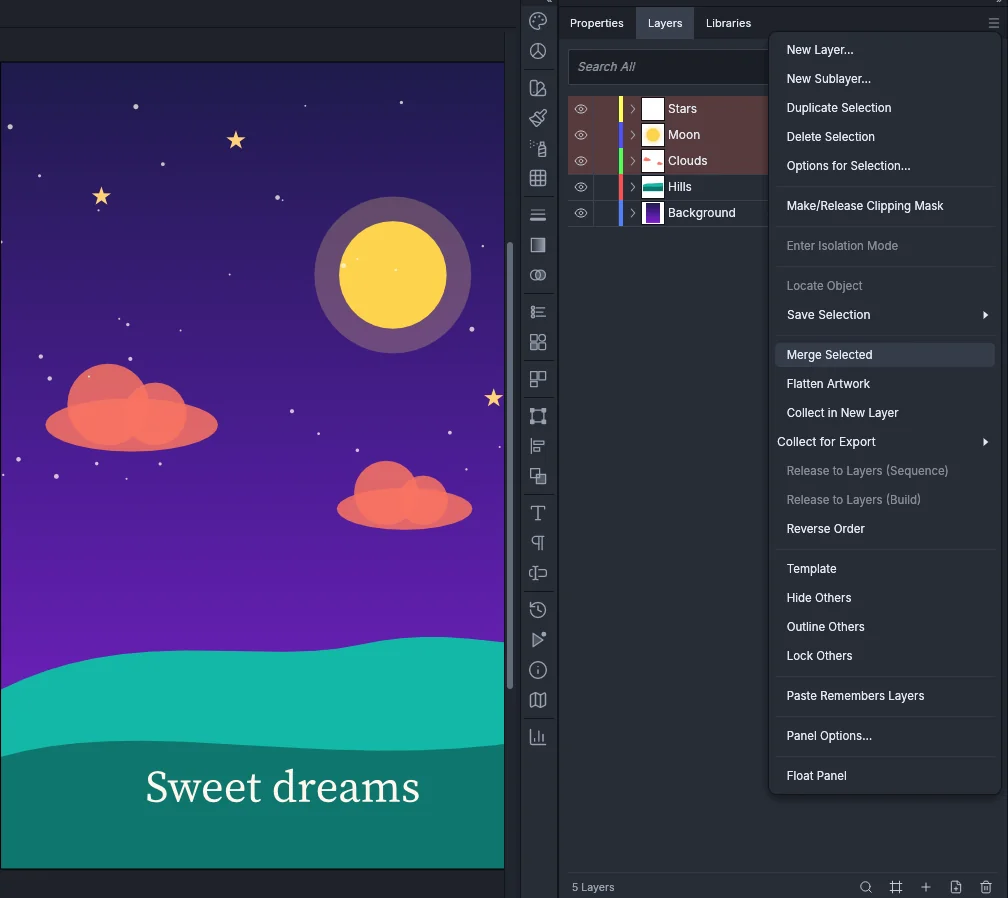
To merge layers:
- Highlight two or more rows. Ctrl-click (Cmd-click on macOS) the layer you want to keep last, or end a Shift-click range on it. A range counts from the top down, so its bottom row is the one highlighted last.
- Choose Merge Selected from the panel menu.
The contents of the other layers, and any highlighted groups or objects, move into the layer you highlighted last. They keep their stacking order, and the emptied layers are removed. Guides from the merged layers stay in the merged layer. When you highlight a layer and one of its own sublayers, the sublayer moves with its layer, and a layer cannot merge into its own sublayer.
To gather objects into a new layer:
- Highlight the rows you want to gather, or select the objects on the canvas.
- Choose Collect in New Layer from the panel menu.
The new layer takes the place of the topmost of those rows. When the rows are inside a layer, the new layer is a sublayer of that layer. When the topmost row is inside a group, the new layer goes on top of the layer that holds the group.
To make export assets from the highlighted rows, use Collect for Export in the same menu. See Export for screens and the web.
Release objects to separate layers
Section titled “Release objects to separate layers”Release to Layers puts each object of one layer or group into a new sublayer of its own.
- Highlight one layer or group. When no row is highlighted, the command acts on the current layer.
- Choose Release to Layers (Sequence) or Release to Layers (Build) from the panel menu.
| Command | What each new sublayer holds |
|---|---|
| Release to Layers (Sequence) | One object. |
| Release to Layers (Build) | One object plus copies of every object below it, so each sublayer holds one more object than the sublayer below it. The top sublayer holds the original objects. |
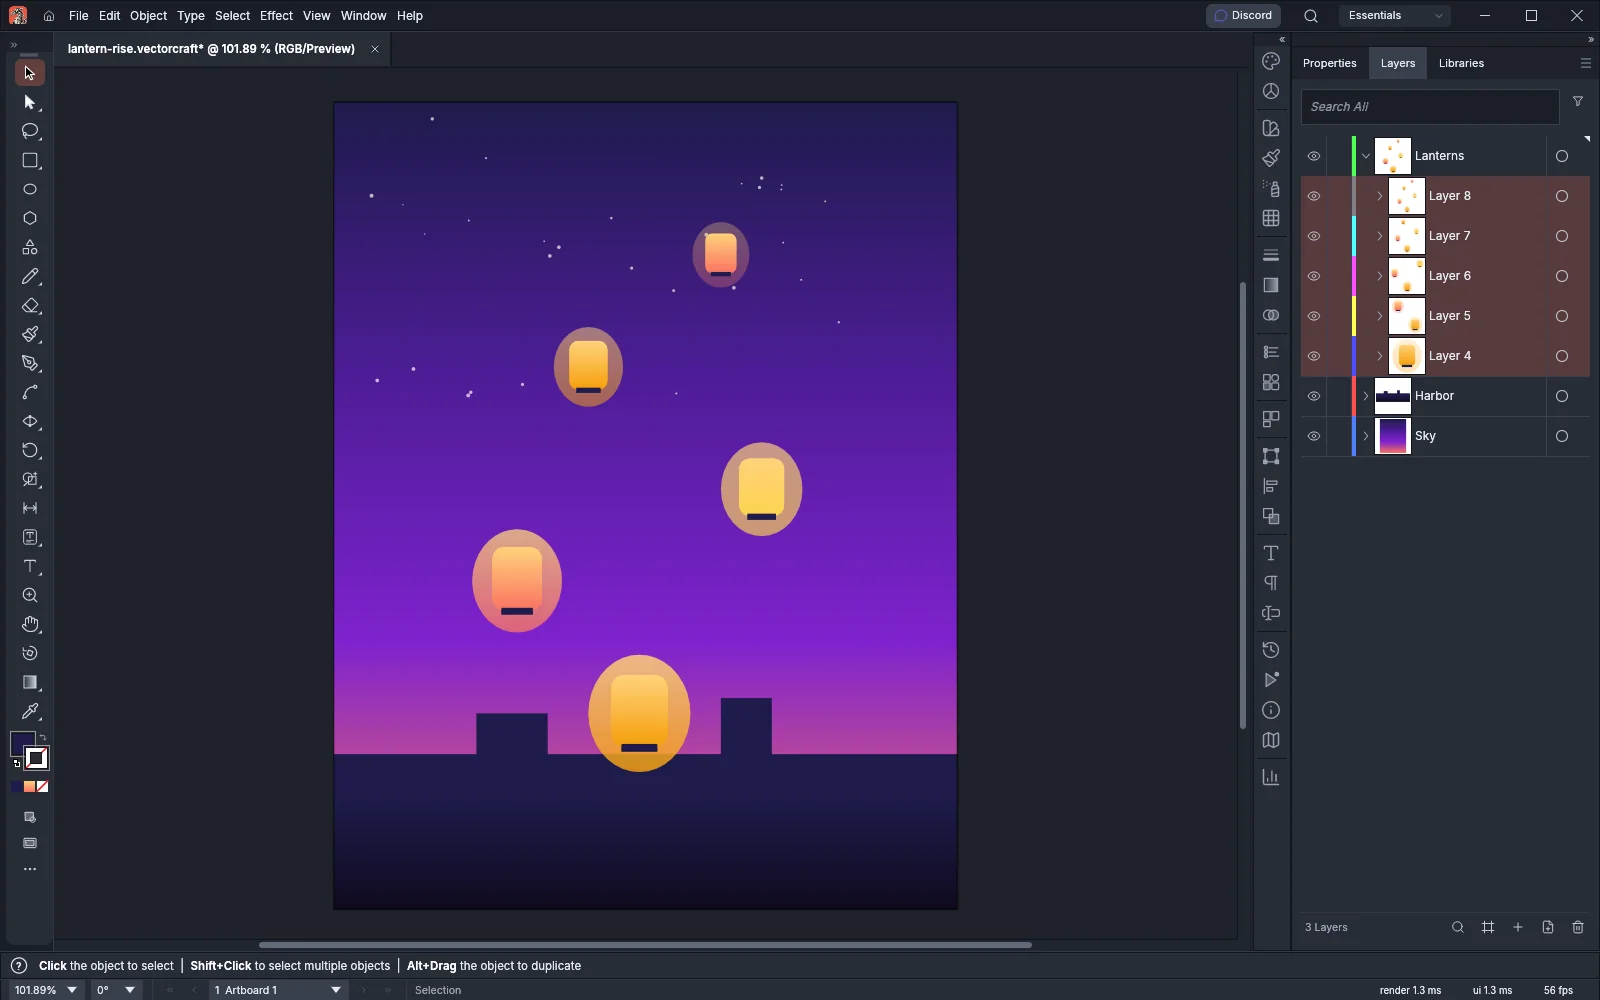
The new sublayers follow the stacking order of the objects and take the next free layer names, such as Layer 4 and Layer 5. They are highlighted after the command. When you release a group, the group is removed and its objects go into sublayers of the layer that holds the group. For a group that sits directly in a layer, the sublayers take the group’s place. For a group inside another group, they go on top of the layer. Sublayers and guides already in a released layer stay as they are. Both commands are one undo step, and both need exactly one layer or group.
Reverse the stacking order of rows
Section titled “Reverse the stacking order of rows”- Highlight two or more rows that are in the same layer or group, or two or more top-level layers.
- Choose Reverse Order from the panel menu.
The highlighted rows swap places: the top one takes the place of the bottom one, and so on. Rows that are not highlighted keep their places.
Flatten the artwork into one layer
Section titled “Flatten the artwork into one layer”Flatten Artwork moves the art of every visible top-level layer into one layer.
- Highlight a row in the layer you want to keep, or make that layer current.
- Choose Flatten Artwork from the panel menu.
The art keeps its stacking order. The layer you keep must be visible.
Keep objects on their layers when you paste
Section titled “Keep objects on their layers when you paste”By default the paste commands put objects into the current layer. With Paste Remembers Layers on, they put each object back into the layer it was copied from.
- Choose Paste Remembers Layers from the Layers panel menu. A check mark shows that it is on.
- Copy objects from one or more layers, then paste them with Edit → Paste or another paste command.
VectorCraft finds the layers by name. When the document has no layer of that name, for example when you paste into another document, a new layer with that name is made on top. Paste Remembers Layers is a setting of the document: it is saved with the file, and turning it on or off is one undo step. It does not apply to Edit → Paste, Paste in Place or Paste on All Artboards while Draw Inside is on: those commands put the objects inside the object you draw into. Paste in Front and Paste in Back still put objects back into their layers in Draw Inside. It also does not apply while you edit a group in isolation mode (pasted objects stay in the group), or when you paste by drag and drop. For the paste commands themselves, see Copy and paste between apps.
Clicks and shortcuts
Section titled “Clicks and shortcuts”| Action | Windows and Linux | macOS |
|---|---|---|
| Layers panel | F7 | F7 |
| New layer above the current layer | Ctrl+L | Cmd+L |
| New layer with options | Ctrl+Alt+L | Cmd+Option+L |
| Highlight one row | Click | Click |
| Highlight a range of rows | Shift-click | Shift-click |
| Add or remove one highlighted row | Ctrl-click | Cmd-click |
| Add a range to the highlighted rows | Shift+Ctrl-click | Shift+Cmd-click |
| New layer above every layer | Ctrl-click Create New Layer | Cmd-click Create New Layer |
| New layer below the current layer | Ctrl+Alt-click Create New Layer | Cmd+Option-click Create New Layer |
| New layer or sublayer with options | Alt-click the button | Option-click the button |
| New sublayer below the layer’s contents | Ctrl+Alt-click Create New Sublayer | Cmd+Option-click Create New Sublayer |
| Copy rows while dragging | Alt-drag | Option-drag |
| Copy selected art to another layer | Alt-drag the selection square | Option-drag the selection square |
| Select a layer’s art | Alt-click the layer name | Option-click the layer name |
Edit → Keyboard Shortcuts… changes the keys for the Layers panel, a new layer and a new layer with options.