
Organize swatches and color groups
This guide covers the Swatches panel after you have saved a few swatches: finding them, grouping them, editing and cleaning them up, and deciding what happens when pasted art brings swatches of its own. To save a new swatch, see Fill, stroke and color.
Find swatches in the panel
Section titled “Find swatches in the panel”Choose Window → Swatches to open the panel. From top to bottom it shows the Fill and Stroke boxes, the Recent Colors row, and the swatch list under Swatch Tiles.
When no filter or search is on, the list starts with [None] and [Registration], followed by your swatches and then the color groups, each shown as a folder with its swatches after it. Registration prints on every plate, and you cannot edit, move or delete it.
- Click a chip in Recent Colors to paint the active box with that color. The row keeps the 30 colors you used last, and hovering a chip shows its hex value.
- Click Show List View or Show Thumbnail View at the top right of the panel to switch between names and tiles. The panel menu has all five views: Small Thumbnail View, Medium Thumbnail View, Large Thumbnail View, Small List View and Large List View. Medium Thumbnail View is the default.
- To search by name, choose Show Find Field from the panel menu and type in the Find field. The match ignores case. When a color group’s name matches, the panel shows all of its swatches.
- To show one kind of swatch, click Show Swatch Kinds at the bottom of the panel and choose Show All Swatches, Show Color Swatches, Show Gradient Swatches, Show Pattern Swatches or Show Color Groups.
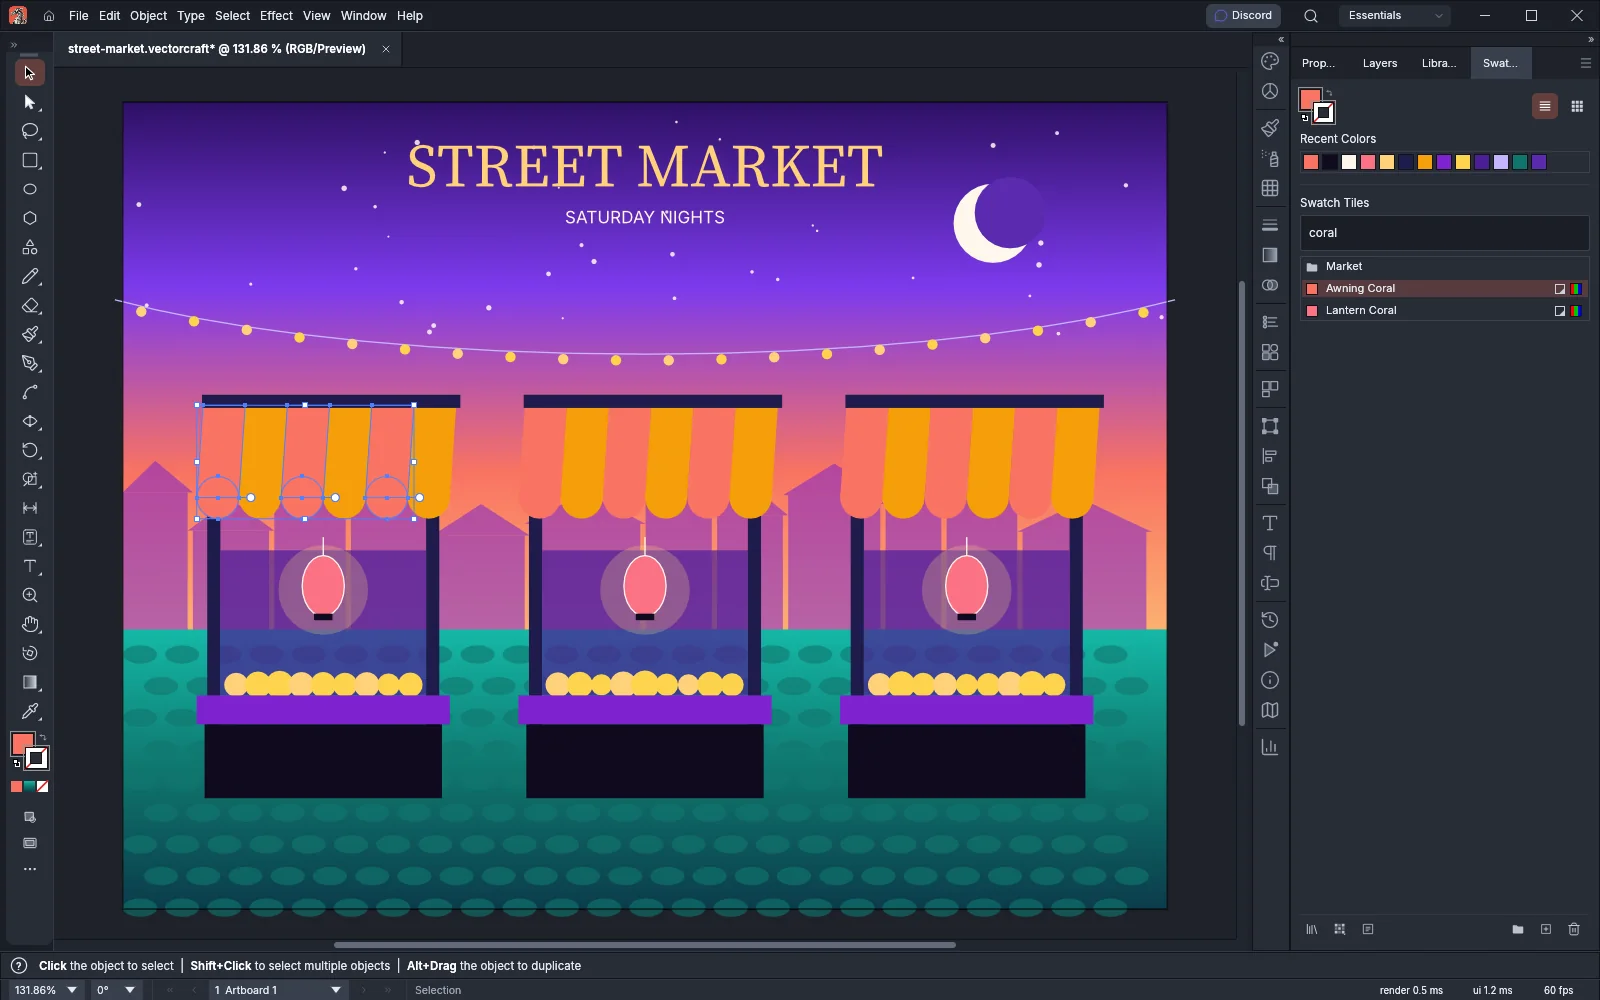
In list view, the icons at the right of each row show the kind of swatch: a square for a process color, a square with a filled corner for a global process color, and a dot in a ring for a spot color. Hover a row to read its name and kind, for example “Global Process Color, RGB”. In thumbnail view, a global swatch has a white corner, and a spot swatch also has a dot in that corner.
Clicking a swatch applies it to the active box, and Alt-click (Option-click on macOS) applies it to the other box. To select swatches without applying them, Shift-click to select a range or Ctrl-click (Cmd-click on macOS) to add or remove one swatch. Clicking a folder selects the whole group. When art is selected and nothing is selected in the panel, the panel highlights the swatch the art is painted with.
The buttons at the bottom of the panel, from left to right:
| Button | What it does |
|---|---|
| Swatch Libraries Menu | Lists the swatch libraries you can open. See Use swatch libraries. |
| Show Swatch Kinds | Filters the list by kind. The button stays lit while a filter other than Show All Swatches is on. |
| Swatch Options | Opens Swatch Options for the one selected swatch. When a color group is selected, this button becomes Edit or Apply Color Group. |
| New Color Group | Opens New Color Group. |
| New Swatch | Opens New Swatch for the active box’s paint. |
| Delete Swatch | Deletes the selected swatches and groups after asking. Alt-click (Option-click on macOS) deletes them without asking. |
Make a color group
Section titled “Make a color group”A color group is a folder of solid colors. You can make one from swatches you already have or from the colors of selected art.
- Select the source. To group existing swatches, Ctrl-click (Cmd-click on macOS) them in the panel. To group the colors of art, select the art on the canvas and leave the panel with nothing selected.
- Click New Color Group at the bottom of the panel, or choose New Color Group… from the panel menu.
- Type a Name. The field starts as “Color Group”.
- Under Create From, choose Selected Swatches or Selected Artwork. Selected Artwork is chosen for you when art is selected and no swatches are.
- For Selected Artwork, set the two options in the following table.
- Click OK.
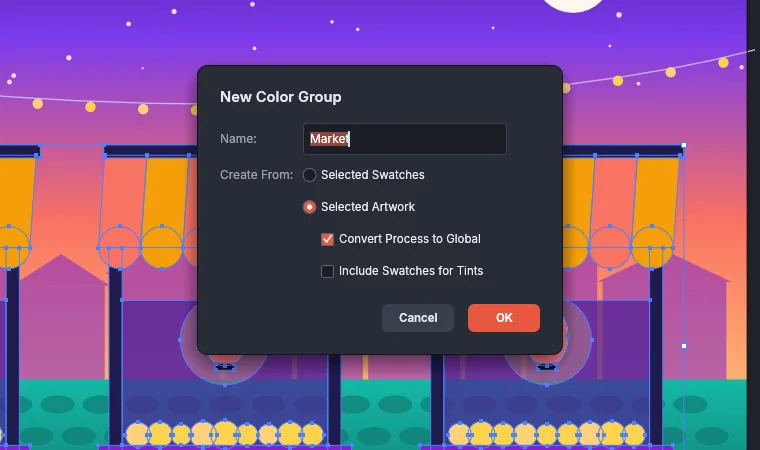
With Selected Swatches, the selected solid colors move into the new group. Gradients, patterns and None stay where they are.
With Selected Artwork, the group gets one swatch for each color in the art’s fills, strokes, text, gradient stops and mesh points. A color that is already linked to a global swatch moves that swatch into the group. Other colors become new swatches named by their values, such as “R=30 G=27 B=75”.
| Option | What it does |
|---|---|
| Convert Process to Global | Makes the new swatches global and links the matching colors in the selected art to them. On by default. |
| Include Swatches for Tints | Gives each tint of a global swatch in the art a swatch of its own. Off by default. |
Both options are available only with Selected Artwork.
Edit a color group
Section titled “Edit a color group”- Click the group’s folder in the panel to select it.
- Choose Edit or Apply Color Group… from the panel menu, click the Edit or Apply Color Group button at the bottom of the panel, or double-click the folder.
- Recolor Artwork opens with the group’s colors. Change them there and click OK. See Recolor artwork.
To take the swatches out of a group, select the group and choose Ungroup Color Group from the panel menu. Its swatches move to the end of the ungrouped swatches and the folder is removed, in one undo step.
Change a swatch with Swatch Options
Section titled “Change a swatch with Swatch Options”- Ctrl-click (Cmd-click on macOS) one swatch in the panel to select it. A plain click also applies the swatch to the selected art.
- Click Swatch Options at the bottom of the panel, choose Swatch Options… from the panel menu, or double-click the swatch.
- Change the settings in the following table. With Preview on, the canvas shows the change as you make it.
- Click OK to apply the change as one undo step, or Cancel to put the art back as it was.
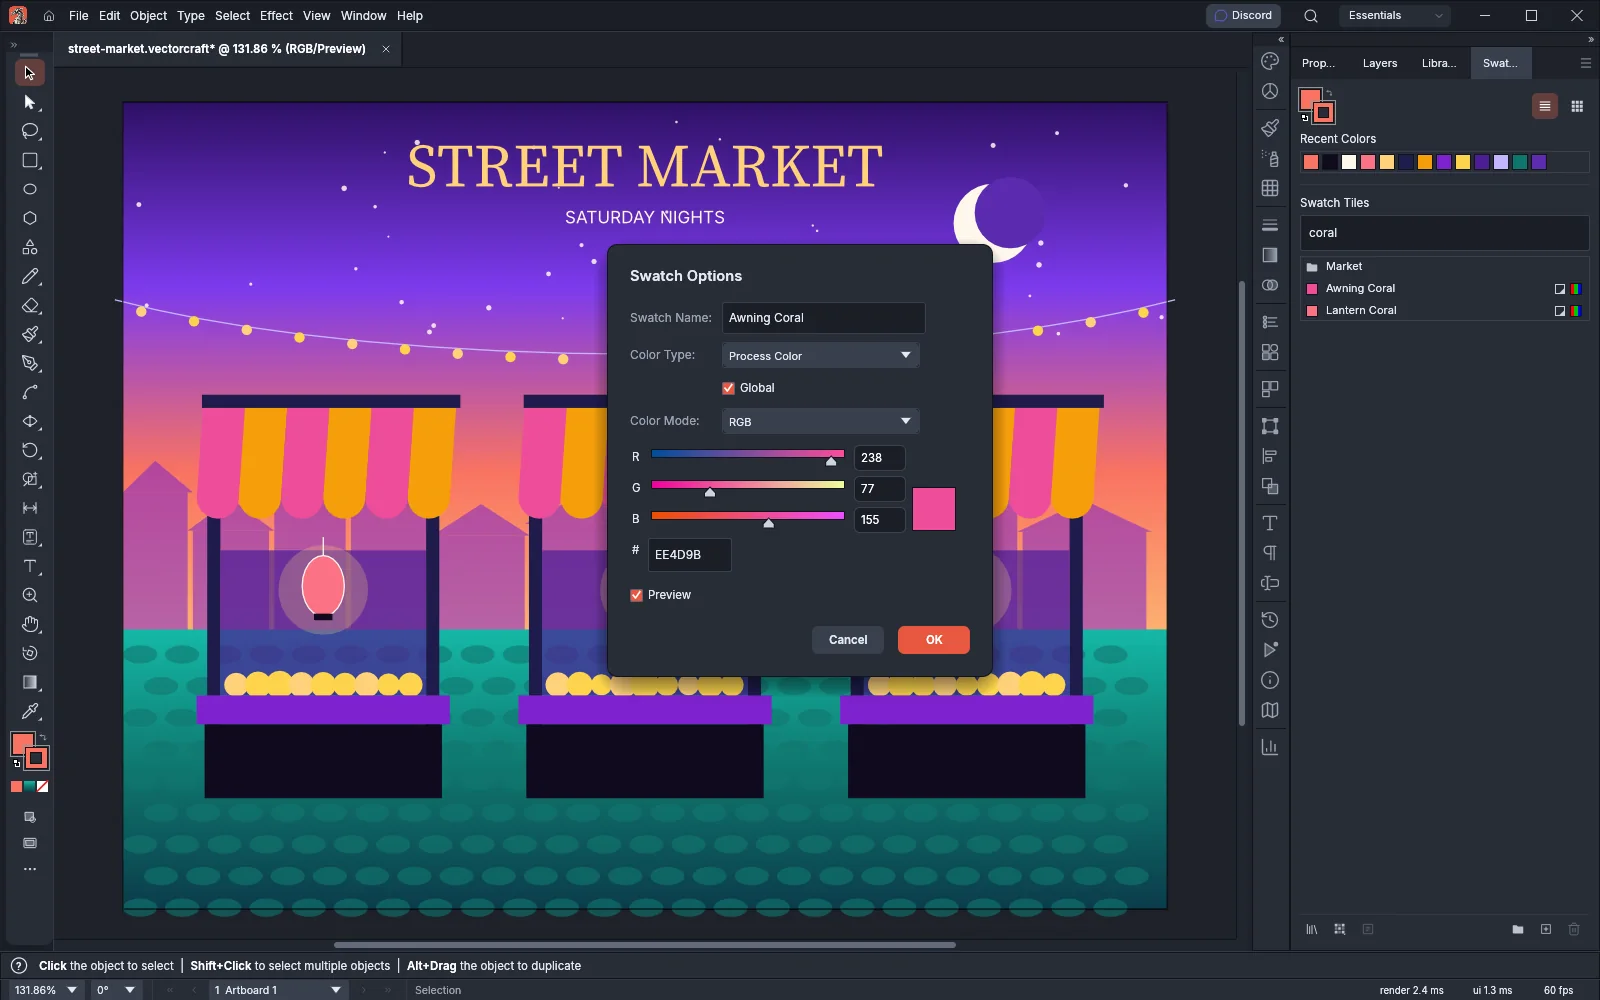
| Setting | What it does |
|---|---|
| Swatch Name | Renames the swatch. Art linked to a global swatch follows the new name. |
| Color Type | Process Color or Spot Color. A spot color is always global, so Global stays on and dimmed. |
| Global | Keeps art painted with the swatch linked to it, so a change to the swatch changes the art. Turning it off unlinks the art, which keeps its current color. |
| Color Mode | Grayscale, RGB, HSB, Lab, CMYK or Web Safe RGB. Switching the mode converts the color. |
| Sliders and fields | Set each component of the color. RGB, HSB and Web Safe RGB also have a hex field. |
| Preview | Shows the change on the canvas while the dialog is open. On by default. |
Some swatches open differently:
- A tint swatch opens Swatch Options for the global color it is a tint of.
- A gradient swatch shows only its name and the gradient, so you can rename it. See Save and reuse gradients.
- A pattern swatch opens pattern editing.
- [None] has no options.
Duplicate, merge and delete swatches
Section titled “Duplicate, merge and delete swatches”Duplicate Swatch in the panel menu copies the one selected swatch. To select a swatch without painting the selected art with it, Ctrl-click (Cmd-click on macOS) it. The copy is named after the original with “copy” added, such as “Awning Coral copy”, and it appears right after the original, in the same group.
To combine colors that should be one swatch:
- Ctrl-click (Cmd-click on macOS) the swatch you want to keep. A plain click would also paint the selected art with it.
- Ctrl-click (Cmd-click on macOS) the solid-color swatches to merge into it.
- Choose Merge Swatches from the panel menu.
The first swatch you selected keeps its name and color, and the others are deleted. Art linked to the deleted swatches takes the kept swatch’s color. When the kept swatch is global, the art links to it; when it is not global, the art keeps the color but is no longer linked to a swatch.
To delete swatches or whole color groups, select them and click Delete Swatch at the bottom of the panel or choose Delete Swatch from the panel menu, then confirm. A group is deleted with its swatches. You cannot delete [None] or [Registration].
Clean up and sort the panel
Section titled “Clean up and sort the panel”| Panel menu item | What it does |
|---|---|
| Select All Unused | Selects, in the panel, every swatch that nothing in the document uses. A color counts as used when art links to it or uses the same color in a fill, stroke, gradient stop or mesh point. A gradient counts as used when a gradient links to it or has its stops, and a pattern when it fills or strokes anything. [None] is never selected. |
| Add Used Colors | Adds a process color swatch for each color the art uses that no swatch has yet, in one undo step. It reads fills, strokes, text, gradient stops and mesh points. |
| Sort by Name | Sorts the ungrouped swatches and the swatches inside each group by name, ignoring case. [None] stays first, and the groups keep their order. |
| Sort by Kind | Sorts each list in this order: None, process colors, spot colors, gradients, patterns. Swatches of one kind keep their order, and the groups stay after the ungrouped swatches. |
To remove the swatches your art does not use, choose Select All Unused, then click Delete Swatch and confirm.
Drag swatches
Section titled “Drag swatches”- Reorder: Drag a swatch along the list. A bar shows where it will land. If the swatch you drag is selected, every selected swatch moves with it.
- Move into a group: Drop swatches on a group’s folder. Only solid colors go into a group; gradients and patterns stay outside.
- Move out of a group: Drop the swatch among the ungrouped swatches, or in the empty space after the tiles to send it to the end of the ungrouped swatches.
- Reorder groups: Drag a folder before or after another group.
- Replace a swatch’s paint: Alt-drag (Option-drag on macOS) a swatch onto another swatch of the same kind. The target takes the dragged swatch’s color, gradient or pattern and keeps its own name and place. This does not work on [None], [Registration] or a tint swatch.
- Paint art: Drag a swatch onto an object on the canvas to paint the active box of that object.
- Color a gradient: Drag a color swatch onto the ramp in the Gradient panel.
- Save a paint as a swatch: Drag the Fill or Stroke box, or the Gradient panel’s thumbnail, onto the panel. Dropped on a folder or on a swatch inside a group, a color joins that group.
- Make a pattern swatch: Drag art from the canvas onto the panel. The panel adds a pattern swatch made from a copy of the art, and the art stays where it was.
Paste art whose swatches clash
Section titled “Paste art whose swatches clash”When you paste art that uses a global or spot swatch, and the document already has a swatch of that name in another color, the Swatch Conflict dialog asks what to do with each such swatch. Pasting art back into the document it came from does not ask.
- Choose Edit → Paste or another paste command.
- In Swatch Conflict, compare the Document and Pasted chips. When more than one swatch clashes, the dialog shows “Conflict 1 of 2” and so on.
- Under Options, choose Merge Swatches or Add Swatches, as described in the following table.
- To give the same answer to the remaining conflicts, turn on Apply to All. The checkbox is available only when more than one swatch clashes.
- Click OK. The dialog moves to the next conflict, and after the last one it pastes the art. Click Cancel to paste nothing.
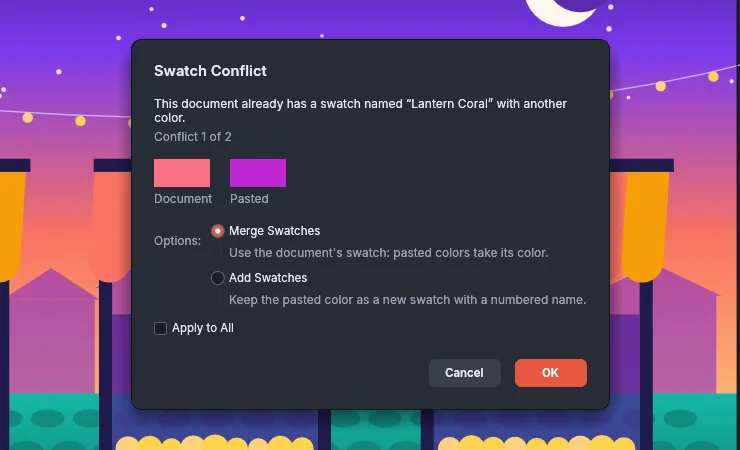
| Option | What it does |
|---|---|
| Merge Swatches | The pasted art uses the document’s swatch and takes its color. This is the default. |
| Add Swatches | The pasted swatch comes in under a numbered name, such as “Awning Amber 2”, and the pasted art keeps its color. |
For more about pasting from other documents and apps, see Copy and paste between apps.