
Align anchor points and guides
This page shows how the Align panel and Object → Align work on anchor points and ruler guides instead of whole objects. For aligning and spacing whole objects, see Align and distribute objects.
Open the Align panel with Window → Align (Shift+F7).
Line up anchor points
Section titled “Line up anchor points”- Choose the Direct Selection tool (A).
- Click an anchor point, then Shift-click the other points you want to line up. They can be on one path or on several. For other ways to select points, see Select artwork.
- In the Align panel’s Align To section, choose Align to Selection or Align to Artboard.
- Click a button in the Align Objects section, or choose a command from Object → Align.
Only the selected points move. Each point goes to the edge or center line of the points’ own bounds, or of the artboard with Align to Artboard. For example, Vertical Align Top moves every selected point up to the height of the highest one.
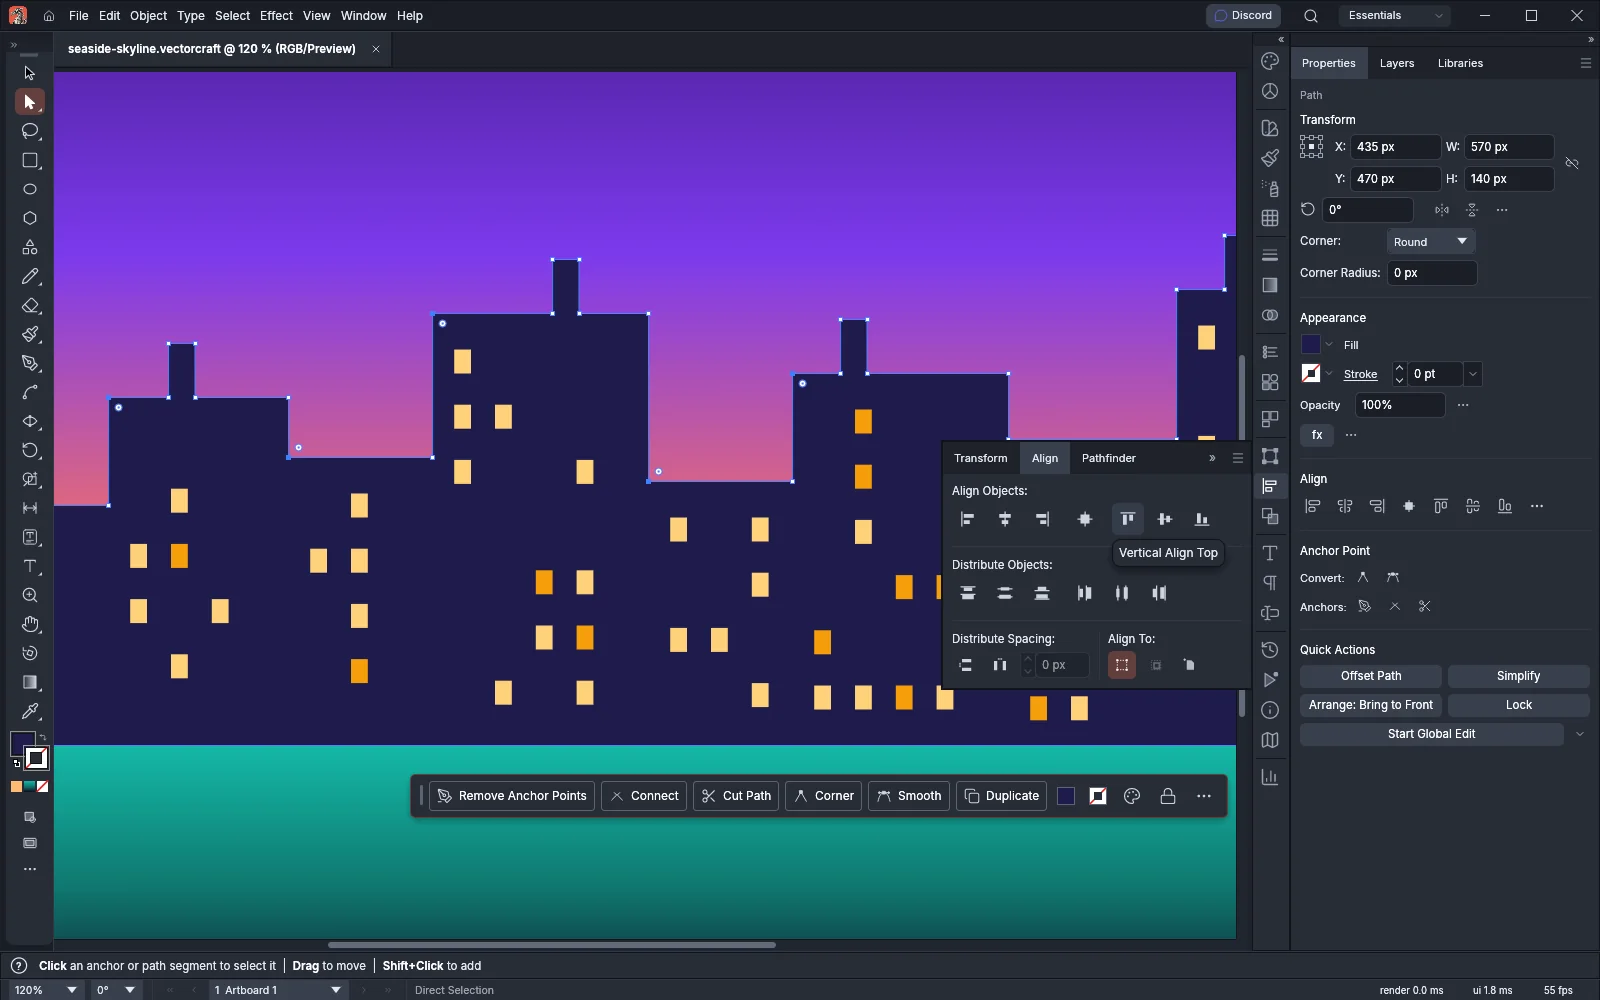
In the following image, the top-left corners of five rooftops on one skyline path are selected at different heights, and the pointer is on Vertical Align Top.
How the points line up depends on what is selected and on the Align To choice:
| Selection or setting | What the points line up with |
|---|---|
| A path selected whole, among the selected points | Every anchor point of that path counts as selected and moves |
| Align to Selection | The bounds of the selected points |
| Align to Artboard | The edges or center of the artboard |
| Align to Key Object | The bounds of the selected points, as with Align to Selection |
| A key guide | The guide’s line, along one axis only (see Line objects up on a guide) |
A single selected object aligns to the artboard unless a guide is the key, but anchor points follow the Align To choice even when they are all on one path. Object → Align lines the points up with their own bounds, or with the key guide while there is one.
Space anchor points evenly
Section titled “Space anchor points evenly”- Select three or more anchor points with the Direct Selection tool.
- In the Align panel, click a button in the Distribute Objects section, or Horizontal Distribute Space or Vertical Distribute Space in the Distribute Spacing section.
The first and last points along the axis stay where they are, and the points between them are spaced evenly. The horizontal buttons space the points from left to right, and the vertical buttons space them from top to bottom. A point has no size, so all three Distribute Objects buttons of an axis give the same result.
When you space points, VectorCraft does not use Align to Artboard. While there is a key object or a key guide, Horizontal Distribute Space and Vertical Distribute Space place the points the Distribute Spacing value apart, starting from the first point. The Distribute Objects buttons always space the points evenly.
Line objects up on a guide
Section titled “Line objects up on a guide”A ruler guide can be the key that the other selected objects line up on. The key guide stays where it is.
- Show the rulers with View → Rulers → Show Rulers (Ctrl+R, or Cmd+R on macOS), and drag a guide out of a ruler. See Use rulers, guides and grids.
- With the Selection tool (V), select the objects that should line up.
- Shift-click the guide to add it to the selection.
- Click the guide again, without Shift. It becomes the key guide and is drawn thicker. The Align panel shows Align to Key Object.
- Click a button in the Align Objects section.
A vertical guide sets where the objects go across: Horizontal Align Left puts their left edges on the guide, Horizontal Align Center puts their centers on it, and Horizontal Align Right puts their right edges on it. The vertical buttons leave the objects where they are. A horizontal guide works the other way around.
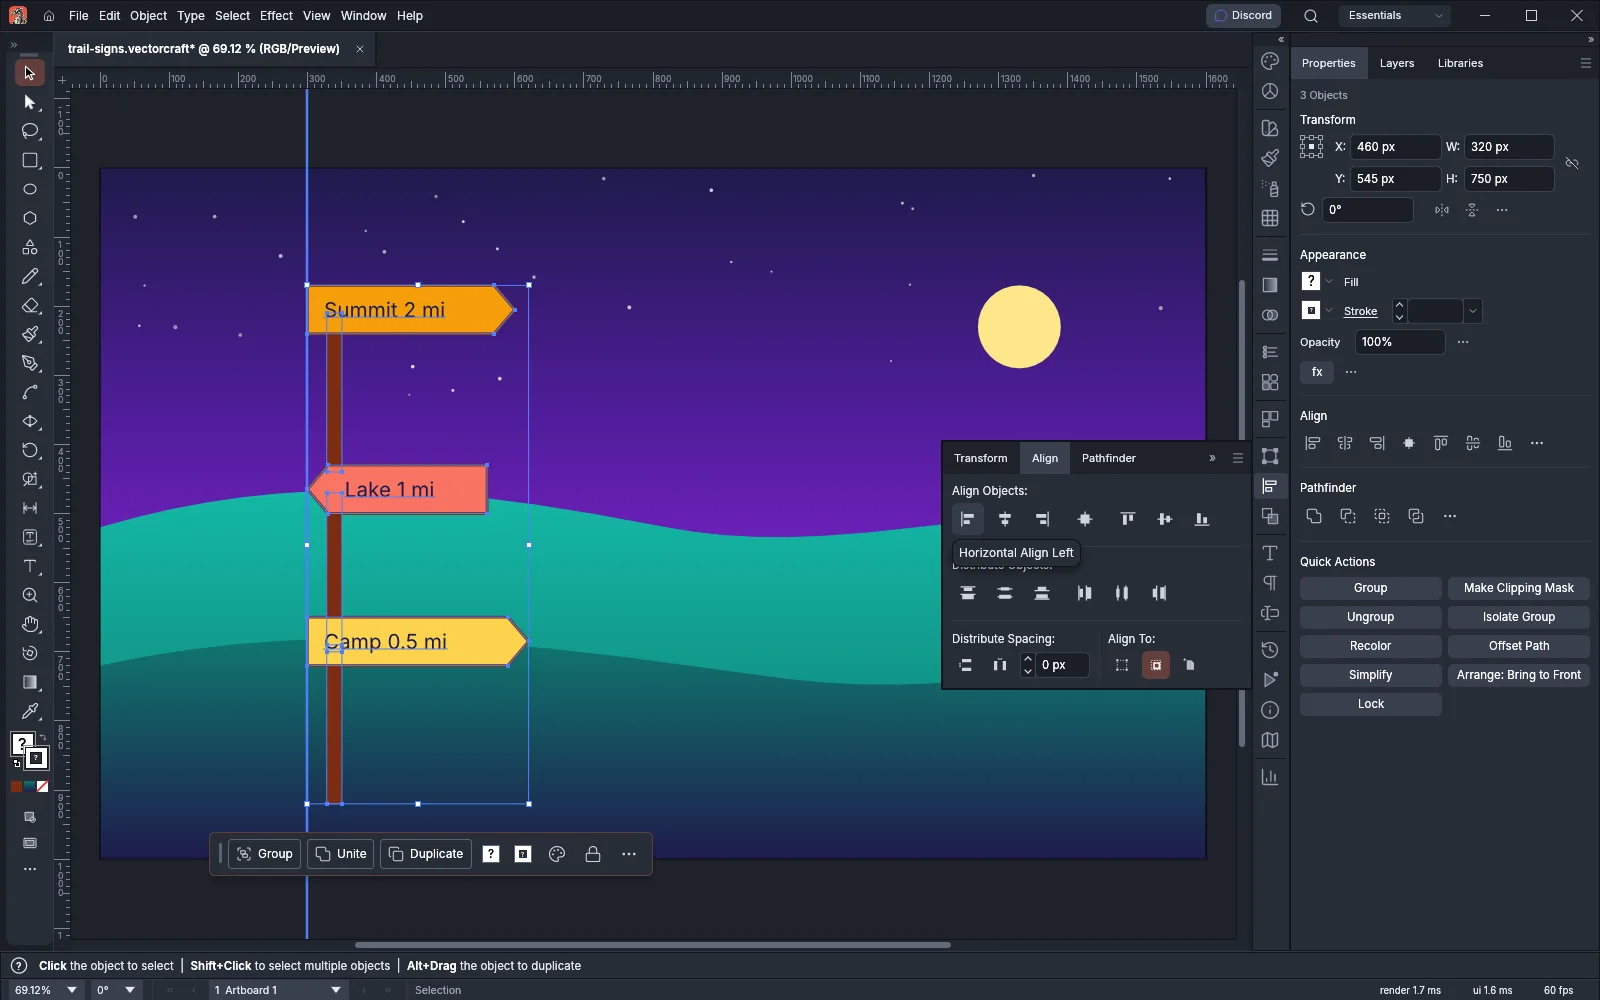
In the following image, the three signs moved left until their left edges touched the key guide. They kept their heights.
When exactly one object is selected with a guide, you can also click Align to Key Object in the Align panel to make the first selected guide the key. With two or more objects selected, that button makes the topmost object the key object instead.
To cancel the key guide, do one of these:
- Click the key guide again.
- Choose Cancel Key Object in the Align panel menu.
- Click Align to Selection or Align to Artboard.
- Deselect the objects, or take the guide out of the selection.
With a key guide, the Distribute Spacing field accepts a value. The Distribute buttons then keep the key guide in place and space the other items that distance apart, starting from its line. If the key guide runs along the axis you distribute on, for example a horizontal guide with Horizontal Distribute Space, nothing moves.
Move guides with the Align panel
Section titled “Move guides with the Align panel”The Align Objects buttons and Object → Align also move selected ruler guides. A vertical guide moves to a left edge, center or right edge, and a horizontal guide moves to a top edge, center or bottom edge. A button for the other axis leaves the guide where it is.
- If the guides should line up with an object, select the object with the Selection tool (V) first.
- Shift-click each guide to add it to the selection. To select guides without any objects, click one guide and Shift-click the others. A marquee also selects the guides it crosses.
- Click a button in the Align Objects section.
Where the guides go depends on the selection and the Align To choice:
| Selection and Align To choice | Where the selected guides go |
|---|---|
| A key object | The key object’s edges or center |
| A key guide | The key guide’s line, for the guides that run the same way as it. The key guide stays where it is |
| Align to Artboard | The artboard’s edges or center |
| Only guides, with Align to Selection | The bounds of the selected guides. For example, Horizontal Align Left moves every vertical guide to the leftmost one |
| Objects and guides, with Align to Selection | The guides stay where they are, and only the objects move |
When only one object is selected and no guide is the key, the Align Objects buttons align it to the artboard, so the selected guides go to the artboard as well.
Space guides evenly
Section titled “Space guides evenly”Distribute Objects and Distribute Spacing space selected guides together with any selected objects. A guide has no width, so its left edge, center and right edge are all its line.
- Select the guides, and any objects to space with them.
- In the Align To section, choose Align to Selection or Align to Artboard.
- Click a button in the Distribute Objects or Distribute Spacing section.
Only the guides that run across the axis are spaced: vertical guides for the horizontal buttons, and horizontal guides for the vertical buttons. Guides that run along the axis stay where they are.
| Align To choice | Result |
|---|---|
| Align to Selection | The first and last items stay where they are, and the items between them are spaced evenly. Select three or more items |
| Align to Artboard | The first item moves to the artboard’s left (or top) edge, the last item moves to its right (or bottom) edge, and the rest are spaced evenly between them. Two items are enough |
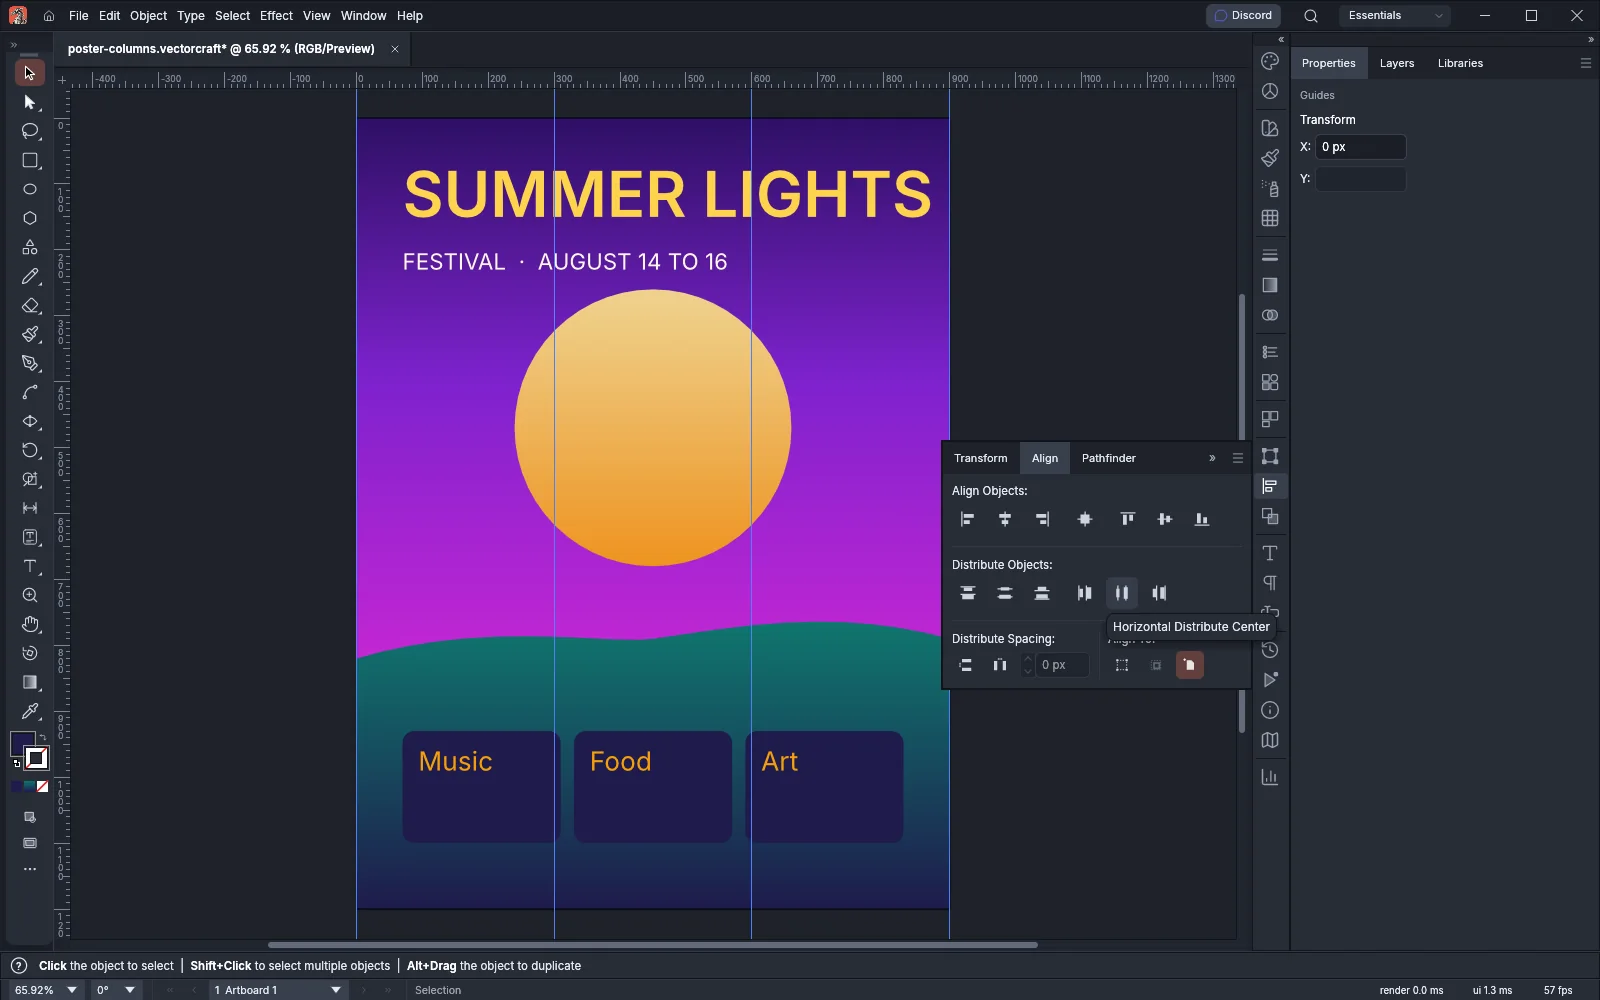
In the following image, four vertical guides that were unevenly placed are spaced evenly across a poster artboard. The outer two now lie on the artboard’s left and right edges.
Horizontal Distribute Space and Vertical Distribute Space treat each guide as an item with no width, and make the gaps between all the items equal. If only guides that run along the axis are selected, nothing moves.