Getting started
1. Install FigCraft
Section titled “1. Install FigCraft”The quickest way is ArtCraft Launcher: install it, then press Install on FigCraft’s card. To download FigCraft on its own, see Install and update.
2. Open FigCraft
Section titled “2. Open FigCraft”The first time, FigCraft opens on its Home screen. From here you can start a New design file or a New board, open a file, join a shared file with a code, or start from a template. After that, it opens straight into a new file. The house button at the top left of the window takes you back to Home at any time.
The Templates section has eight starter files: a mobile app, a landing page, a dashboard, a design system starter, a wireframe kit, social post sizes, presentation slides and an icon set starter. To look around before you design anything, open the Mobile app template: it has four screens built from components, with a prototype flow.
3. Find your way around
Section titled “3. Find your way around”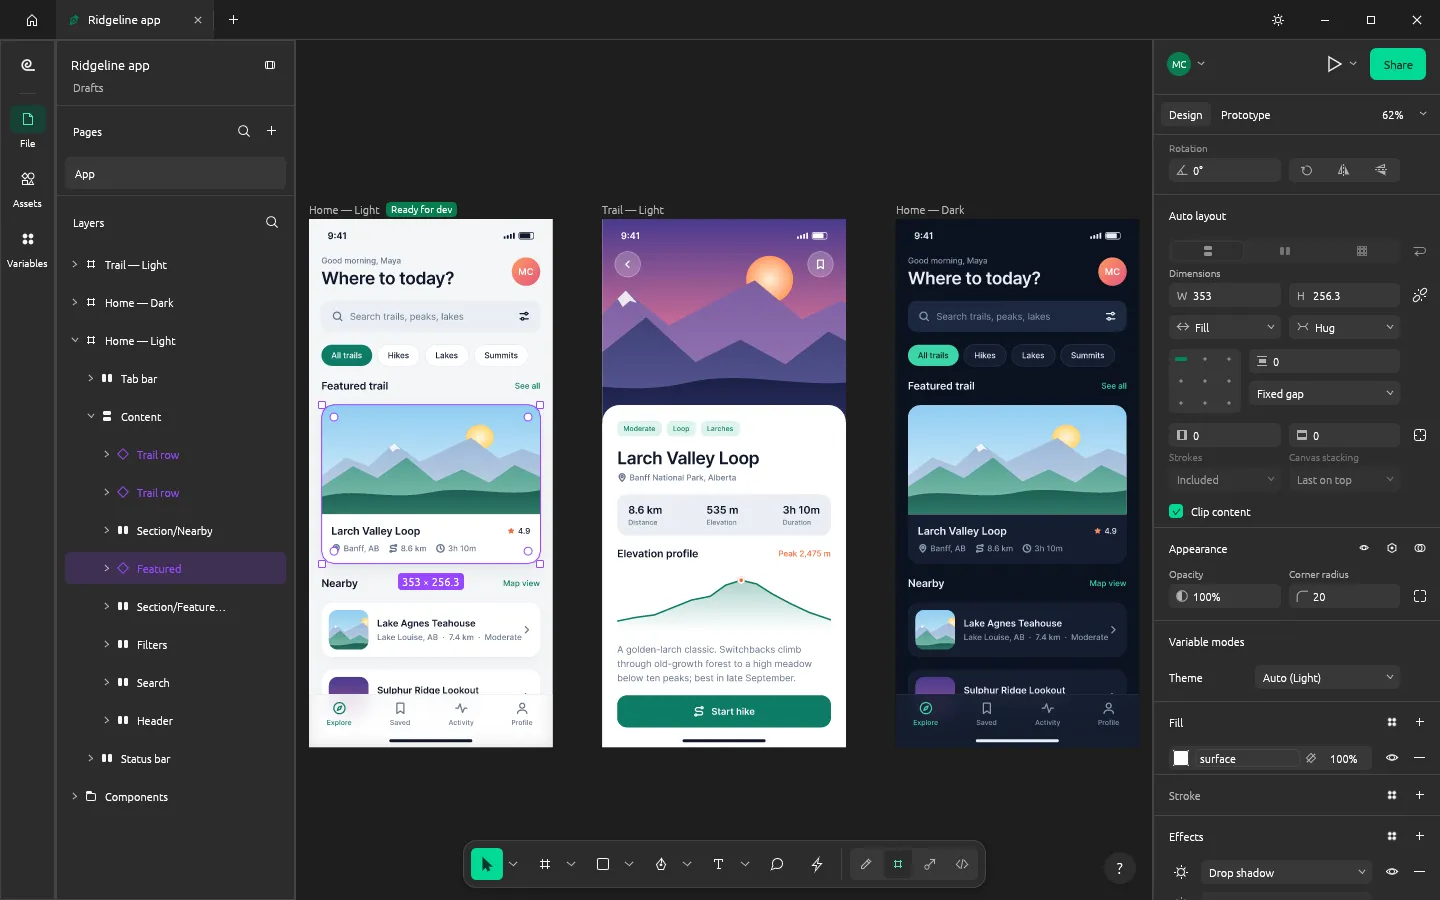
- Left: the File panel lists the file’s pages and layers. Assets has your components, and Variables your variables. The button above them opens the main menu.
- Bottom: the toolbar, with the drawing tools on the left and a switcher for Draw, Design, Prototype and Inspect (Dev Mode) on the right.
- Right: the Design and Prototype panels for whatever you’ve selected, with Share and the play button (present) at the top.
- Bottom right: the ? button has Getting started tips, Keyboard shortcuts and Check for updates….
To find any command by name, press Ctrl+K (⌘K on a Mac) to open Actions.
4. Draw a frame
Section titled “4. Draw a frame”- Press F for the Frame tool, then drag on the canvas. Or pick a device size from the Design panel.
- Press R for a rectangle, T for text, or O for an ellipse, and draw inside the frame.
- Press V to go back to the Move tool, and select a layer to change its fill, stroke and effects in the Design panel.
5. Add auto layout
Section titled “5. Add auto layout”Select a frame and press Shift+A (Add auto layout in the Object menu). Its children now line up in a row or column, with padding and gaps you set in the Design panel. Change a child’s size and the frame grows or shrinks to fit.
6. Save
Section titled “6. Save”Press Ctrl+S (⌘S on a Mac). FigCraft saves a .figcraft file. To pick another name or save a copy as .fig, choose File › Save as… from the main menu.
FigCraft keeps a recovery copy of unsaved work in the background. If it closes unexpectedly, the next start opens the copy again for you to save. To save every change by itself, turn on Save files automatically in Preferences.
7. Export
Section titled “7. Export”Select a layer, then choose File › Export… (Ctrl+Shift+E, ⇧⌘E on a Mac). Pick PNG at 1×, 2× or 3×, JPEG, WebP, SVG or PDF.
Next steps
Section titled “Next steps”- Workflows: components, variables, prototypes, Dev Mode and boards.
- Live sessions: edit a file together with others.
- Troubleshooting: if the window doesn’t open or something looks wrong.