
Recolor artwork
This guide covers the Recolor Artwork dialog, which lists the colors of the selected art and replaces each one with a new color while a live preview shows the result.
Recolor Artwork changes fills, strokes, gradient stops, type, gradient meshes, embedded image pixels and the tiles of pattern fills. OK applies every change as one undo step.
Open Recolor Artwork
Section titled “Open Recolor Artwork”- Select the art you want to recolor. To recolor a whole poster, choose Select → All.
- Open the dialog in one of these ways:
- Choose Edit → Edit Colors → Recolor Artwork….
- Click the palette button Recolor Artwork on the Control bar or on the Contextual Task Bar. The button appears on both bars when the selection has colors.
- Click Recolor under Quick Actions in the Properties panel. The button appears when the selection uses more than one color.
- In the Swatches panel, select a color group and click Edit or Apply Color Group, or choose Edit or Apply Color Group… from the panel menu.
- In the Color Guide panel, click Edit or Apply Colors to start from the guide’s colors. With art selected, the art is reduced to as many rows as the guide has colors, and the guide’s colors become the new colors. When the panel’s Limit colors to swatch library button has a library or Document Swatches chosen, the dialog opens with Limit to Library set to the same choice.
Recolor Artwork… and the Recolor with Preset items are available only when something is selected. The Swatches and Color Guide buttons also work with nothing selected; see Save the new colors as a color group.
The dialog opens on the Assign tab with these settings:
| Option | Default | What it does |
|---|---|---|
| Preset (top right) | Custom, or the preset the current settings match | Applies a ready-made setup. See Recolor with a preset or a library. |
| Colors | Auto | Sets how many rows the art’s colors are merged into. Auto gives one row per color. |
| Preserve White | On | Leaves white out of the rows. |
| Preserve Black | On | Leaves black out of the rows. |
| Preserve Grays | Off | Leaves grays out of the rows. |
| Method | Scale Tints | Sets how the colors in a row take its new color. |
| Limit to Library | None | Moves each new color to the nearest color of a library or of the document’s swatches. |
| Preview | On | Shows the new colors on the canvas while the dialog is open. |
| Harmony Rules (Edit tab) | Complementary | Gives the new colors the rule’s colors, starting from the base color. |
| Link button (Edit tab) | On | Moves every marker on the wheel together when you drag one. |
| Wheel display (Edit tab) | Smooth color wheel | Shows the new colors on a smooth wheel, a segmented wheel or color bars. |
The Preserve boxes open as they were the last time you clicked OK. Some ways of opening the dialog change the other defaults:
- Opening on a color group or on the Color Guide’s colors sets Colors to the number of colors in the group or guide.
- The 1 Color Job, 2 Color Job and 3 Color Job presets set Colors to 1, 2 or 3.
- The Color Library preset and the Color Guide’s library choice set Limit to Library.
When Colors is 1, 2 or 3 and Method is Scale Tints, the Preset menu shows the matching Color Job.
Assign new colors to the current colors
Section titled “Assign new colors to the current colors”The Assign tab lists the art’s colors in rows. Each row shows its current colors on the left, an arrow, and the new color that replaces them on the right.
- Under Colors, keep Auto for one row per color, or pick a number. With a number, similar colors merge until that many rows remain.
- Under Preserve, tick White, Black or Grays to leave those colors out of the rows so they stay as they are.
- Click a row to select it. Shift-click or Ctrl-click (Cmd-click on macOS) adds a row to the selection or removes it.
- Change the new color of a row in one of these ways:
- Type a hex value in the # field at the end of the row.
- Double-click the new color to open the Color Picker, pick a color and click OK.
- Use the sliders under the rows. See Change a new color with the sliders.
- Watch the canvas. With Preview on, the art shows the new colors as you change them.
- Click OK to keep the new colors, or Cancel to leave the art as it was.
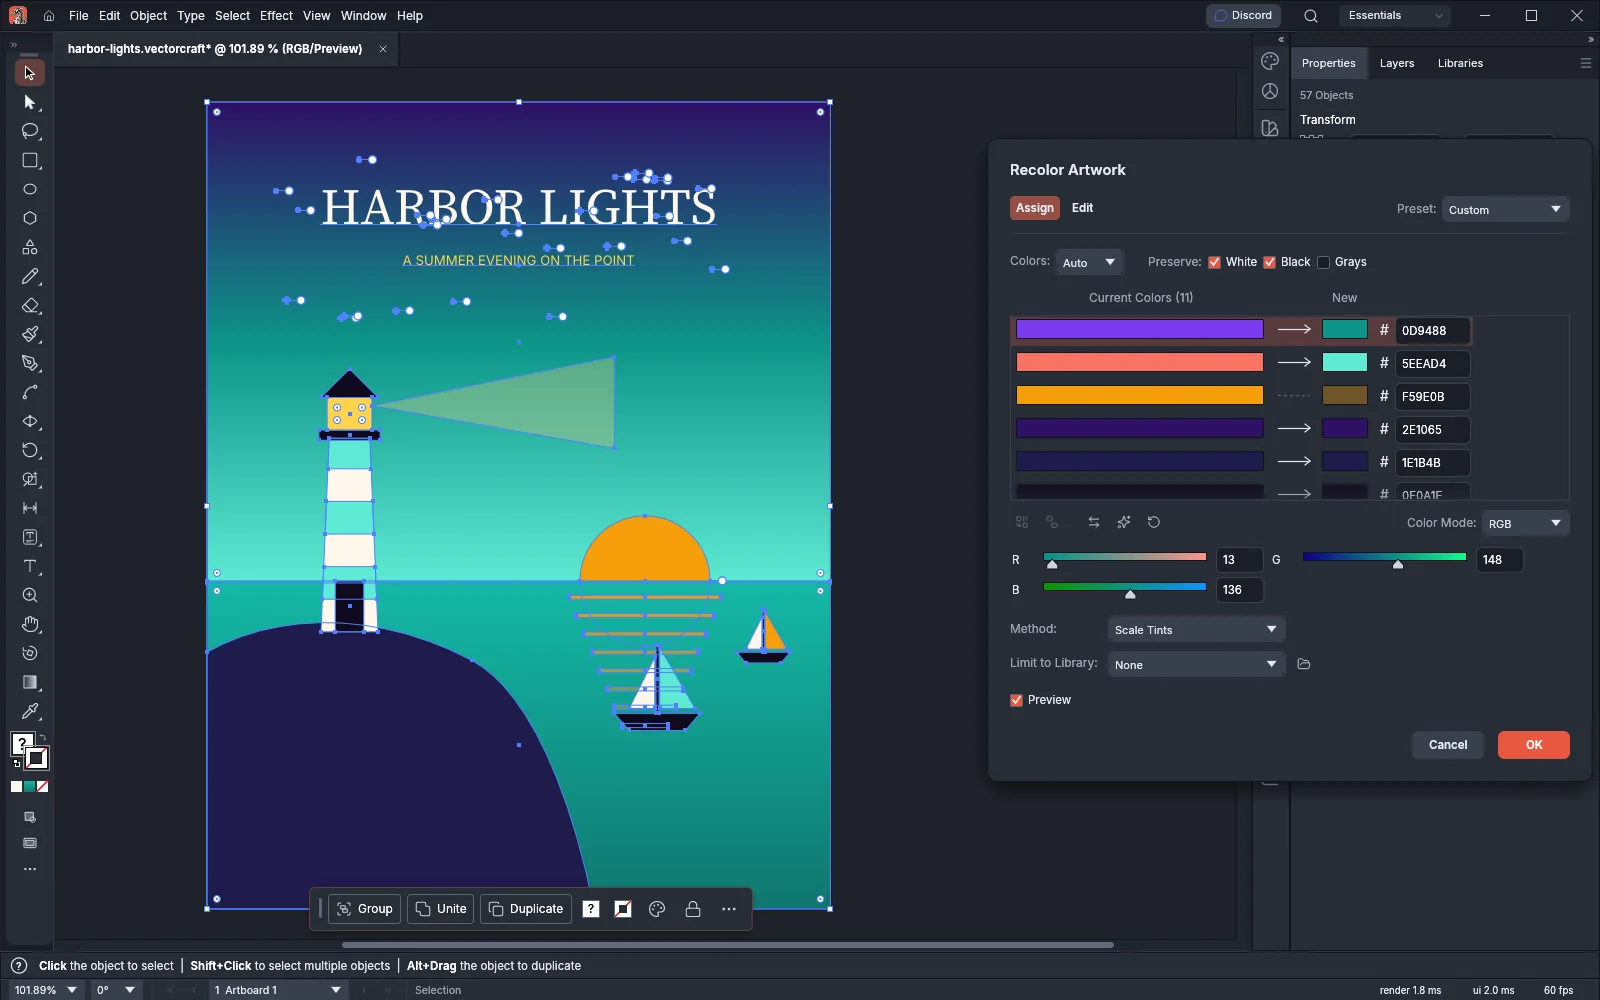
Three buttons under the rows act on all the rows at once:
| Button | What it does |
|---|---|
| Randomly change color order | Shuffles the new colors among the rows that are not excluded. |
| Randomly change saturation and brightness | Gives the new colors random saturation and brightness, keeping each hue. |
| Reset the rows to the artwork’s colors | Puts back the rows as the art’s own colors and drops slider edits. |
Method sets how the colors in one row take its new color:
| Method | What it does |
|---|---|
| Exact | Every color in the row becomes the new color. |
| Preserve Tints | Tints of the row’s darkest color become the same tints of the new color. Other colors become the new color. |
| Scale Tints | Every color becomes a tint of the new color, as light relative to the row’s darkest color as it was. |
| Tints and Shades | The color of average lightness becomes the new color. Lighter and darker colors become tints and shades of it. |
| Hue Shift | The row’s most saturated color becomes the new color. The other colors turn by the same hue and keep their saturation and brightness. |
Merge, separate and exclude colors
Section titled “Merge, separate and exclude colors”- To merge rows, select two or more rows and click Merge colors into one row. The merged row keeps the new color of the topmost selected row.
- To separate a row, select a row that holds more than one color and click Separate colors into rows. Each color gets its own row, with itself as its new color.
- To exclude a row, click its arrow. The arrow turns into a dashed line, the new color dims, and the row’s colors stay as they are. Click the dashed line to recolor the row again.
When you change Colors, a Preserve box or Limit to Library, the dialog builds the rows again from the art, and merges, exclusions and new colors you set before are replaced.
Change a new color with the sliders
Section titled “Change a new color with the sliders”The sliders under the rows edit the new color of the topmost selected row. With no row selected, they are dimmed.
- Select a row.
- Pick a model from the Color Mode menu: HSB, RGB, CMYK or Lab. Tint also appears when the row’s new color is a spot color from the library chosen under Limit to Library, and its slider sets the percentage of that spot color.
- Drag a slider or type a value in its field.
Until you pick a mode, the sliders show the new color in its own model. They show a gray in HSB and a library spot color as Tint. OK gives the art a color you changed with the sliders in the model the sliders showed.
To pick the color visually instead, double-click the row’s new color. The Color Picker opens on that color, and its OK sets the new color of the row.
Edit colors on the wheel
Section titled “Edit colors on the wheel”The Edit tab shows the new colors of the rows that are not excluded as markers on a color wheel. Hue runs around the wheel and saturation runs outward from the center.
- Click the Edit tab.
- Click a color chip under the sliders, or a marker on the wheel, to make it the base color. The base color has the larger marker and a frame around its chip.
- Pick a rule from Harmony Rules. The new colors take the rule’s colors, starting from the base color.
- Drag a marker to change its color. Drag the Brightness slider under the wheel to change the brightness of the base color.
- Click OK.
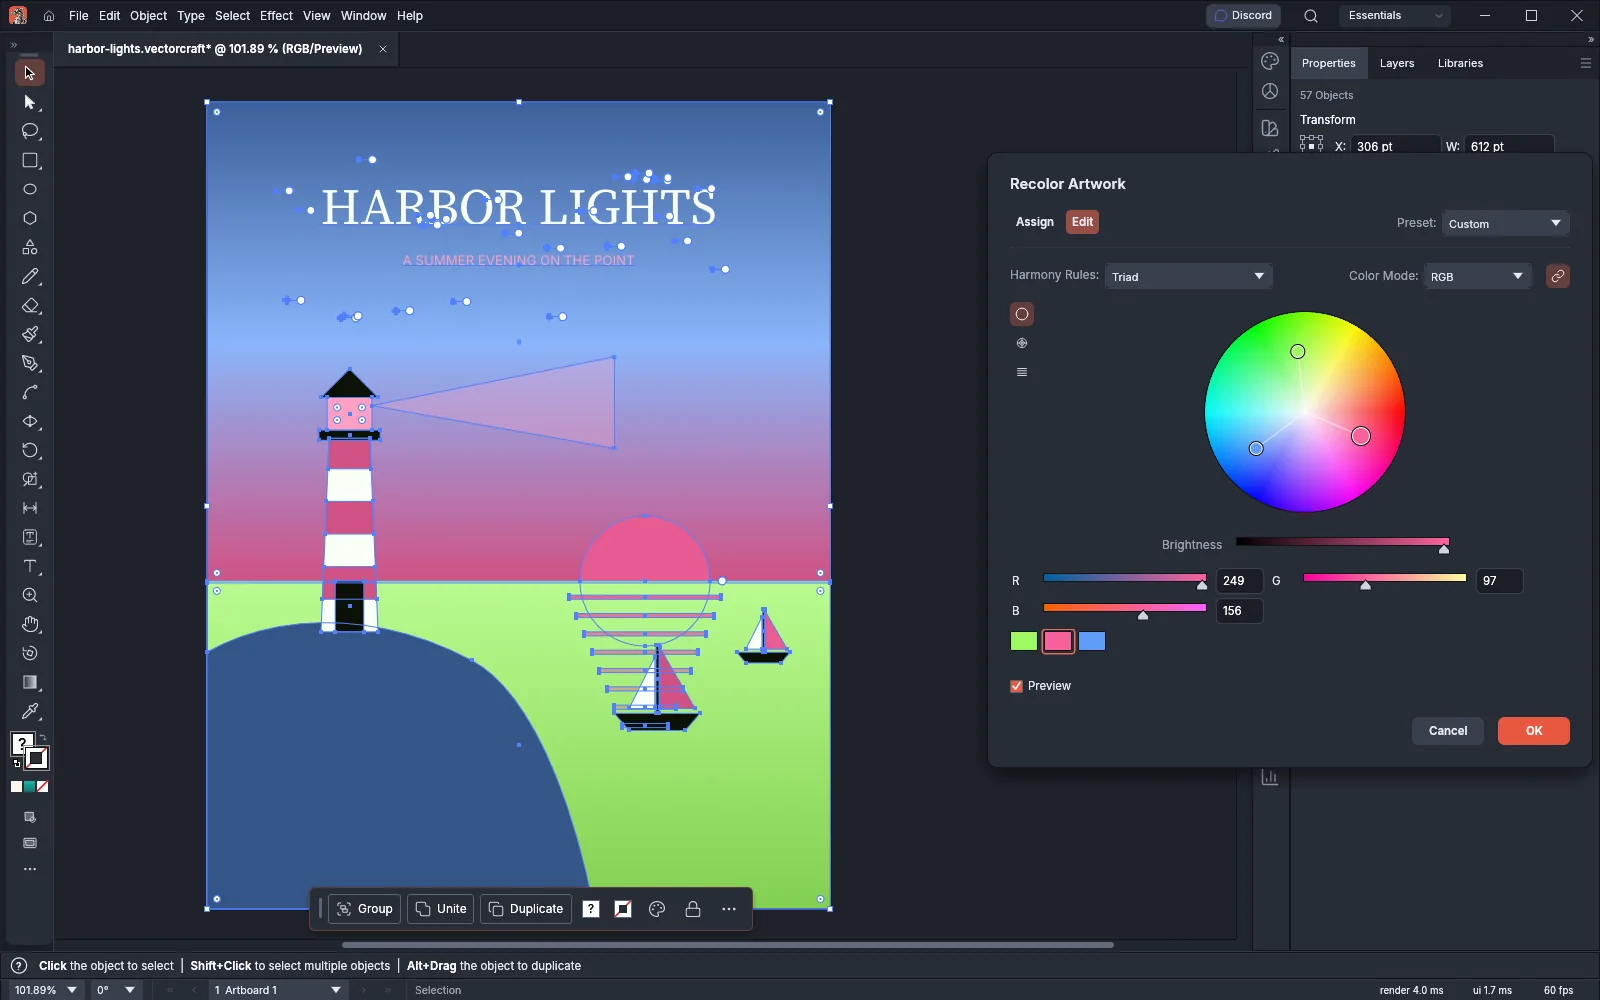
The link button at the right end of the Harmony Rules line sets how markers move. It is on when the dialog opens.
- While it is on, dragging one marker turns and scales every marker by the same amount, so the colors keep their harmony. Its tooltip then reads Unlink harmony colors.
- While it is off, dragging a marker changes only that color. Its tooltip then reads Link harmony colors.
The three buttons to the left of the wheel change the display:
| Button | What it shows |
|---|---|
| Show smooth color wheel | A continuous hue and saturation wheel. The dialog opens on this display. |
| Show segmented color wheel | Solid patches of 24 hues in 5 saturation steps. The markers still move freely. |
| Show color bars | One bar per new color, in row order. Click a bar to select it for the sliders. Drag a bar to move its row up or down; this does not change any color. |
Harmony Rules offers Complementary, Complementary 2, Split Complementary, Left Complement, Right Complement, Analogous, Analogous 2, Monochromatic, Shades, Triad, Triad 2, Triad 3, Tetrad, Tetrad 2, Tetrad 3, Compound, Compound 2, High Contrast, High Contrast 2, High Contrast 3 and Pentagram.
Shift every color with Global Adjust
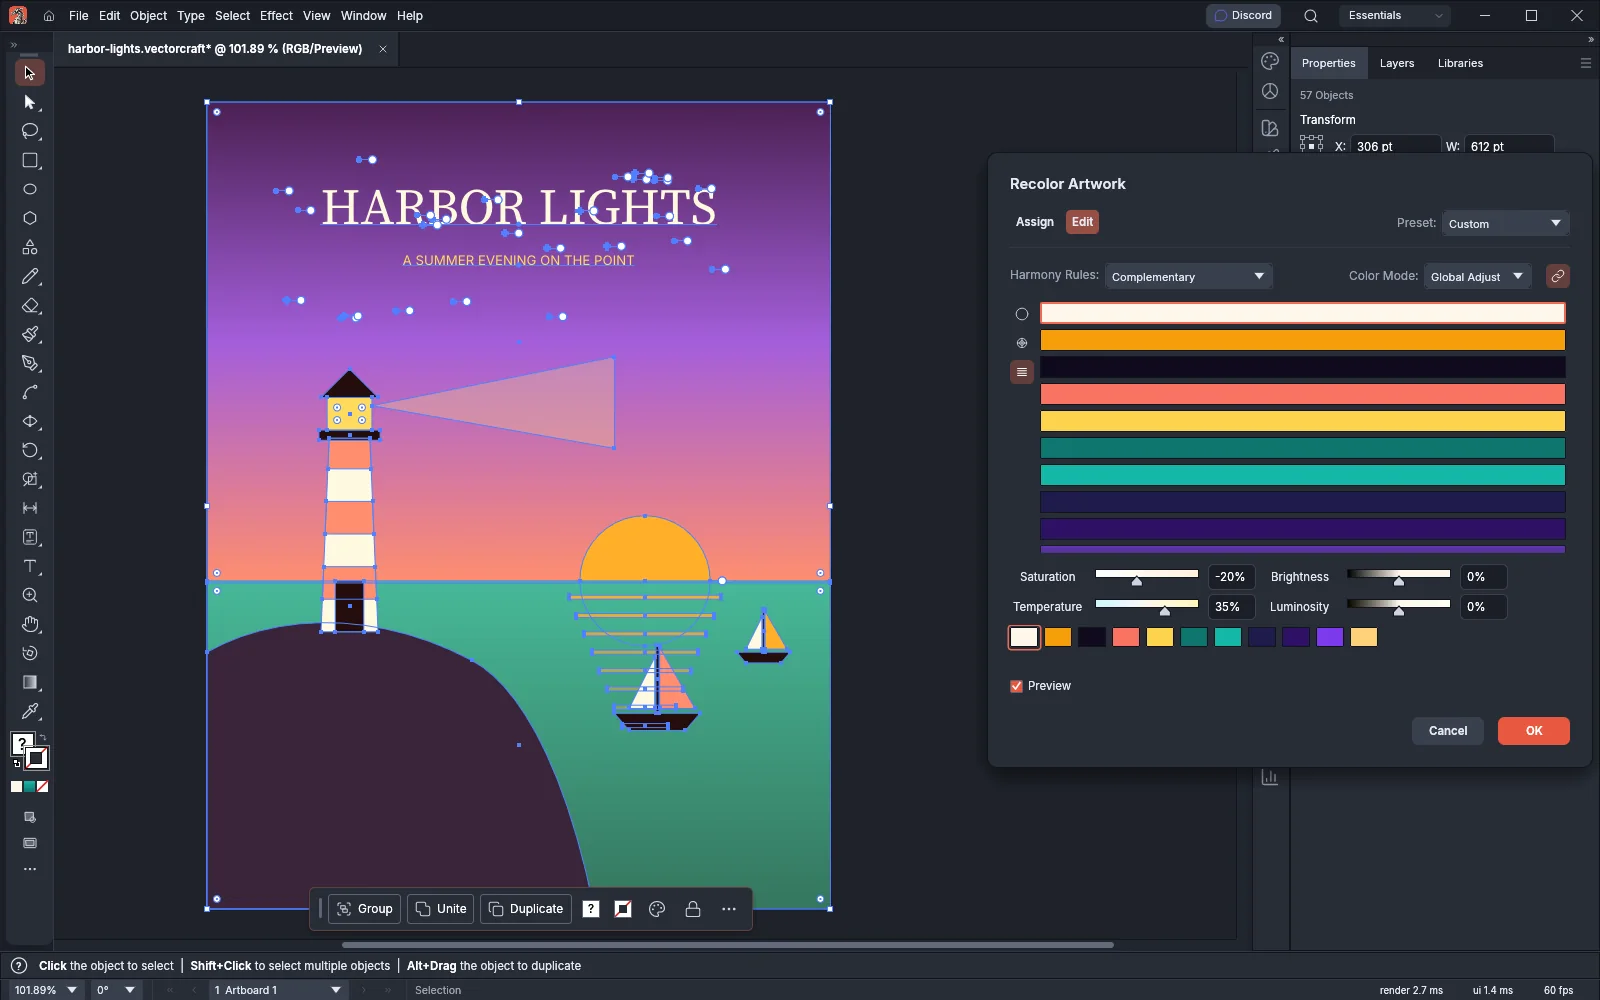
Section titled “Shift every color with Global Adjust”Global Adjust changes every new color at once, by the same amount.
-
On the Edit tab, choose Global Adjust from the Color Mode menu.
-
Drag the sliders or type values from −100% to 100%:
Slider What a positive value does Saturation Makes colors more saturated. Negative values mute them. Brightness Moves colors toward full brightness. Negative values move them toward black. Temperature Adds red and takes away blue, so colors look warmer. Negative values look cooler. Luminosity Makes colors lighter. Negative values make them darker. -
Check the preview, then click OK.
At 0% a slider leaves the colors as they are. The amounts stay in effect when you switch Color Mode back to a color model to edit a single row. Excluded rows do not change.
Recolor with a preset or a library
Section titled “Recolor with a preset or a library”The presets reduce art to a few inks, or fit its colors to a swatch library.
-
Select the art.
-
Choose Edit → Edit Colors → Recolor with Preset, then one of these:
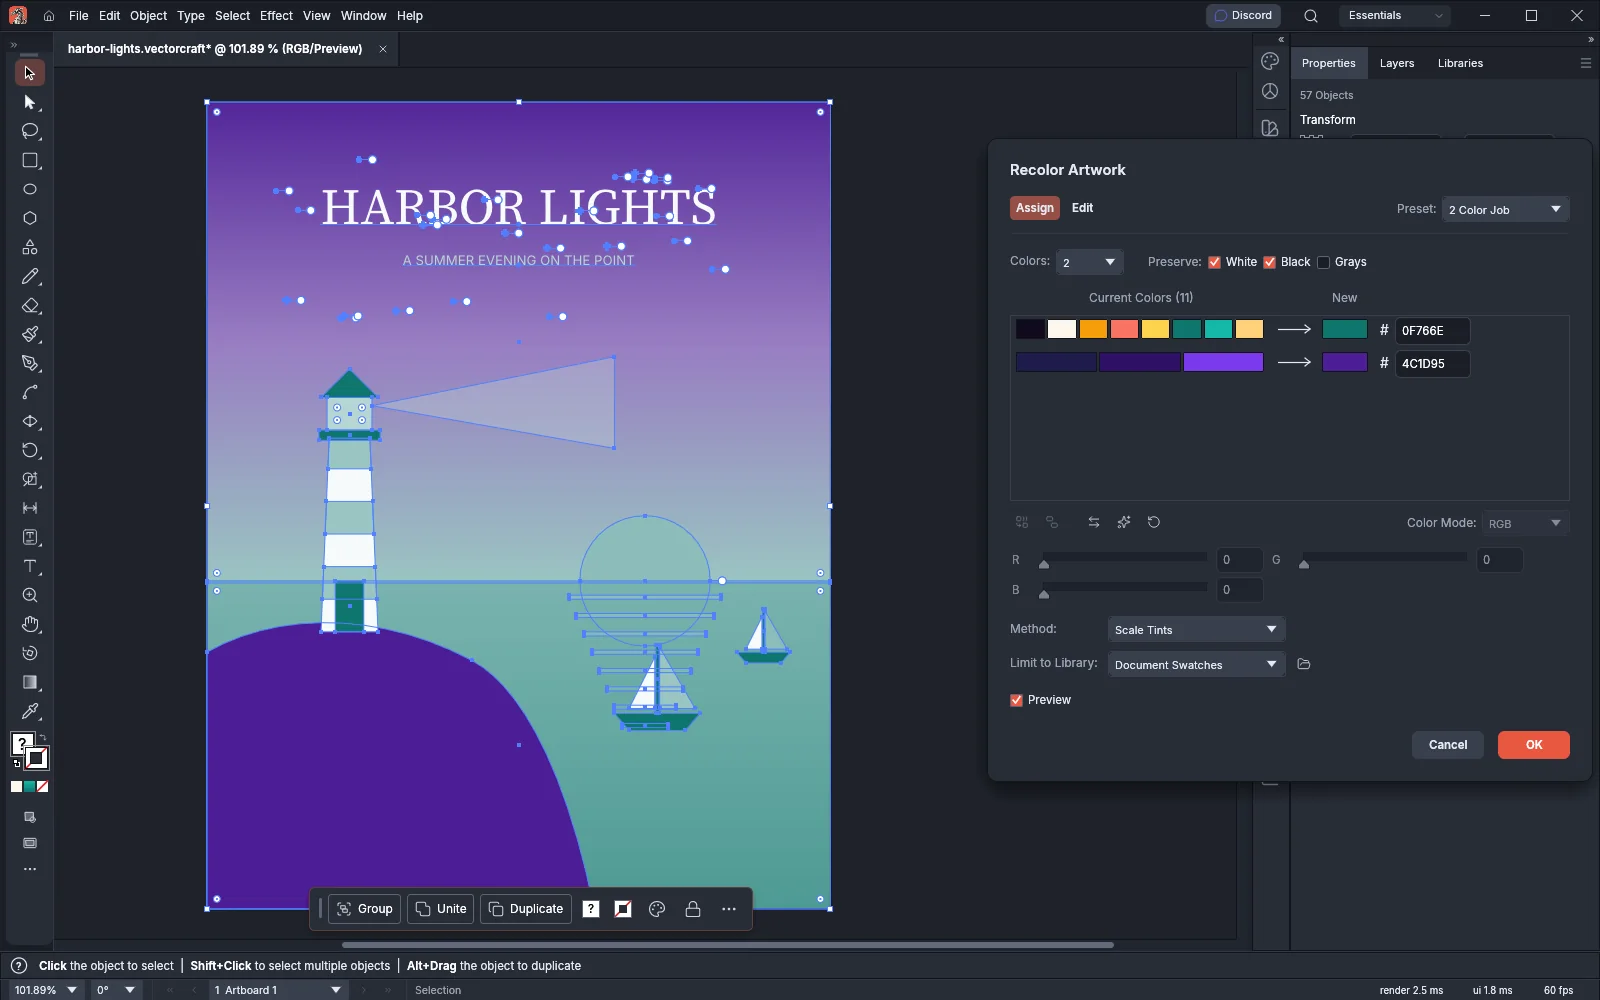
Preset What it sets up 1 Color Job… One row, Method Scale Tints. 2 Color Job… Two rows, Method Scale Tints. 3 Color Job… Three rows, Method Scale Tints. Color Library… Limit to Library set to the first color library in the list. -
Under Limit to Library, pick the colors the new colors must come from: None, Document Swatches or a color library. Each new color moves to the nearest color in that set.
-
To use a library file that is not in the list, click the folder button Other Library… next to the menu and pick an
.ase,.acb,.gplor.vcswatchesfile, or a document whose swatches you want. The dialog loads it and limits to it. -
Set each row’s new color, then click OK.
You can also pick the same setups from the Preset menu at the top of the dialog.
When a new color comes from a library, the art takes that swatch itself. A spot color stays a spot color, and the swatch is added to the document’s swatches.
Save the new colors as a color group
Section titled “Save the new colors as a color group”When Recolor Artwork opens on a color group, or on the Color Guide’s colors with no art selected, a Color Group name field appears below the color controls. Preview, Colors and the Preserve boxes appear only when art is selected.
To change a color group and the art that uses it:
- Select the art, or select nothing to change only the group.
- In the Swatches panel, select the color group and click Edit or Apply Color Group.
- Set the new colors. With art selected, the art is reduced to as many rows as the group has colors, and the group’s colors become the new colors.
- Type a new name in Color Group if you want to rename the group.
- Click OK. The group takes the new colors, and the selected art is recolored.
To save colors from the Color Guide as a new color group:
- Deselect all art.
- In the Color Guide panel, click Edit or Apply Colors. Each guide color opens as its own row. The Assign tab has no Colors menu, Preserve boxes or Preview box here. When the Color Guide panel is limited to a library or to Document Swatches, Limit to Library opens set to the same choice, and each row’s new color moves to the nearest color in that set.
- Change the colors on either tab. Global Adjust and Limit to Library apply to the saved colors too.
- Type a name in Color Group. The field starts as “Color Group”.
- Click OK. The colors of the rows that are not excluded become a new color group in the Swatches panel.