Getting started
This guide takes you through a first project in about 15 minutes. You make a badge with a rounded gradient background, a faded logo, a circle, a star, a wavy line and a line of type, save it as a VectorCraft file and export it as a PNG and an SVG. The following image shows the badge you make in this guide, as exported to PNG.

1. Install VectorCraft
Section titled “1. Install VectorCraft”The quickest way is ArtCraft Launcher: install it, then press Install on VectorCraft’s card. To download VectorCraft on its own, see Install and update.
Open VectorCraft. With no document open, it shows the Home screen.
Use the Home screen
Section titled “Use the Home screen”The Home screen is titled Welcome to VectorCraft and has these parts:
| Part | What it does |
|---|---|
| New file | Opens the New Document window. |
| Open | Opens a file you already have. |
| Recent Files | Lists up to six of the files you used last, each with its name and folder. Click one to open it. The list is not shown while there are no recent files. |
| Quickly start a new file | Makes a document from a preset in one click. The cards are Letter, A4, Web 1920×1080, Phone 390×844, Postcard and Social Square Post 1080×1080. |
| Community | Holds the Join our Discord button and links to the ArtCraft website, VectorCraft on getartcraft.com and the VectorCraft repository on GitHub. |
To return to the Home screen while documents are open, click the Home button (the house icon) at the left end of the menu bar. Click a document tab to go back to that document. If you turn off Show The Home Screen When No Documents Are Open in the General section of Preferences, the window stays empty when no document is open, and the Home button still opens the screen.
2. Tour the window
Section titled “2. Tour the window”The window has the same layout on every platform. The following screenshot shows the badge from this guide with the wavy line selected, and numbers the main areas of the window to match the list after it.
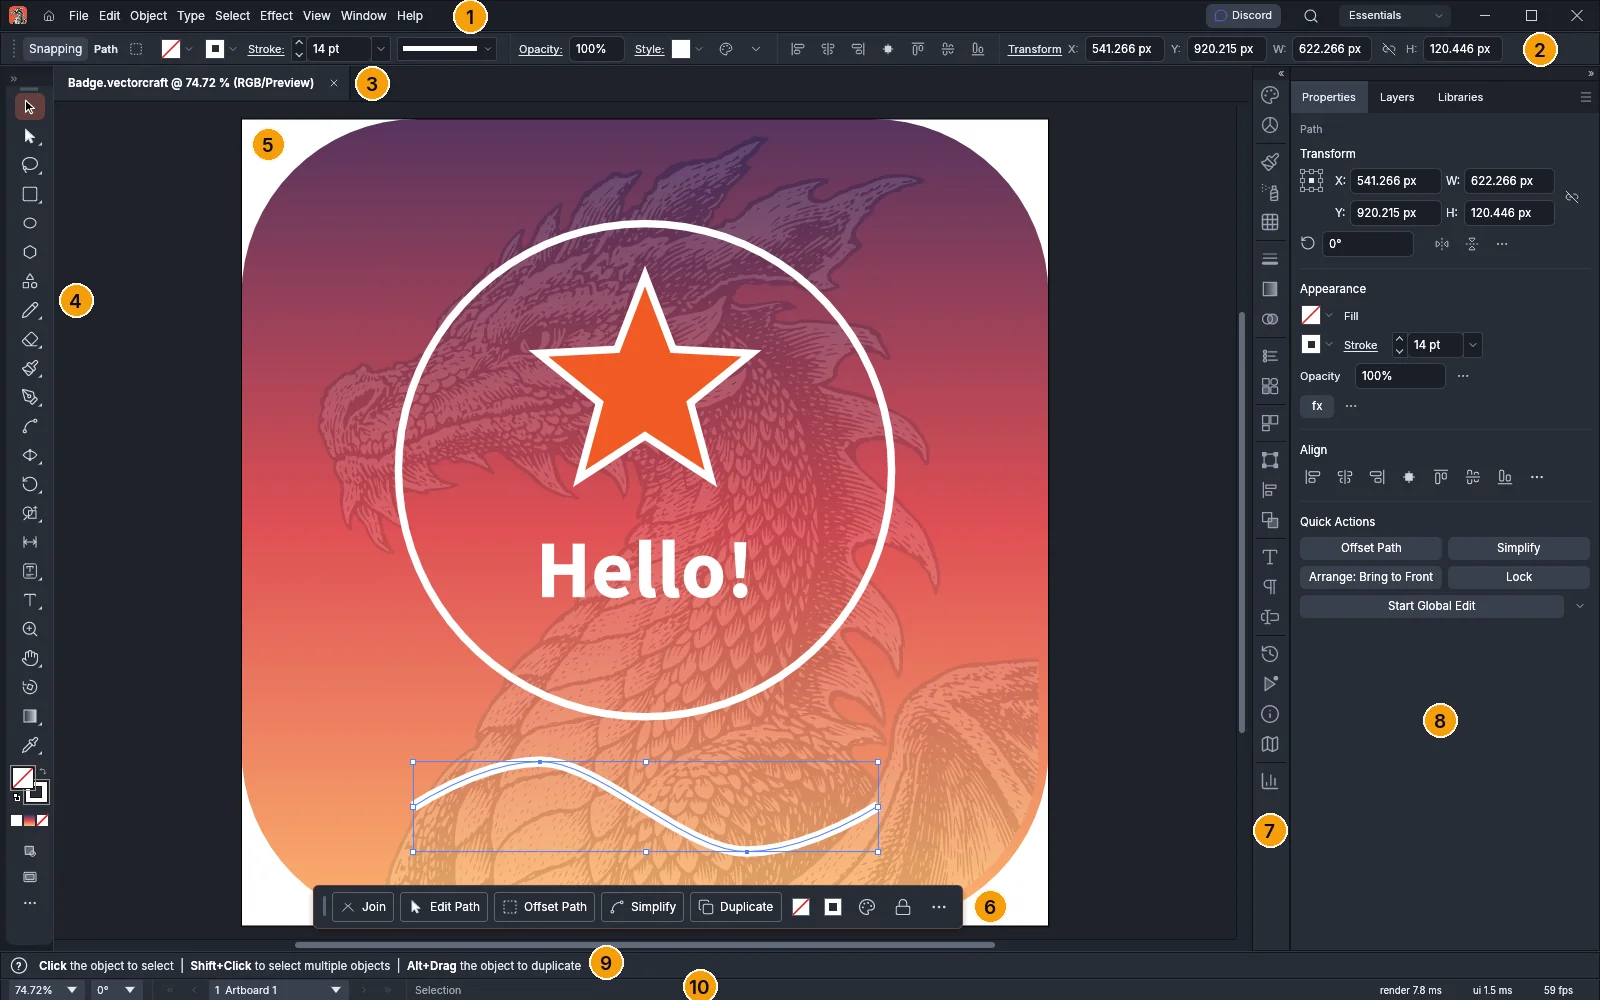
- Menu bar: holds the File, Edit, Object, Type, Select, Effect, View, Window and Help menus. The search button and the Essentials workspace menu are at its right end.
- Control bar: shows the fill, stroke, stroke weight, opacity and alignment of the selection. The Essentials workspace hides it; choose Window → Control to show it.
- Document tab: shows the document name, the zoom level, the color mode and the view. Each open document has its own tab.
- Tools panel: holds the drawing and editing tools. A button with a small triangle in its corner holds a group of tools; press and hold it to see the others. The Fill and Stroke boxes are near the bottom.
- Canvas and artboard: the artboard is the white page that prints and exports. You can draw outside it on the gray canvas.
- Contextual Task Bar: shows buttons for likely next actions on the selection, such as Edit Path, Simplify and Duplicate. Turn it off with Window → Contextual Task Bar.
- Panel icons: each icon opens a panel, such as Swatches, Brushes, Stroke or Character, beside the dock.
- Panel dock: shows the Properties, Layers and Libraries panels as tabs. Properties shows the settings of whatever is selected.
- Hint line: lists what the active tool does with a click, a drag and the modifier keys.
- Status bar: shows the zoom, the view rotation, the artboard navigator, the active tool and the pointer position.
Every panel is on the Window menu. To find any command by name, choose Help → Search Commands… (Ctrl+Shift+/, or Cmd+Shift+/ on macOS) and type part of its name. Find any command describes the search box.
3. Create a document
Section titled “3. Create a document”- Choose File → New… (Ctrl+N, or Cmd+N on macOS), or press New file on the Home screen.
- In the New Document window, choose the Social tab and then the Social Square Post 1080×1080 card.
- In the name field at the top of PRESET DETAILS, type
Badge. - Press Create.
The new document opens with one 1080 × 1080 px artboard. Double-clicking a preset card also creates the document.
The following screenshot shows New Document the first time it opens, on the Print tab with the Letter card selected. After you create a document, New Document opens on the Recent tab.
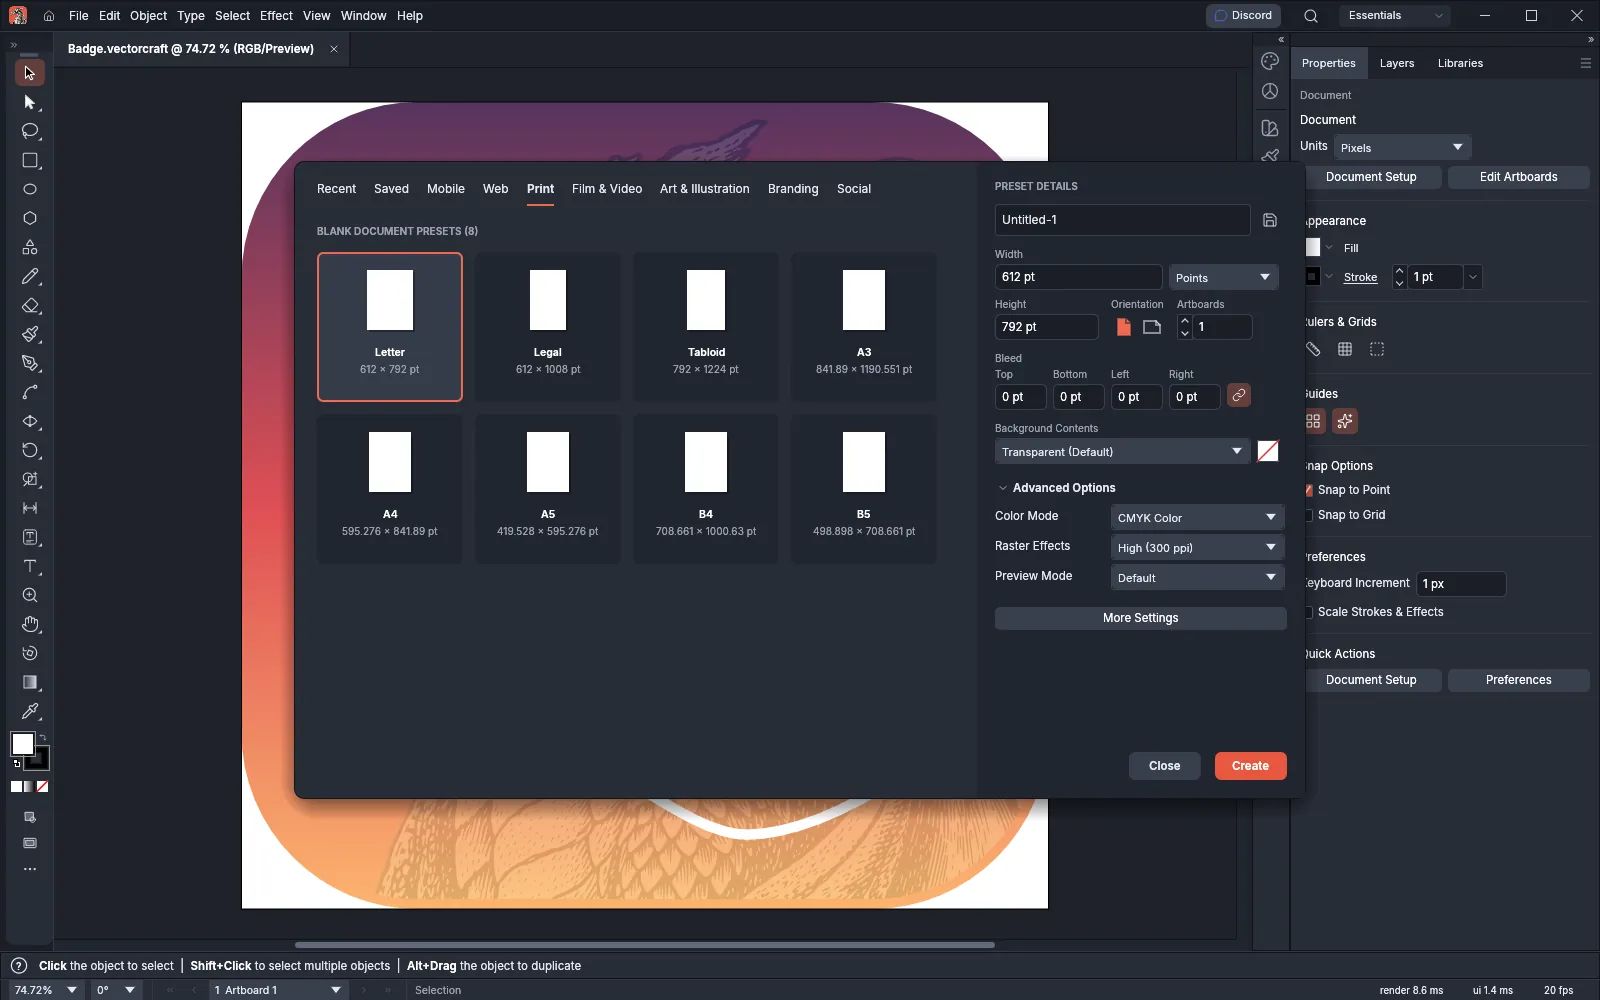
The tabs across the top are Recent, Saved, Mobile, Web, Print, Film & Video, Art & Illustration, Branding and Social. Choosing a card fills in PRESET DETAILS. The defaults in the following table are those of the Letter card on the Print tab.
| Option | Default | What it sets |
|---|---|---|
| Name | Untitled-1 | The document name shown on its tab. |
| Width and Height | 612 pt × 792 pt | The size of each artboard. |
| Units | Points | The units of the rulers and size fields. |
| Orientation | Portrait | Portrait or landscape. |
| Artboards | 1 | The number of artboards. |
| Bleed | 0 pt | The area outside the artboard that prints, on each side. The link button keeps the four sides equal. |
| Background Contents | Transparent | Transparent or White. |
| Color Mode | CMYK Color | The color mode of the document. |
| Raster Effects | High (300 ppi) | The resolution of raster effects. |
| Preview Mode | Default | Default, Pixel or Overprint. |
Color Mode, Raster Effects and Preview Mode are under Advanced Options. The Mobile, Web, Film & Video, Art & Illustration and Social presets use RGB Color. The Mobile, Web, Film & Video and Social presets use Screen (72 ppi) for Raster Effects.
4. Make the background
Section titled “4. Make the background”The background is a square with rounded corners and a gradient fill, with a logo placed on it and faded. This guide uses the VectorCraft app icon, vectorcraft.svg. Any logo file works, for example an SVG, PDF or PNG file.

- Choose the Rectangle Tool (M) and drag from the top-left corner of the artboard to the bottom-right corner. This square becomes the background.
- In the Transform section of the Properties panel, type
236in Corner Radius and press Enter. The square gets rounded corners, like an app icon. - Choose Window → Gradient to open the Gradient panel. With the square still selected, open the Presets list and choose Sunset under Sky Gradients. The fill of the square changes to a gradient of deep violet, coral and amber.
- In the Angle field of the Gradient panel (beside the rotate icon), type
-90and press Enter. The violet end of the gradient moves to the top of the square. - In the Appearance section of the Properties panel, click the Stroke swatch and choose [None]. The black outline of the square is removed.
- Choose File → Place… (Ctrl+Shift+P, or Cmd+Shift+P on macOS), pick the logo file, and press Place in the Place dialog. VectorCraft places the logo in the middle of the view and selects it.
- In the Transform section of the Properties panel, type
1080in W and in H, then540in X and in Y. The logo now covers the whole square. The VectorCraft icon is a rounded square with the same corners as the background, so their edges line up. - In the Appearance section of the Properties panel, type
12in Opacity and press Enter. The logo fades into the gradient. - Choose Select → Deselect (Ctrl+Shift+A, or Cmd+Shift+A on macOS), then press D. The shapes you draw next get a white fill and a 1 pt black stroke instead of the gradient.
The following screenshot shows the logo after steps 7 and 8.
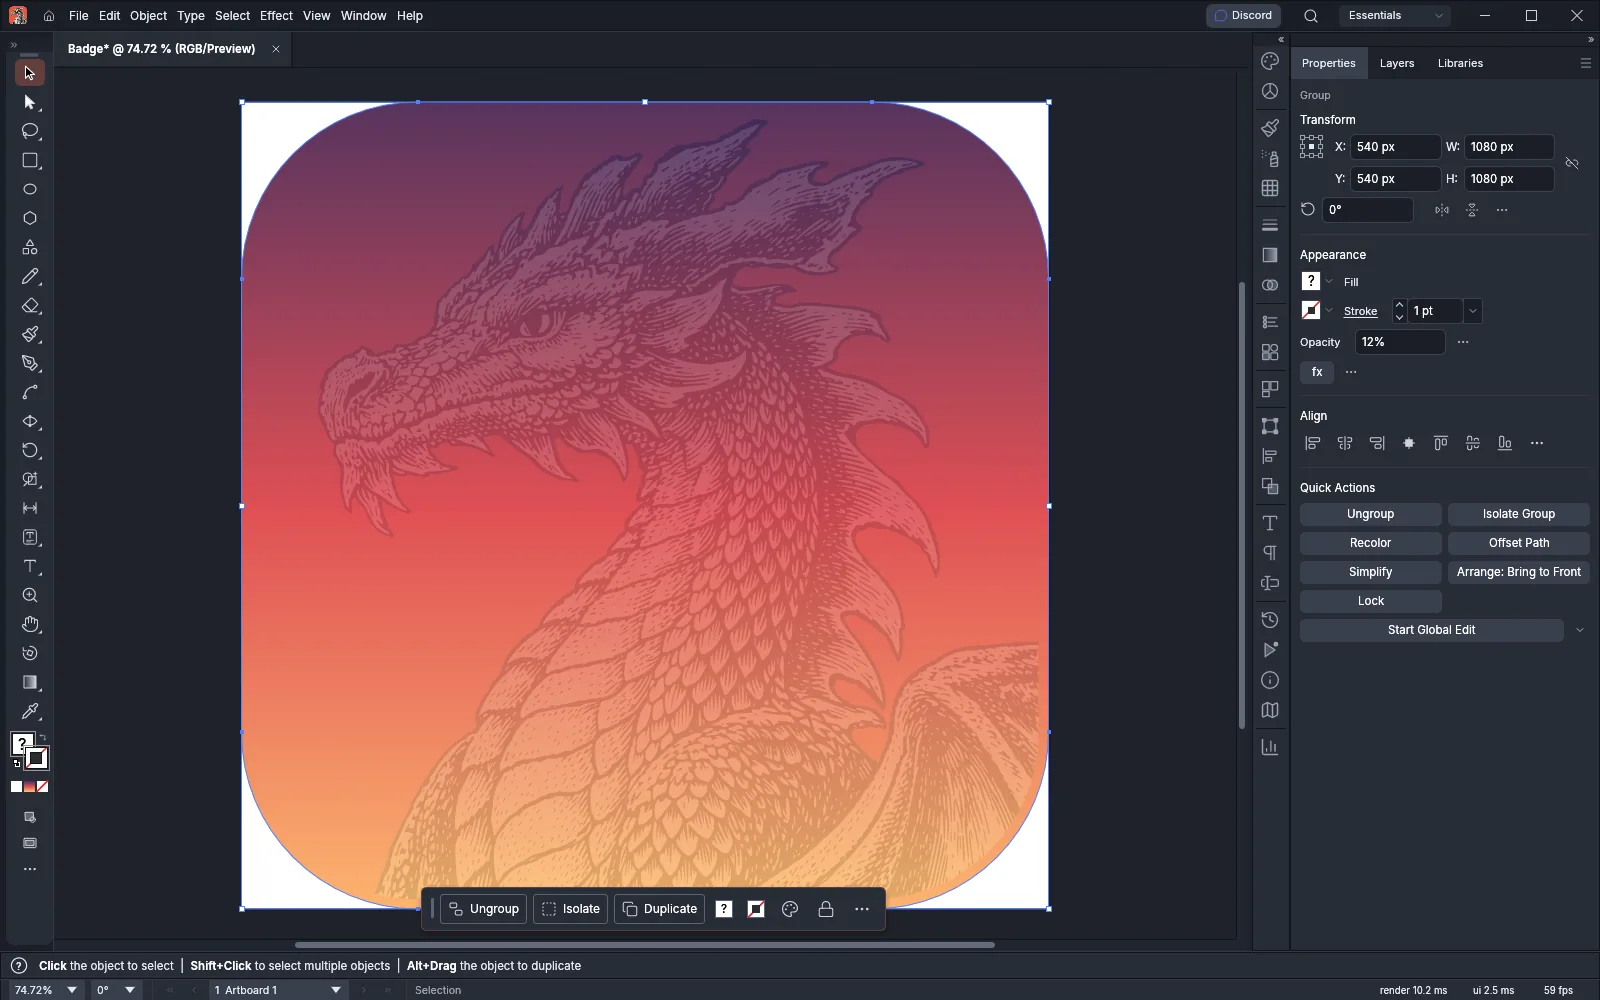
An SVG logo is placed as a group of its paths, which you can edit like the rest of the artwork. Fill, stroke and color covers gradients and opacity, and Open and save files covers the Place options.
5. Draw shapes and a path
Section titled “5. Draw shapes and a path”New objects get a white fill and a 1 pt black stroke until you change them. The hint line shows the keys each tool takes: with a shape tool, Shift+drag keeps the proportions, Alt+drag (Option+drag on macOS) draws from the center, and a click lets you enter an exact size.
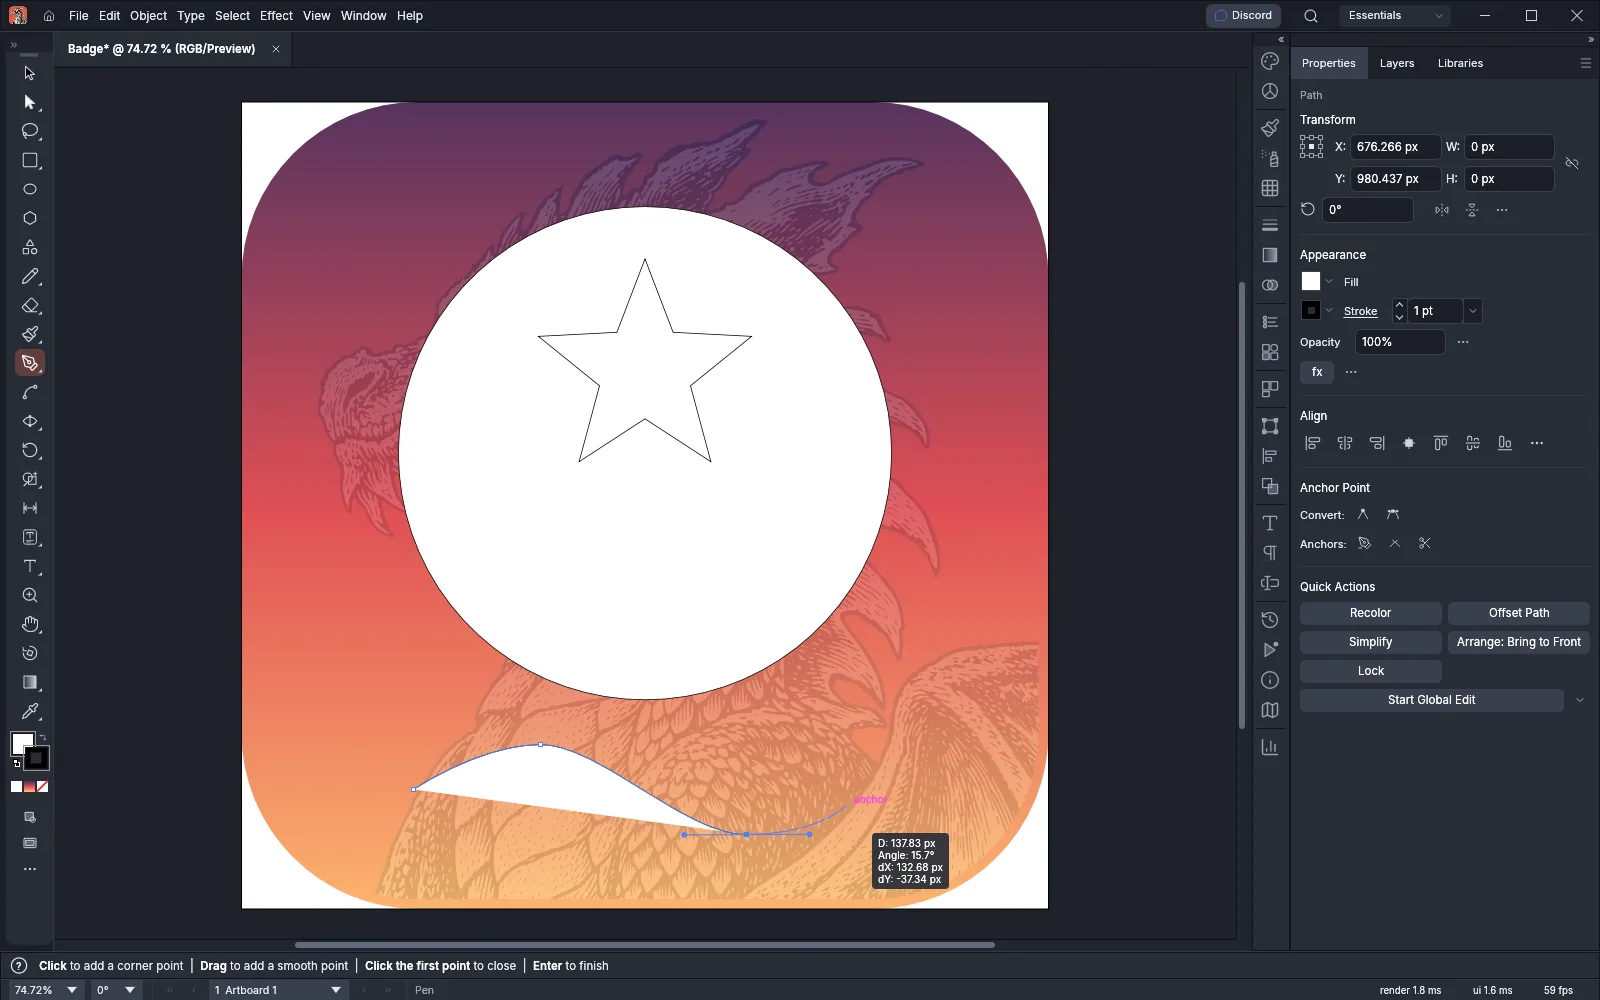
- Choose the Ellipse Tool (L) and Shift+drag a circle in the middle of the square.
- Press and hold the Rectangle tool’s button to open its group, and choose the Star Tool. Drag outward from the center of the circle to draw a star.
- Choose the Pen Tool (P) to draw a wave below the circle:
- Click once at the left to place a corner point.
- Click a little to the right and drag up to place a smooth point.
- Click further right and drag down to place another smooth point.
- Click at the right end, then press Enter to finish the path.
The following screenshot shows the shapes and the pen path before any color is added.
Move around the canvas
Section titled “Move around the canvas”To look at a part of the artwork more closely, or to see all of it again, change the view:
- Pan: hold Space and drag, with any tool. You can also choose the Hand Tool (H) and drag.
- Zoom with the Zoom tool: choose the Zoom Tool (Z). Click to zoom in, and Alt+click (Option+click on macOS) to zoom out. With Animated Zoom and GPU Performance on in Preferences → Performance (both are on by default), drag right or left to zoom in or out, or hold the mouse button to keep zooming. With either one off, drag across an area to zoom into it.
- Zoom with the keyboard: View → Zoom In is Ctrl+= (Cmd+= on macOS), and View → Zoom Out is Ctrl+- (Cmd+- on macOS).
- Fit the artboard: View → Fit Artboard in Window (Ctrl+0, or Cmd+0 on macOS) shows the whole artboard. View → Fit All in Window (Ctrl+Alt+0, or Cmd+Option+0 on macOS) shows every artboard, and View → Actual Size (Ctrl+1, or Cmd+1 on macOS) shows the artwork at 100%.
- Use the status bar: choose a zoom level, Fit on Screen or Fit All from the zoom list at the left end of the status bar. The artboard navigator beside it has First, Previous, Next and Last buttons and a list of the artboards by number and name. Choosing an artboard there fits it in the window.
Set up a document and artboards covers rulers, guides and the other view options.
6. Color the shapes
Section titled “6. Color the shapes”Each object has a fill (the inside) and a stroke (the outline). The Fill and Stroke boxes near the bottom of the Tools panel show them, and the box in front receives the color you pick. Press X to bring the other box to the front.
- Choose the Selection Tool (V) and click the circle.
- Choose Window → Swatches to open the Swatches panel.
- With the Fill box in front, click the [None] swatch (the white tile with a red slash) to remove the fill.
- Press X to bring the Stroke box to the front, click the White swatch, and type a stroke weight of
10in the Stroke field of the Properties panel. The circle becomes a white ring. - Color the other objects the same way. In the example, the star has an Orange Red fill and a White stroke with a weight of
10. - Select the wave, set its fill to [None] and its stroke to White, and type a stroke weight of
14in the Stroke field.
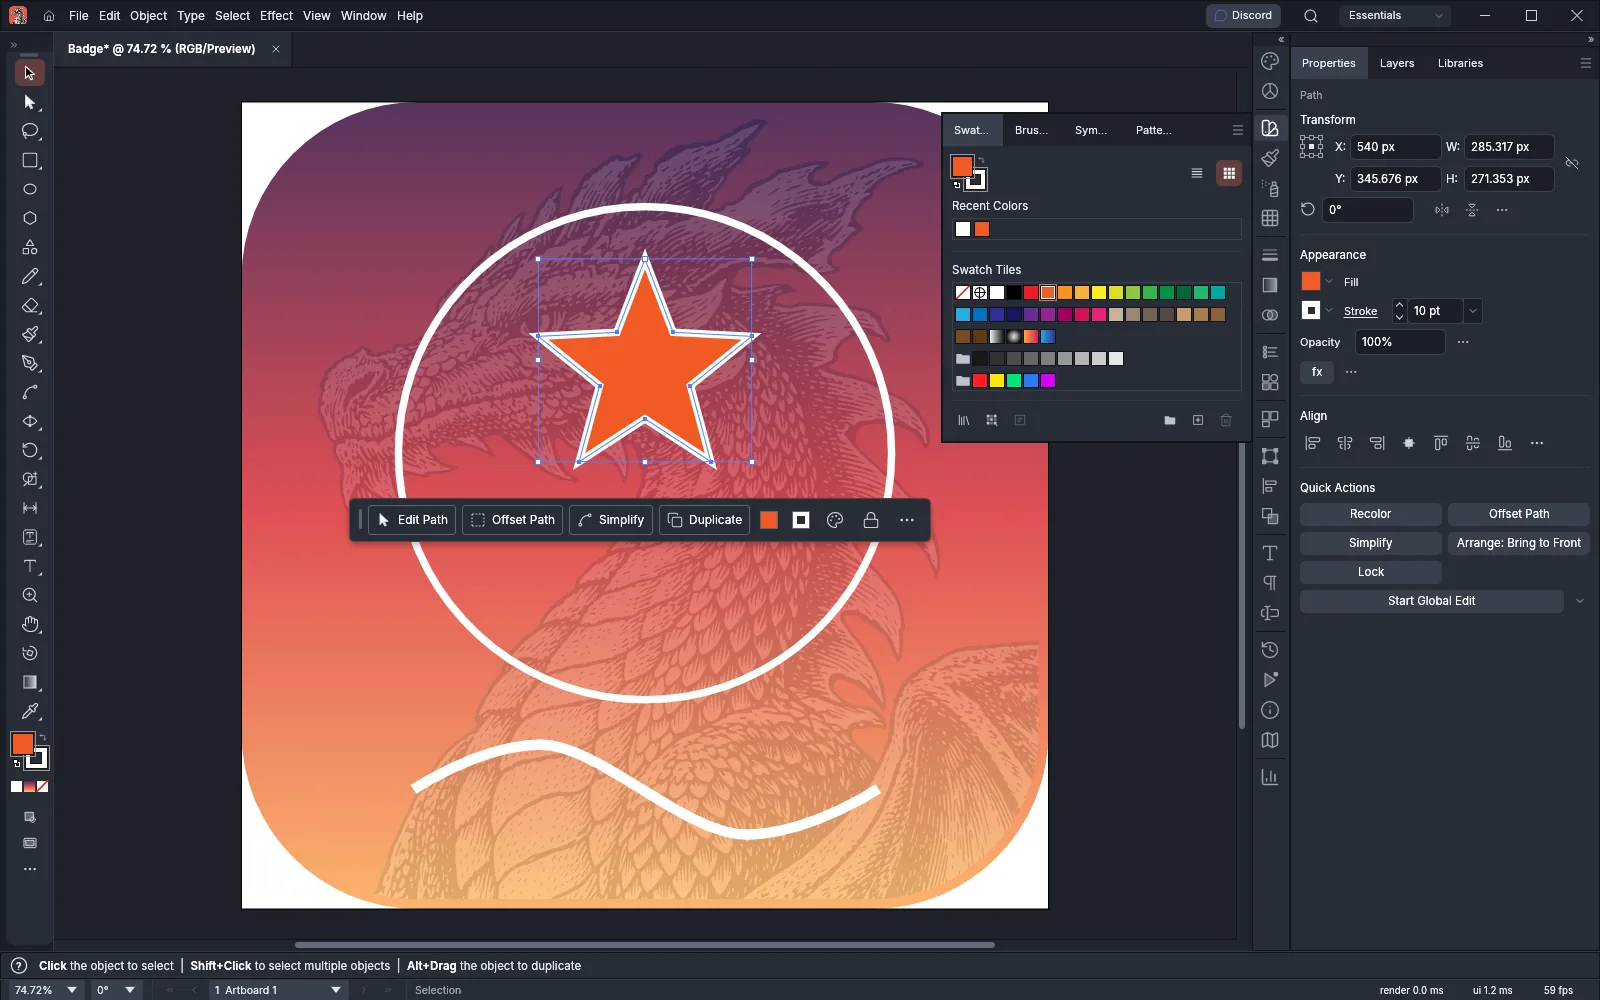
You can also color a selected object from the Appearance section of the Properties panel: click the Fill or Stroke swatch there and pick a color.
| Key | What it does |
|---|---|
| X | Brings the Fill or the Stroke box to the front. |
| Shift+X | Swaps the fill and stroke of the selection. |
| D | Gives the selection a white fill and a 1 pt black stroke. Type gets a black fill and no stroke. |
Fill, stroke and color covers gradients, the Stroke panel and recoloring.
Undo a step
Section titled “Undo a step”Edit → Undo (Ctrl+Z, or Cmd+Z on macOS) undoes a step, and Edit → Redo (Ctrl+Shift+Z, or Cmd+Shift+Z on macOS) redoes it. The Edit menu names the step that each command undoes or redoes.
To go back several steps at once, choose Window → History. The History panel lists the steps of the document, starting with Open. Click a row to return the document to that state, and click a later row to go forward again. Customize the workspace covers the History panel.
7. Add a line of type
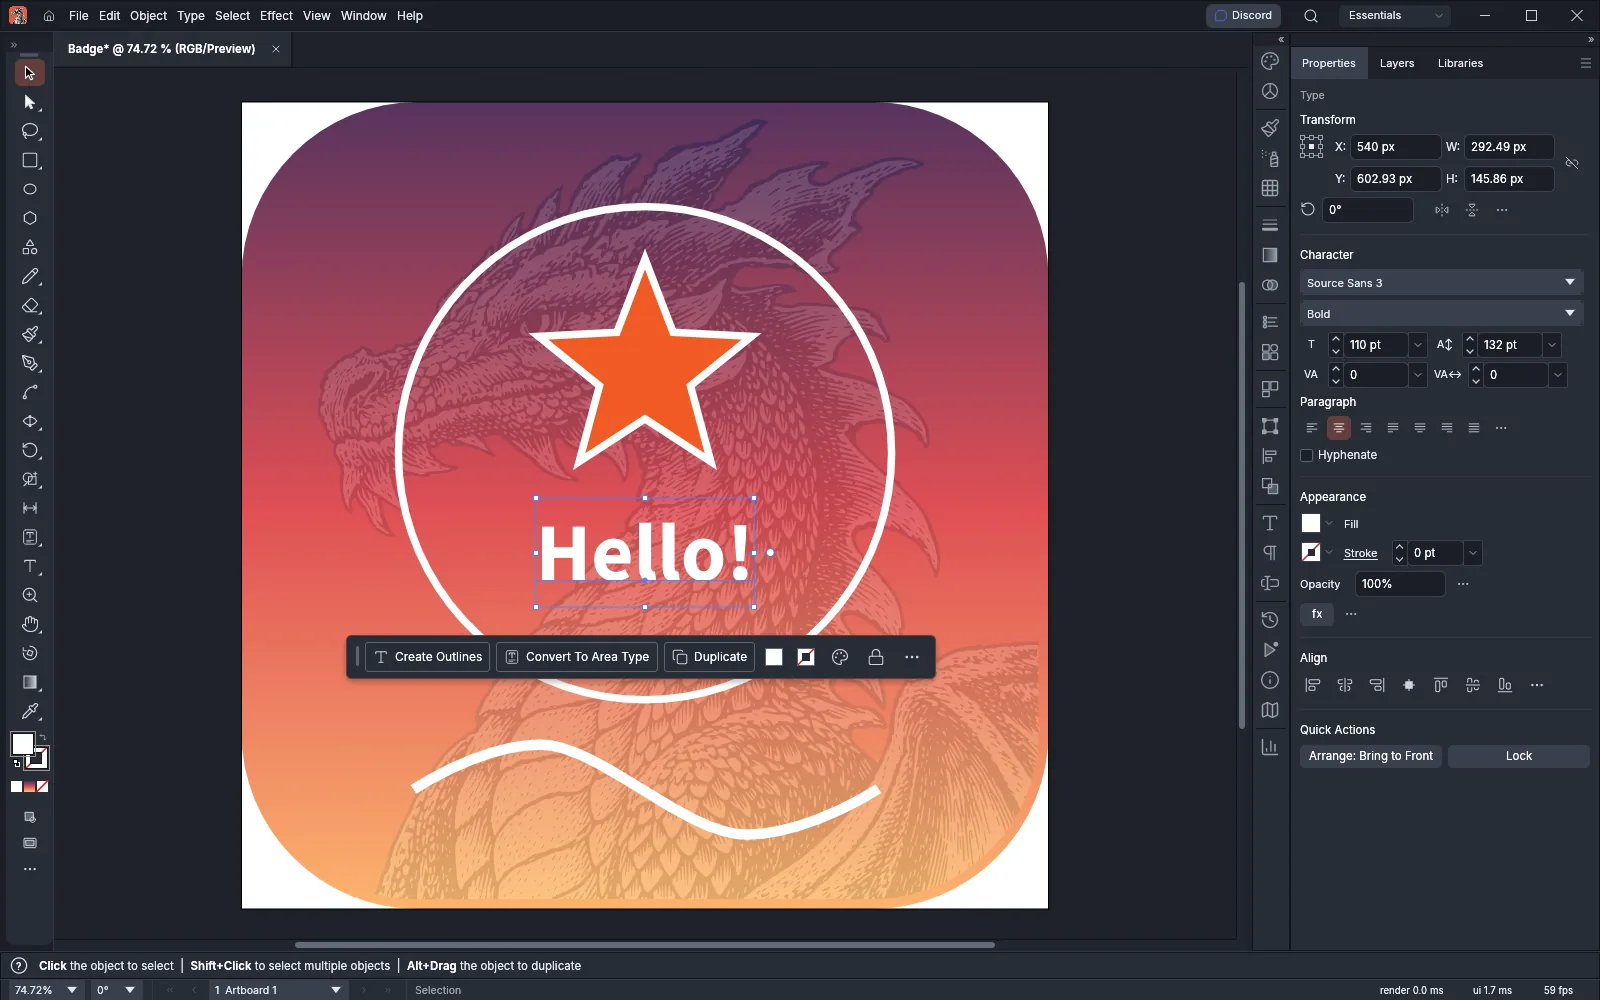
Section titled “7. Add a line of type”- Choose the Type Tool (T) and click inside the circle, below the star. VectorCraft places a line of placeholder text with all of it selected.
- Type
Hello!to replace the placeholder. - Press Esc. VectorCraft stops editing the text and switches to the Selection tool, with the type object still selected.
- In the Character section of the Properties panel, choose a bold style and a size of
110 pt, and set the fill to White. - Drag the type to center it under the star.
8. Arrange and group
Section titled “8. Arrange and group”Objects stack in the order you draw or place them, so the last one is in front. The Layers panel lists them from front to back.
- With the Selection tool, click the white ring of the circle, then Shift+click the star and the type to add them to the selection.
- Choose Object → Group (Ctrl+G, or Cmd+G on macOS). The three objects now move and scale together.
- Choose the Layers tab in the panel dock. Layer 1 lists the group, the wave, the logo and the rounded rectangle.
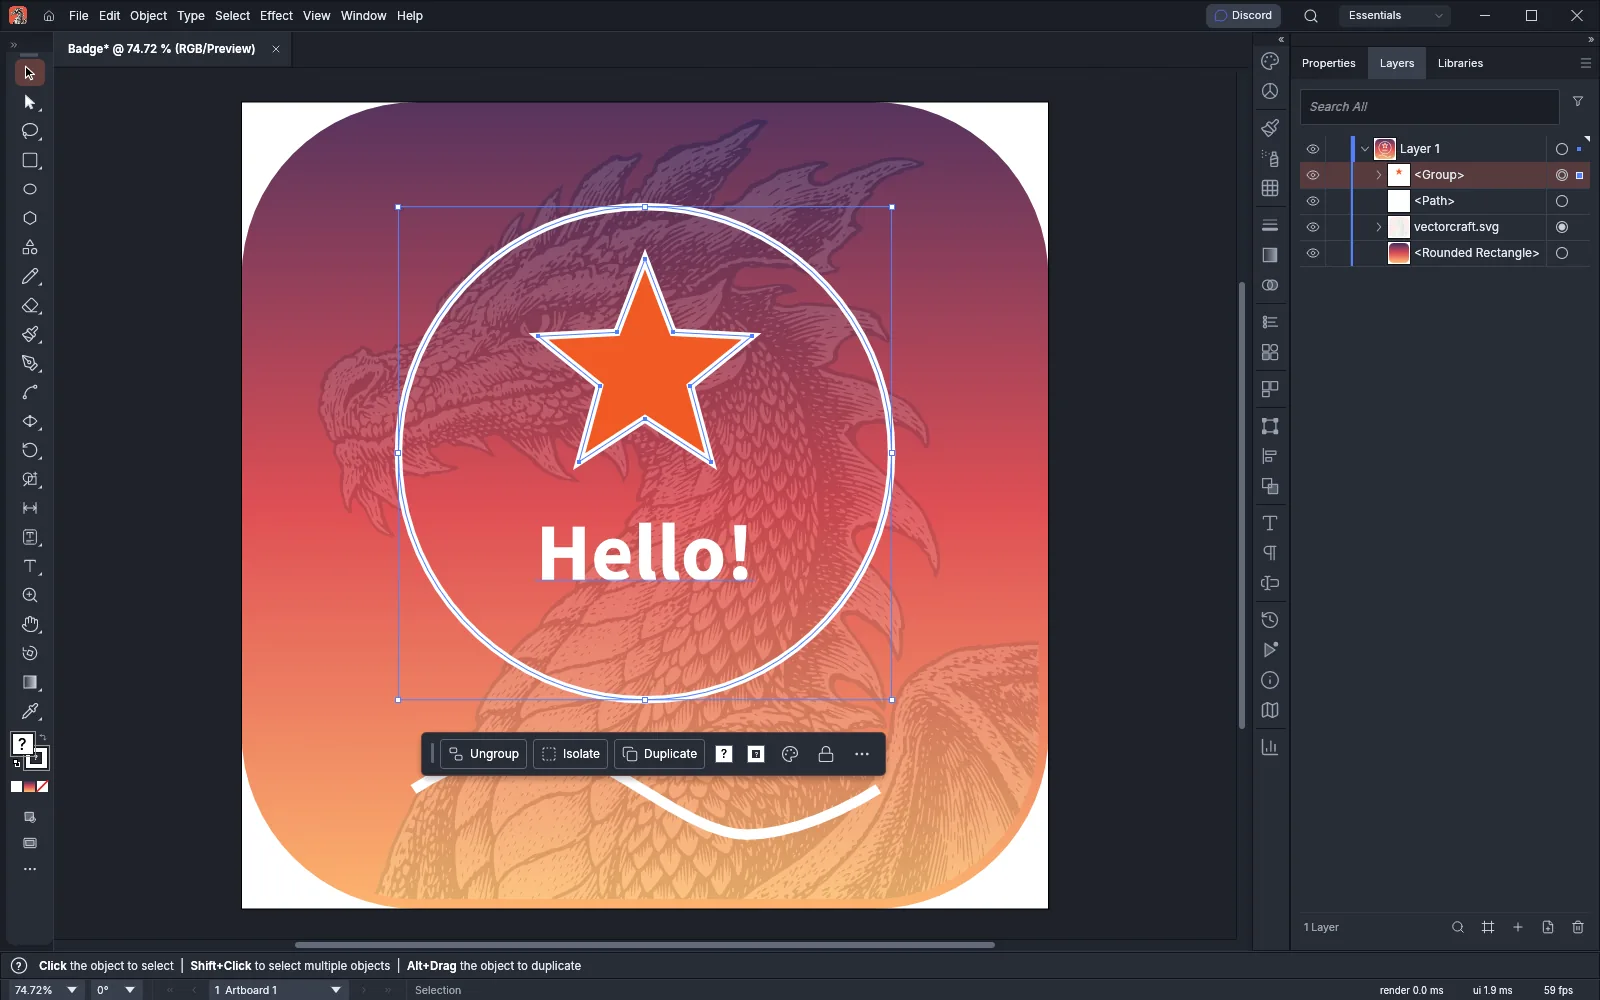
To change the stacking order, select an object and choose a command from Object → Arrange:
| Command | Windows and Linux | macOS |
|---|---|---|
| Bring to Front | Ctrl+Shift+] | Cmd+Shift+] |
| Bring Forward | Ctrl+] | Cmd+] |
| Send Backward | Ctrl+[ | Cmd+[ |
| Send to Back | Ctrl+Shift+[ | Cmd+Shift+[ |
Object → Ungroup (Ctrl+Shift+G, or Cmd+Shift+G on macOS) separates a group again. Arrange, group and align covers locking, hiding and the Align panel.
9. Save a VectorCraft file
Section titled “9. Save a VectorCraft file”- Choose File → Save (Ctrl+S, or Cmd+S on macOS).
- The first time, a save dialog opens. Choose the VectorCraft file type, name the file
Badgeand save it.
The file gets the .vectorcraft extension, VectorCraft’s native format, which keeps everything editable. The document tab shows its name. File → Save As… can also write the document as SVG or PDF; Open and save files lists the formats.
VectorCraft keeps recovery copies of unsaved work in the background. If it closes unexpectedly, it offers them back the next time it starts. See Troubleshooting.
10. Export a PNG
Section titled “10. Export a PNG”- Choose File → Export → Export As….
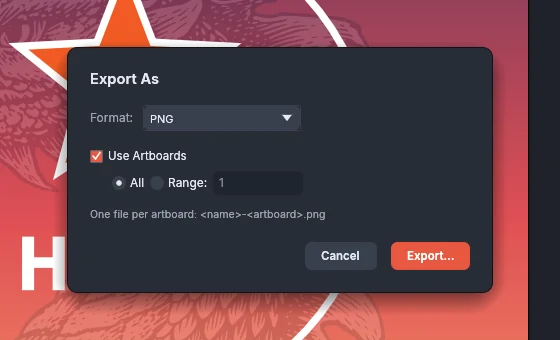
- Set Format to PNG and turn on Use Artboards with All selected. Without Use Artboards, the export covers the bounds of the visible art instead of the artboard.
- Press Export…, choose a folder and a file name, and save.
- In PNG Options, check the settings and press Export.
| PNG option | Default | What it sets |
|---|---|---|
| Resolution | Screen (72 ppi) | The pixel size. |
| Background Color | Transparent | Transparent, White, Black or Other. |
| Anti-aliasing | Art Optimized | None, Art Optimized or Type Optimized. |
| Interlaced | Off | Writes an interlaced PNG. |
At 72 ppi, one pixel covers one point, so the badge exports at 1080 × 1080 px. Resolution also offers Medium (150 ppi), High (300 ppi) and Other. Background Color starts as White when the document’s Background Contents is White.
11. Export an SVG
Section titled “11. Export an SVG”- Choose File → Export → Export As SVG….
- SVG Options opens. Check the settings and press OK.
- Choose a folder and a file name, and save.
The SVG file opens in web browsers and other drawing programs. Export for screens and the web covers the SVG options and Export for Screens.
Find any command
Section titled “Find any command”You can search for commands and tools by name.
- Choose Help → Search Commands… (Ctrl+Shift+/, or Cmd+Shift+/ on macOS), or click the search button (the magnifying glass) at the right end of the menu bar.
- Type part of a command or tool name, for example
zoom. The list shows up to 14 matches, each command with its menu path and its shortcut. - Press the Up and Down arrow keys to highlight a result, then press Enter to run it. You can also click a result.
When the active tool has no hints of its own, the hint line shows the shortcut that opens the search box. Automate VectorCraft covers the search box, keyboard shortcuts, actions and the command line.
Shortcuts to learn first
Section titled “Shortcuts to learn first”| Action | Windows and Linux | macOS |
|---|---|---|
| Selection Tool | V | V |
| Direct Selection Tool (edit single points) | A | A |
| Rectangle Tool | M | M |
| Pen Tool | P | P |
| Type Tool | T | T |
| Hand Tool (or hold Space) | H | H |
| Zoom Tool | Z | Z |
| New… | Ctrl+N | Cmd+N |
| Place | Ctrl+Shift+P | Cmd+Shift+P |
| Save | Ctrl+S | Cmd+S |
| Undo (Redo adds Shift) | Ctrl+Z | Cmd+Z |
| Group | Ctrl+G | Cmd+G |
| Fit Artboard in Window | Ctrl+0 | Cmd+0 |
| Search Commands | Ctrl+Shift+/ | Cmd+Shift+/ |
Edit → Keyboard Shortcuts… changes them.
Next steps
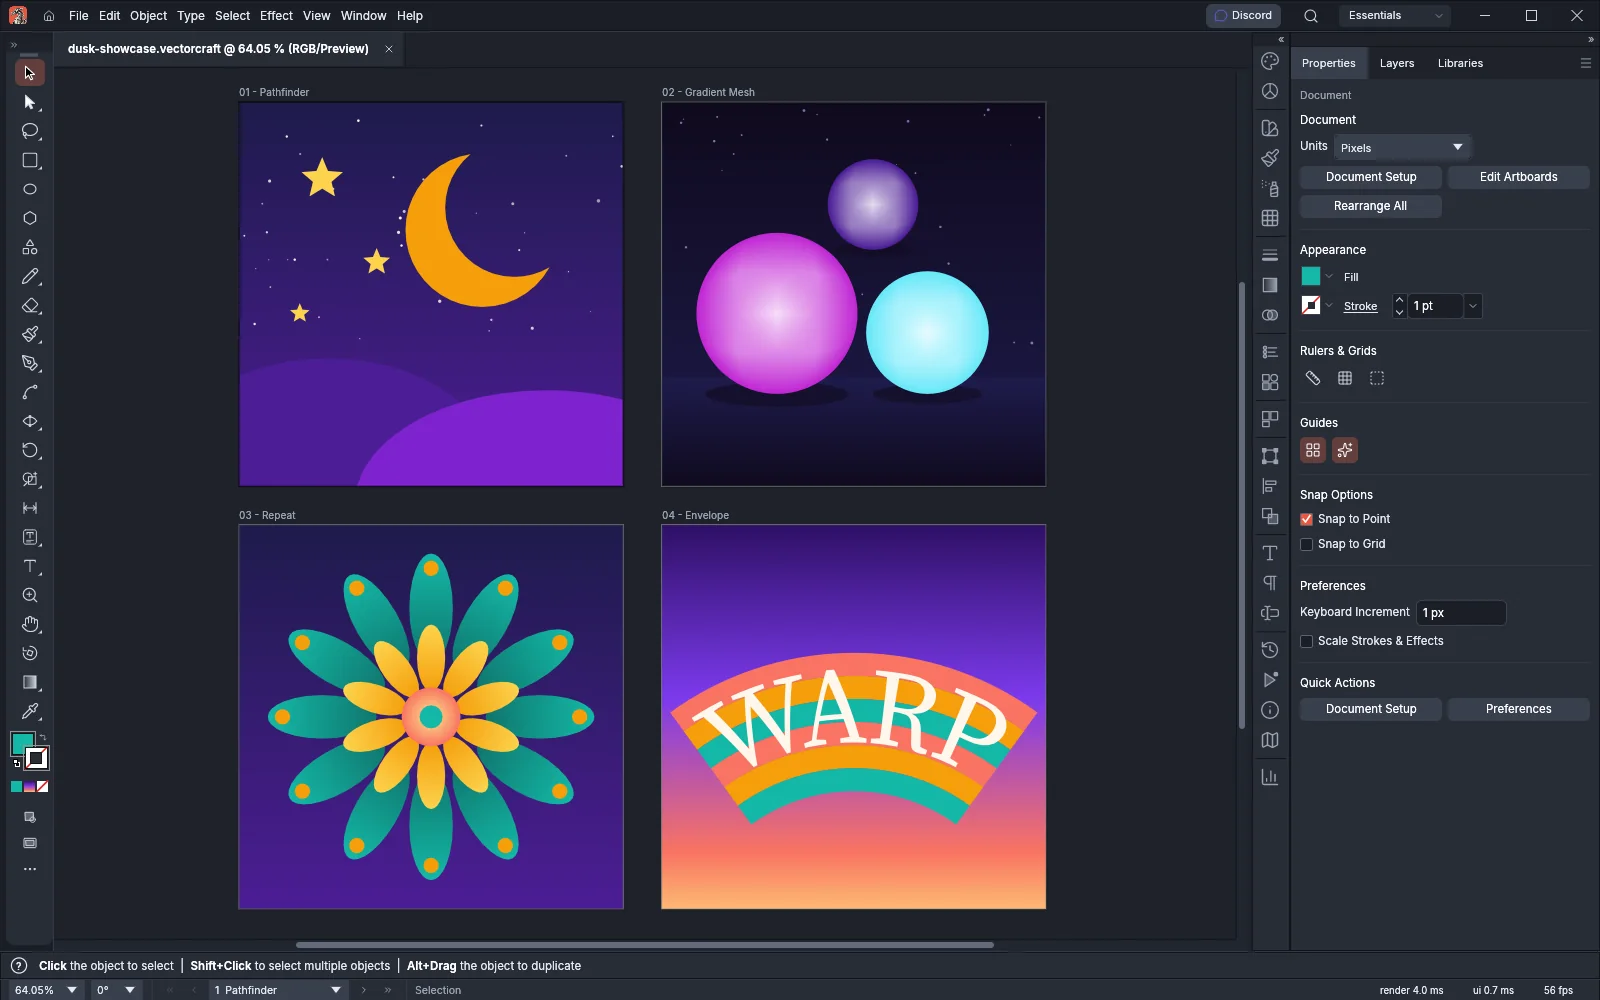
Section titled “Next steps”The following screenshot shows four artboards made with tools that the guides cover: Pathfinder, Gradient Mesh, Repeat and Envelope Distort.
Each step of this guide has a guide of its own:
| Step | Guide |
|---|---|
| 1. Install VectorCraft | Install and update |
| 2. Tour the window | Customize the workspace |
| 3. Create a document | Set up a document and artboards |
| 4. Make the background | Fill, stroke and color and Open and save files |
| 5. Draw shapes and a path | Draw and transform shapes and Draw and edit paths |
| 6. Color the shapes | Fill, stroke and color |
| 7. Add a line of type | Add and style type |
| 8. Arrange and group | Arrange, group and align |
| 9. Save a VectorCraft file | Open and save files |
| 10. Export a PNG and 11. Export an SVG | Export for screens and the web |
| Find any command | Automate VectorCraft |
Workflows lists every task guide, and Troubleshooting covers what to do if the window does not open or something looks wrong.