Glossary
This page defines the terms the VectorCraft guides use, in alphabetical order, and links each term to the guide that teaches it.
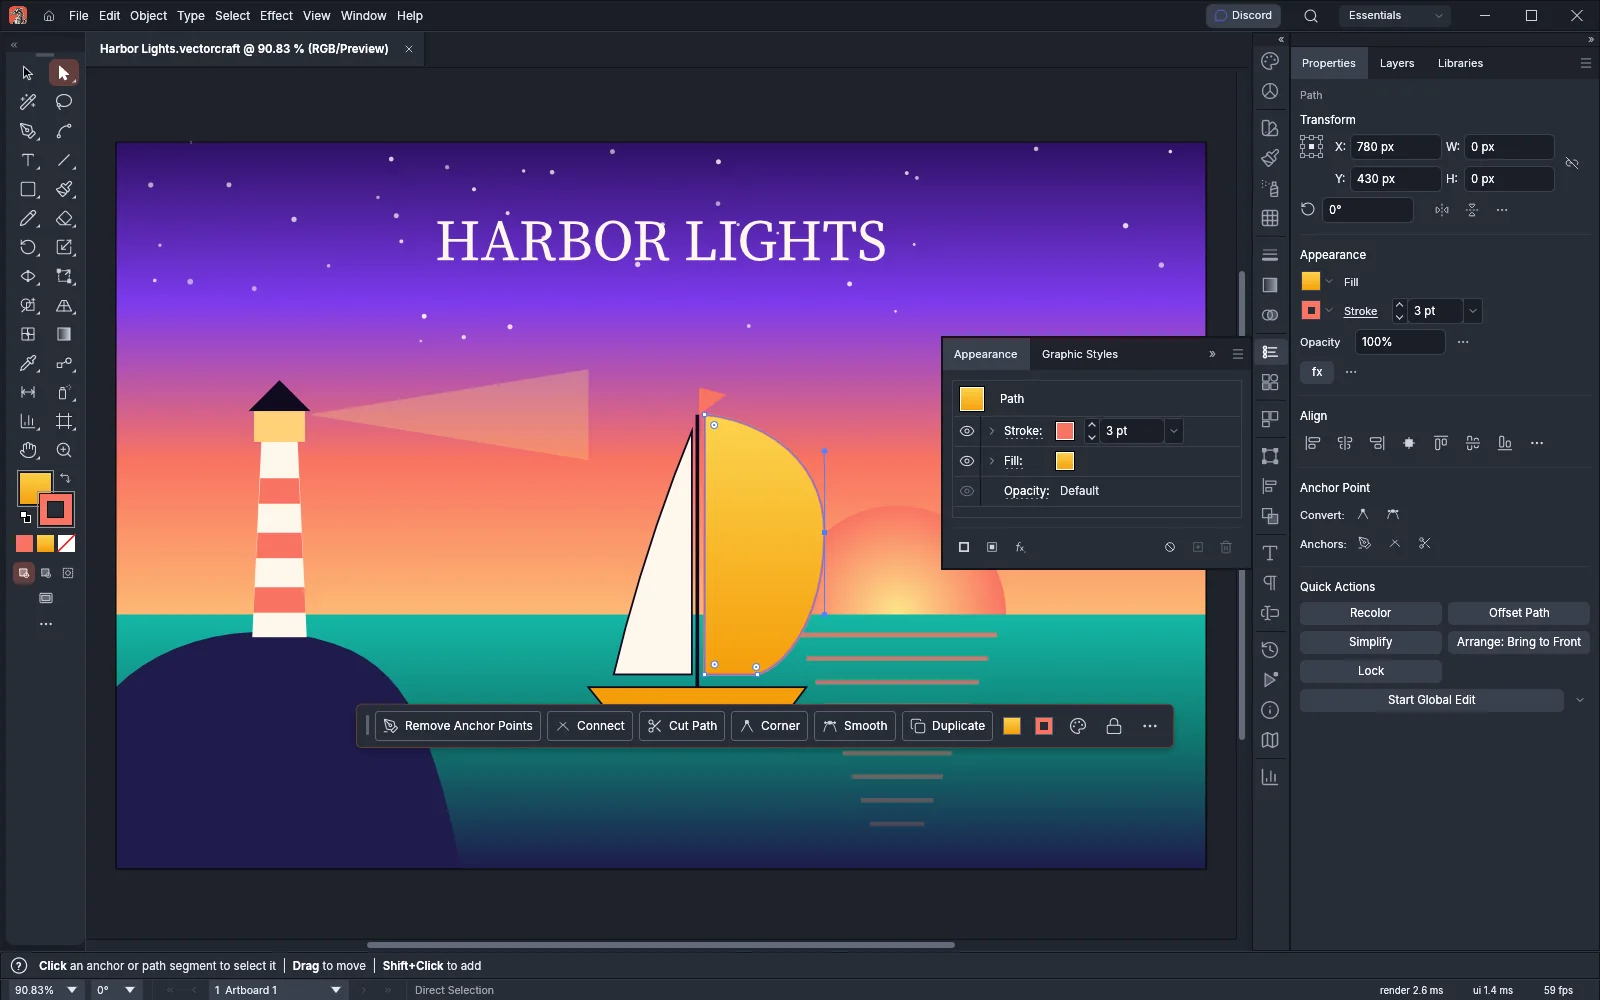
The following image shows several of these terms at once. The sail of the boat is a path selected with the Direct Selection Tool, the anchor point at the widest point of its curved edge is selected, its two direction handles stand out from the edge above and below it, and the Appearance panel lists the path’s stroke and fill.
A to C
Section titled “A to C”Anchor point. An anchor point is a point on a path where one segment ends and the next one begins. A smooth anchor point keeps its two direction handles in line, so the path passes through it without a bend. A corner anchor point has no handles, or handles that move on their own, so the path changes direction there. The Direct Selection Tool (A) selects and moves single anchor points. See Draw and edit paths.
Appearance. An object’s appearance is everything that paints it: its fills, its strokes, the effects on each of them and on the whole object, and its opacity. The Appearance panel (Window → Appearance) lists these rows, and you can change or remove each one later. See Apply effects and appearance.
Area type. Area type is text that wraps at the edges of a frame or a closed path. Type → Area Type Options… sets its rows, columns, gutters and inset, and Type → Convert To Area Type turns point type into area type. See Add and style type.
Artboard. An artboard is a page of the document. One document can hold several artboards. The Artboard Tool (Shift+O) and the Artboards panel (Window → Artboards) add and arrange them. See Set up a document and artboards.
Bleed. The bleed is an area outside the edges of the artboard that art can extend into, so that no white edge shows after the printed sheet is trimmed. File → Document Setup… sets it from 0 to 72 pt on each side. See Set up a document and artboards.
Blend. A blend fills the space between two or more objects with steps that change in shape and color from one object to the next. Object → Blend → Make or the Blend Tool (W) makes one, and the blend stays live when you change the original objects. See Make patterns, blends and repeats.
Bounding box. The bounding box is the rectangle drawn around the selected objects. Drag its handles to scale the selection. View → Hide Bounding Box hides it. See Draw and transform shapes.
Canvas. The canvas is the work area around the artboards. You can keep art on the canvas while you work. See Overview.
Clipping mask. A clipping mask shows the objects under it only where they fall inside its shape. Object → Clipping Mask → Make turns the topmost selected object into the clipping path, and the result is a clip group. See Combine and cut shapes.
Color group. A color group is a named set of solid color swatches in the Swatches panel. Click New Color Group at the bottom of the panel to make one. See Fill, stroke and color.
Compound path. A compound path joins several paths into one object with one paint. Where a path in front overlaps the back-most path, it cuts a hole. Object → Compound Path → Make makes one, and Object → Compound Path → Release splits it again. See Combine and cut shapes.
Compound shape. A compound shape shows the combined area of its members, and each member stays editable. Object → Plug-ins → Compound Shapes → Make Compound Shape makes one. See Built-in plug-ins.
D to G
Section titled “D to G”Direction handle. A direction handle is a line that extends from an anchor point on a curved segment. The length and angle of each handle set the shape of the curve on that side of the anchor point. Drag a handle with the Direct Selection Tool to change the curve. See Draw and edit paths.
Document color mode. The document color mode is CMYK Color for print or RGB Color for screens. Change it with File → Document Color Mode, which converts the colors in the document. The document tab shows the mode, for example (RGB/Preview). See Set up a document and artboards.
Effect (live effect). An effect, such as a drop shadow, changes how an object looks but leaves its path as it is. Effects come from the Effect menu and stay live, so you can change or remove them at any time in the Appearance panel. Object → Expand Appearance turns them into ordinary objects. See Apply effects and appearance.
Embedded image. See linked and embedded image.
Envelope. An envelope bends artwork, type included, into a shape. Object → Envelope Distort makes one with Make with Warp…, Make with Mesh… or Make with Top Object, which uses the shape on top. The envelope stays live: Object → Envelope Distort → Edit Contents edits the art inside, and Object → Envelope Distort → Expand makes the distortion permanent. See Apply effects and appearance.
Fill. The fill paints the inside of a path with a color, a gradient or a pattern. See Fill, stroke and color.
Flyout. A flyout is the row of related tools that opens from a button in the Tools panel. A small triangle in the corner of a button marks a group with more than one tool. Press and hold the button, right-click it, or click the triangle to open the flyout. See Tools reference.
Global color. A global color is a swatch that stays linked to the art painted with it. When you edit the swatch with Swatch Options…, every object that uses it changes color. Turn on Global in the New Swatch dialog to make one. A spot color is always global. See Fill, stroke and color.
Gradient mesh. A gradient mesh shades a shape smoothly between color points. Each mesh point has its own color, and the color blends toward the neighboring points along the mesh lines. Object → Create Gradient Mesh… or the Mesh Tool (U) makes one. See Fill, stroke and color.
Graphic style. A graphic style stores an object’s whole appearance: its fills, strokes, effects, opacity and blend mode. The Graphic Styles panel (Window → Graphic Styles) lists the styles in the document. Click a style to apply it to the selected objects, which stay linked to that style. See Apply effects and appearance.
Group. A group holds objects so that they move and scale together. Object → Group makes a group, and Object → Ungroup separates the objects again. See Arrange, group and align.
Guide. A guide is a line on the canvas that art snaps to. Drag from a ruler onto the canvas to make one. View → Guides hides, locks, makes, releases and clears guides. See Set up a document and artboards.
H to O
Section titled “H to O”Instance. See symbol and instance.
Isolation mode. In isolation mode you edit the contents of one group, and you cannot select the rest of the artwork. Double-click a group with the Selection Tool to enter it, and press Esc to leave it. See Arrange, group and align.
Key object. The key object is the selected object that stays in place while the other selected objects are aligned to it or spaced from it. Click one of the selected objects again to make it the key object. It is drawn with a thicker outline. See Arrange, group and align.
Layer and sublayer. A layer holds groups and objects in a stacking order, and a sublayer is a layer inside another layer. The Layers panel (Window → Layers) lists them. New art goes into the current layer. See Organize with layers and symbols.
Linked and embedded image. A linked image is placed from a file and stays connected to that file, so VectorCraft can update it when the file changes. An embedded image stores its pixels in the document and has no file. File → Place… links or embeds an image, and the Links panel (Window → Links) shows the status of each one and embeds linked images. See Work with placed images.
Live effect. See effect.
Live Paint group. A Live Paint group treats overlapping paths as a set of regions, called faces, and the path segments between crossings, called edges. You can fill each face and stroke each edge on its own. Object → Live Paint → Make (Ctrl+Alt+X, or Cmd+Option+X on macOS) makes one, and the Live Paint Bucket (K) paints it. See Combine and cut shapes.
Opacity mask. An opacity mask uses the brightness of the mask art to set the opacity of the art under it. White shows the art, black hides it, and grays make it partly transparent. Click Make Mask in the Transparency panel (Window → Transparency) to make one. See Fill, stroke and color.
Outline mode. In Outline mode the canvas shows only the outlines of paths. View → Outline (Ctrl+Y, or Cmd+Y on macOS) switches between Outline and Preview, and the document tab shows which one is on. See Set up a document and artboards.
Overprint. By default an object knocks out the inks under it, so only its own ink prints there. An object set to overprint prints on top of the inks below it, and the inks mix. Overprint Fill and Overprint Stroke in the Attributes panel set it, and View → Overprint Preview shows the result on screen. See Manage color and proof for print.
P to S
Section titled “P to S”Path. A path is a line made of segments that run between anchor points. Every shape, line and letter outline is a path. A path can be open, with two ends, or closed. See Draw and edit paths.
Pattern. A pattern swatch repeats a tile of artwork to fill or stroke an object. Object → Pattern → Make adds the selected art to the Swatches panel as a pattern and opens pattern editing mode. See Make patterns, blends and repeats.
Point type. Point type is text that starts where you click with the Type Tool (T). It does not wrap, and each line ends where you press Enter. See Add and style type.
Process color. A process color is printed as a mix of cyan, magenta, yellow and black inks. A spot color has an ink of its own. In the New Swatch and Swatch Options dialogs, Color Type is Process Color or Spot Color. See Manage color and proof for print.
Raster effect. A raster effect works on the pixels of the object’s image, at the resolution that Effect → Document Raster Effects Settings… sets. The Effect menu lists raster effects under its Raster Effects heading, and they stay live like vector effects. See Apply effects and appearance.
Rasterize. To rasterize is to turn vector art into an image made of pixels. Object → Rasterize… does it for the selected objects. See Work with placed images.
Repeat. A repeat shows copies of one piece of art in a radial, grid or mirror arrangement. When you change the art, every copy changes with it. Object → Repeat makes one, and Object → Repeat → Options… changes the arrangement. See Make patterns, blends and repeats.
Segment. A segment is the part of a path between two anchor points. It is straight, or curved by the direction handles at its ends. See Draw and edit paths.
Slice. A slice is a rectangle that divides the artwork for web output, and each image slice is saved as an image of its own. The Slice Tool (Shift+K) draws a slice, and Object → Slice → Make makes one from the bounds of an object. See Slice artwork for the web.
Smart guides. Smart guides are temporary guides that snap the pointer to the edges, centers and anchor points of art and artboards. View → Smart Guides (Ctrl+U, or Cmd+U on macOS) turns them on or off. See Set up a document and artboards.
Spot color. A spot color prints with its own premixed ink on its own plate, instead of being built from cyan, magenta, yellow and black. Set Color Type to Spot Color in the New Swatch or Swatch Options dialog to make one. See Manage color and proof for print.
Stroke. The stroke paints the outline of a path. The Stroke panel (Window → Stroke) sets its weight and its other options. See Fill, stroke and color.
Sublayer. See layer and sublayer.
Swatch. A swatch is a named color, gradient or pattern saved in the document. The Swatches panel (Window → Swatches) lists the swatches. Click a swatch to paint the active fill or stroke box with it. See Fill, stroke and color.
Symbol and instance. A symbol is art stored once in the document. Each copy of it on the canvas is an instance, and every instance changes when you edit the symbol. The Symbols panel (Window → Symbols) lists the symbols. See Organize with layers and symbols.
T to Z
Section titled “T to Z”Target. Each row of the Layers panel has a target circle. Click the circle of a layer to target the layer: its art is selected, it becomes the current layer, and effects, appearance and transparency changes then apply to the layer as a whole instead of to each object. Click the circle of a group or an object to select it. The circle is filled when the item has its own fills, strokes or effects, or an opacity, blend mode or mask that is not the default. See Panels.
Text thread. A text thread is the line VectorCraft draws between frames of threaded text to show the order the text flows in. View → Hide Text Threads hides these lines. See Add and style type.
Threaded text. Threaded text is one story that flows through several frames in order. Area type and type on a path can be threaded in any mix. Type → Threaded Text → Create threads the selected frames. See Add and style type.
Type on a path. Type on a path is text that runs along the outline of a path. Click an open path with the Type Tool, or any path with the Type on a Path Tool, and type. Type → Type on a Path → Type on a Path Options… sets how the text sits on the path. See Add and style type.
Workspace. A workspace is a saved arrangement of the bars, the Tools panel and the panels. VectorCraft starts in Essentials. Window → Workspace switches to another workspace, such as Painting, Typography or Layout, and Window → Workspace → New Workspace… saves your own. See Customize the workspace.
Related
Section titled “Related”- Overview
- Getting started
- Tools reference
- Draw and edit paths
- Fill, stroke and color
- Apply effects and appearance
- Organize with layers and symbols
- Combine and cut shapes
- Set up a document and artboards
- Add and style type
- Manage color and proof for print
- Work with placed images
- Make patterns, blends and repeats