
Pick and sample colors
This guide covers the Color Picker, the Color panel menu’s Invert, Complement and Copy Color Value (Hex) commands, Sample Color from Screen, and the Eyedropper Options dialog.
These keys open the panel and the tool that this guide uses. They are the same on every platform.
| Tool or panel | Key |
|---|---|
| Color panel | F6 |
| Eyedropper tool | I |
Open the Color Picker
Section titled “Open the Color Picker”- Select the objects you want to paint. With nothing selected, the color you pick becomes the paint for the next object you draw.
- Double-click the Fill box to pick a fill color, or the Stroke box to pick a stroke color. The Fill and Stroke boxes in the Tools panel, the Color panel, the Color Wheel panel, the Gradient panel and the Swatches panel all open the picker this way.
- Pick a color using any of the methods in the sections below. While the picker is open, the selected art shows each new color as you pick it.
- Click OK to keep the color, or Cancel to put the art back as it was.
The picker starts on the color in the box you double-clicked. For a gradient, that is the gradient’s first stop. OK applies the color as one undo step and also makes it the base color of the Color Guide panel. In a CMYK document, the picker stores an RGB color as CMYK.
To pick an artboard’s background color, click the Fill chip in the Artboards section of the Properties panel, or choose Color Picker… from the Fill menu beside it. The picker then shows the color on the artboard’s paper.
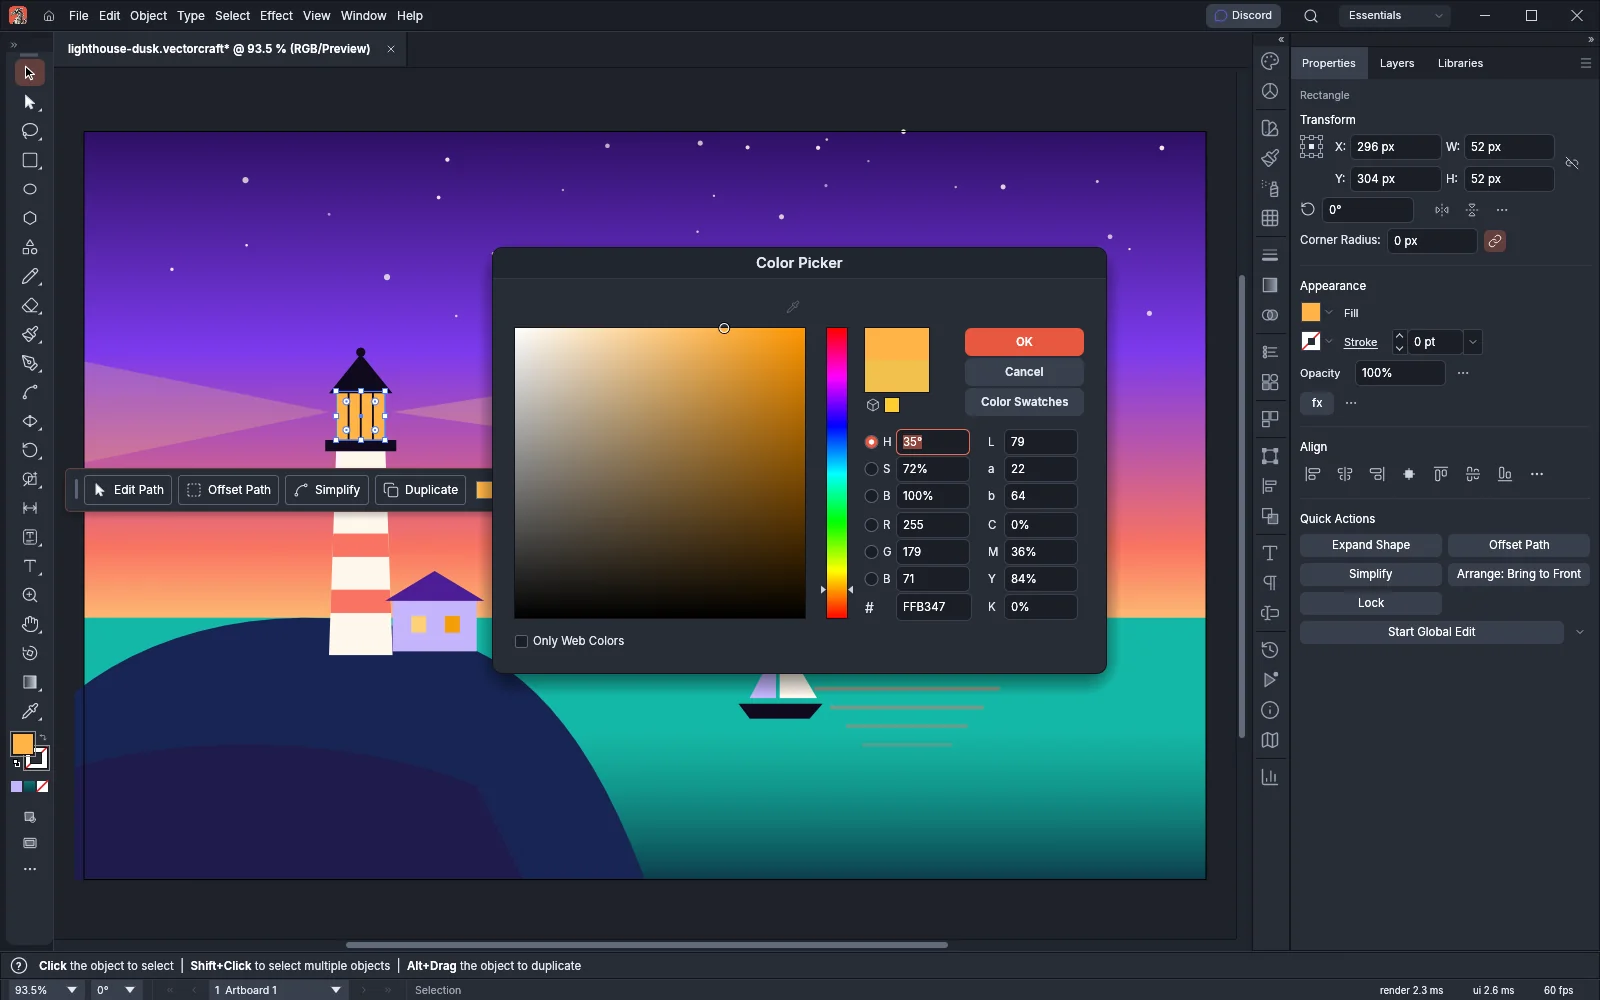
Pick in the color field
Section titled “Pick in the color field”The large square is the color field and the narrow bar beside it is the channel slider. The slider changes one channel, and the field shows the other two.
- Click the radio button next to H, S, B, R, G or B to choose the channel the slider changes. H (hue) is chosen when the picker opens.
- Drag the slider to set that channel. With H chosen, the slider shows the whole spectrum.
- Click or drag in the field to set the other two channels.
- To nudge the color, click the field and press the arrow keys. Each press moves one unit: one degree of hue, one percent of saturation or brightness, or one level of red, green or blue.
Two chips at the top of the dialog show the new color next to the original. The top chip shows the new color, and the bottom chip shows the color the picker started with. Click the bottom chip to go back to the original color.
Type exact values
Section titled “Type exact values”The picker shows the same color in four color models and as a hex value. Type in any field and the others update.
| Field | Range |
|---|---|
| H | 0 to 360 degrees |
| S, B | 0 to 100% |
| R, G, B | 0 to 255 |
| # | Six hex digits, such as FFB347 |
| L | 0 to 100 |
| a, b | -128 to 127 |
| C, M, Y, K | 0 to 100% |
Press Tab to move through the fields in this order: H, S, B, R, G, B, the hex field, then L, a, b, C, M, Y and K. Tab also stops on each channel’s radio button before its field.
Correct out-of-gamut and web colors
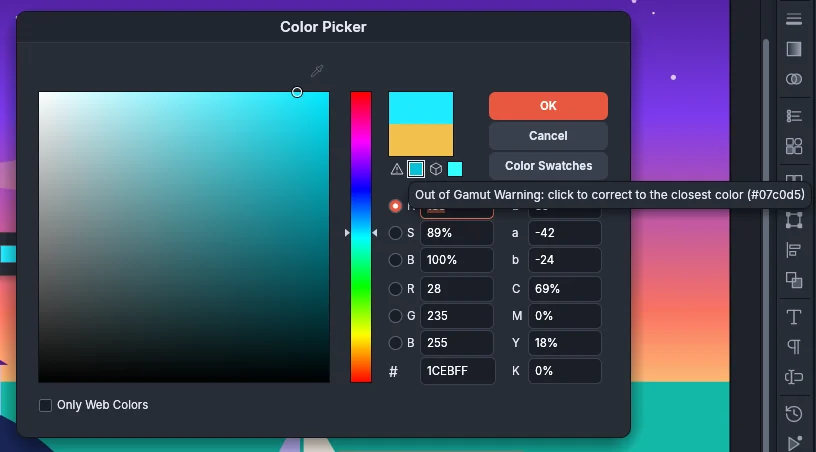
Section titled “Correct out-of-gamut and web colors”Two warnings can appear below the New and Original chips. Each warning has an icon and a chip that shows the closest safe color.
| Warning | When it appears | What the chip picks |
|---|---|---|
| Out of Gamut Warning | The color is outside the printable CMYK range of the current color settings | The closest color that prints |
| Out of Web Color Warning | The color is not a web color and Only Web Colors is off | The closest web color |
- Point at a warning chip. Its tooltip names the warning and the hex value of the corrected color.
- Click the chip to replace the picked color with the corrected one.
Turn on Only Web Colors to keep every pick on a web color. A web color uses only the values 00, 33, 66, 99, CC and FF in each of its red, green and blue channels. With the option on, the field and the slider show only web colors, and any color you type snaps to the nearest one.
For color settings, profiles and soft proofing, see Manage color and proof.
Pick from the document’s swatches
Section titled “Pick from the document’s swatches”- Click Color Swatches. The color field changes to a list of the document’s solid color swatches, including the swatches inside color groups.
- Click a swatch to pick its color. Each row shows the swatch’s chip and name, and the row of the current color is marked.
- Click Color Models to go back to the color field.
The picker copies the swatch’s color. The art does not stay linked to the swatch. To link art to a swatch, click the swatch in the Swatches panel instead. See Organize swatches and color groups.
Invert, complement and copy a color in the Color panel
Section titled “Invert, complement and copy a color in the Color panel”The Color panel menu changes or copies the color in the active Fill or Stroke box.
- Select the objects and bring the Fill box or the Stroke box to the front.
- Open the Color panel with Window → Color (F6).
- Click the menu button at the top right of the panel and choose a command.
| Command | What it does |
|---|---|
| Invert | Replaces each red, green and blue value with its opposite, so white becomes black. A gray inverts its ink amount. |
| Complement | Replaces the color with its complement. For an RGB color, this turns the hue by 180 degrees. A gray stays as it is. |
| Create New Swatch… | Saves the color as a swatch. |
| Copy Color Value (Hex) | Copies the color to the clipboard as a hex value, such as #14b8a6. |
Invert and Complement keep each object in its own color model, so a CMYK color stays CMYK. When a gradient stop is selected in the Gradient panel, they recolor that stop. When the selected objects have different colors, the active box shows a question mark. Invert and Complement still work then, and they recolor each object from its own color. Create New Swatch… and Copy Color Value (Hex) need a single color, so they are dimmed in that case. All four commands are dimmed when the active box holds no color.
You can also apply them from the spectrum bar at the bottom of the Color panel:
| Action | Windows and Linux | macOS |
|---|---|---|
| Complement | Ctrl-click the spectrum | Cmd-click the spectrum |
| Invert | Ctrl+Shift-click the spectrum | Cmd+Shift-click the spectrum |
| Apply to the inactive box | Add Alt | Add Option |
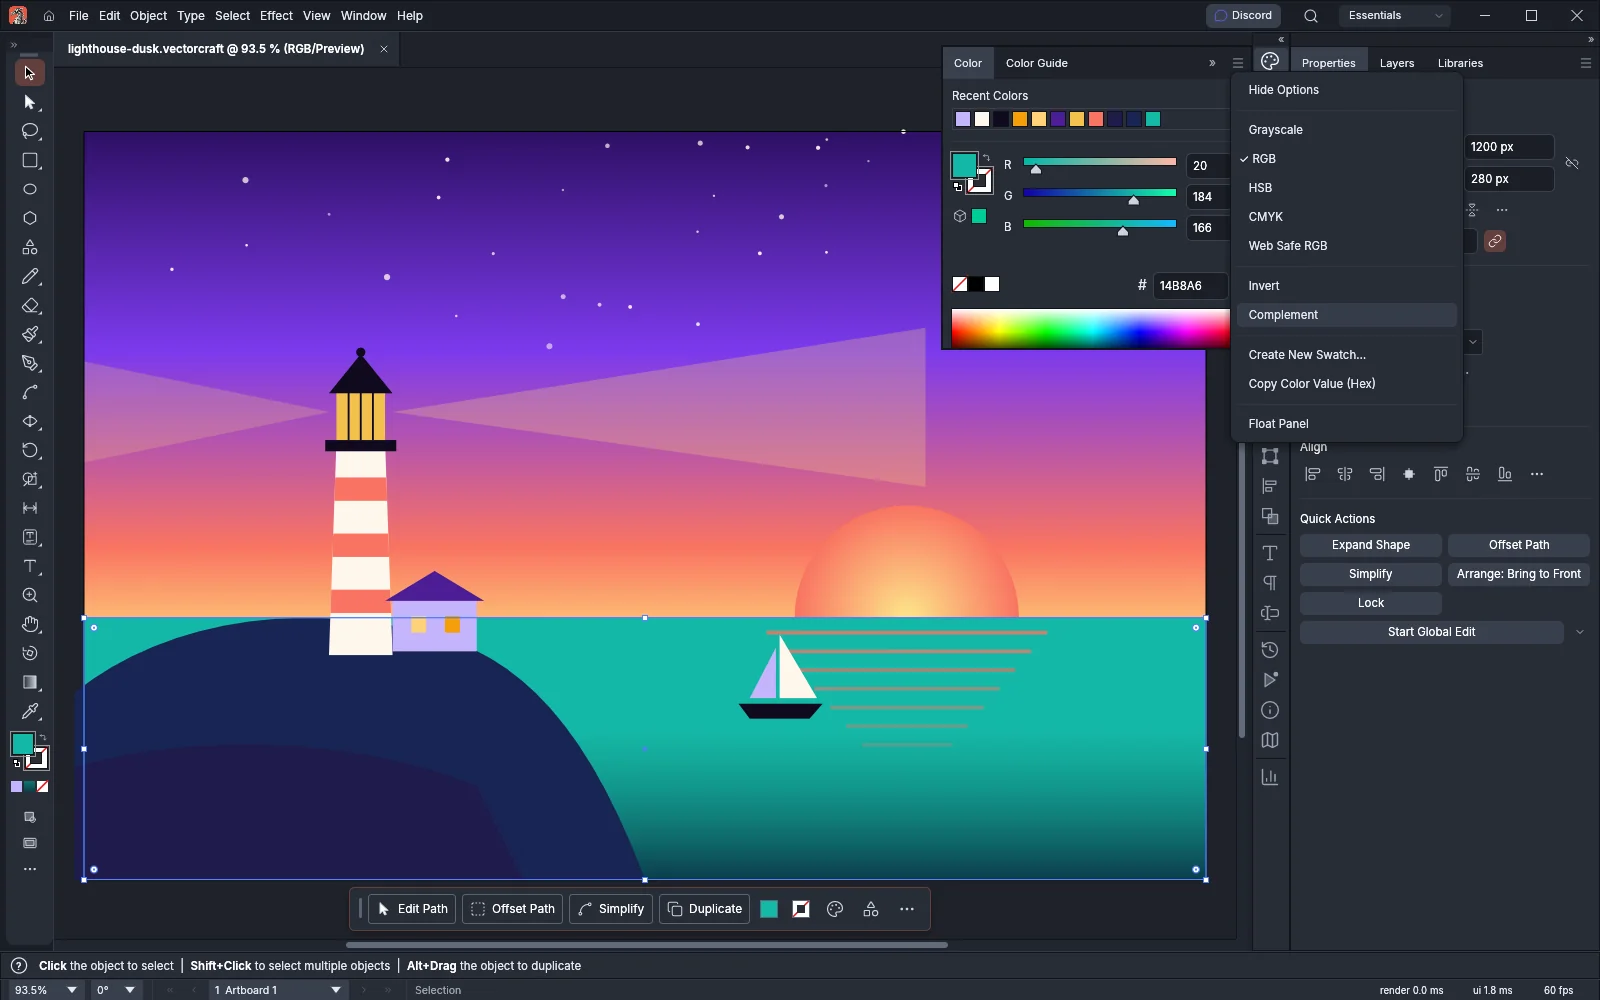
In RGB and HSB modes, the Color panel shows the same out-of-gamut warning as the Color Picker, below the Fill and Stroke boxes. The out-of-web warning appears in every mode except Web Safe RGB and Grayscale.
Sample a color from the screen
Section titled “Sample a color from the screen”Sample Color from Screen picks a color from anywhere on your screen, including other apps. It works on macOS and in the web version in browsers that support color sampling. On Windows and Linux, the eyedropper button in the Color Picker is gray, and its tooltip reads “This system has no screen color sampler”.
- Open the Color Picker.
- Click the eyedropper button above the color field.
- Click anywhere on the screen. The color you click becomes the picker’s color.
- Press Esc instead to cancel. The colors stay as they were.
You can also give Sample Color from Screen its own key and paint the selection without opening the picker:
- Choose Edit → Keyboard Shortcuts….
- Find the entry Sample Color from Screen and give it a key.
- Select the objects, bring the Fill box or the Stroke box to the front, and press the key.
- Click anywhere on the screen. The color you click becomes the active fill or stroke as one undo step.
The sampled color is converted from the screen’s sRGB into the working RGB space set in the color settings.
Choose what the Eyedropper copies
Section titled “Choose what the Eyedropper copies”The Eyedropper tool (I) copies the attributes of an object you click onto the selected objects. The options set which attributes it copies.
| Action | What it does |
|---|---|
| Click an object | Copies its attributes to the selected objects. Its fill, stroke and stroke weight also become the paint for new art, as the options allow. |
| Alt-click (Option-click on macOS) | Copies the attributes of the first selected object onto the object you click. With nothing selected, it copies what the Eyedropper picked up last. |
| Shift+Alt-click (Shift+Option-click on macOS) | Adds the clicked object’s appearance to the selected objects’ appearance |
| Shift-click | Samples only the color under the pointer into the active Fill or Stroke box |
To set the options:
- Double-click the Eyedropper tool in the Tools panel. The Eyedropper Options dialog opens.
- Choose a Raster Sample Size for clicks on placed images.
- Check the attributes the Eyedropper reads under Eyedropper Picks Up:, and the attributes it writes under Eyedropper Applies:.
- Click OK.
| Raster Sample Size | What it samples |
|---|---|
| Point Sample | The single pixel under the pointer. This is the default. |
| 3 x 3 Average | The average of a 3 by 3 pixel square around the pointer |
| 5 x 5 Average | The average of a 5 by 5 pixel square around the pointer |
Both columns list the same attributes:
| Group | Attributes |
|---|---|
| Appearance | Transparency |
| Focal Fill (under Appearance) | Color, Transparency, Overprint |
| Focal Stroke (under Appearance) | Color, Transparency, Overprint, Weight, Cap, Join, Miter Limit, Dash Pattern |
| Character Style | The type’s character attributes, such as font, size, leading and tracking |
| Paragraph Style | The type’s paragraph attributes |
Every attribute is checked by default. The Eyedropper copies an attribute only when it is checked in both columns. Checking or clearing a group’s box changes every attribute under it, and a group with some attributes on and some off shows a dash. VectorCraft saves these options in your preferences, so they apply to every document.
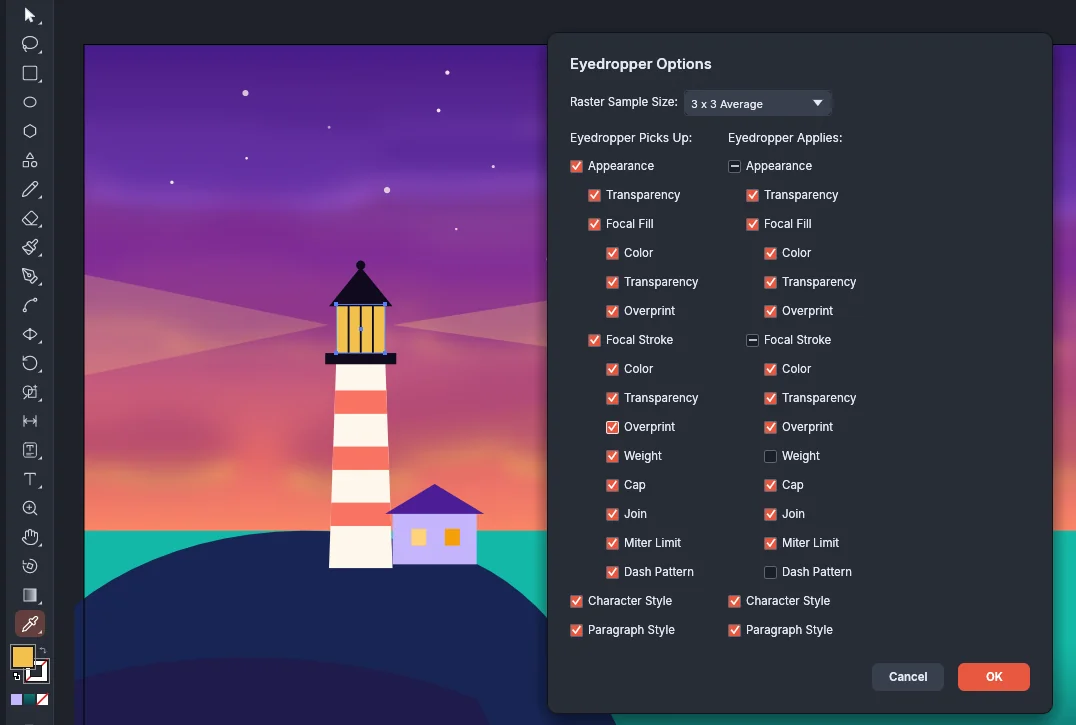
With these settings, a click copies the stroke’s color and style from another object but keeps the selected objects’ own stroke weight and dashes.