Mask artwork
This guide covers the two kinds of mask in VectorCraft, clipping masks and opacity masks. It shows how to draw and paste straight into a shape with Draw Inside, clip a whole layer from the Layers panel, change what a mask shows, and turn off, unlink or release an opacity mask. The basic steps for making each kind of mask are in Clip art with a clipping mask and Fade art with an opacity mask.
Choose a clipping mask or an opacity mask
Section titled “Choose a clipping mask or an opacity mask”A clipping mask uses the outline of a shape. Art inside the outline shows in full, and art outside it is hidden. An opacity mask uses the brightness of its mask art. White shows the art, black hides it, and grays make it partly transparent.
| Clipping mask | Opacity mask | |
|---|---|---|
| The mask | One path, compound path or type object, the clipping path | Any artwork, including gradients, images and groups |
| Edges | Hard, along the clipping path | Soft or hard, following the brightness of the mask art |
| Made with | Object → Clipping Mask → Make (Ctrl+7, or Cmd+7 on macOS), Draw Inside, or the Layers panel | Make Mask in the Transparency panel (Window → Transparency, Ctrl+Shift+F10, or Cmd+Shift+F10 on macOS) |
| Result | A clip group, or a clipping layer | The masked object keeps its place, and the mask belongs to it. Several selected objects under the mask are grouped first. |
| Use it for | Framing art in a shape, cropping art to a card or a window | Fades, vignettes and see-through edges |
Draw inside a shape
Section titled “Draw inside a shape”Draw Inside puts everything you draw or paste inside one shape, clipped to its outline.
- Select one path, compound path or type object. Draw Inside does not start with a group, an image or several objects selected.
- Press Shift+D until the drawing-mode button near the bottom of the toolbar shows Draw Inside. Shift+D steps through Draw Normal, Draw Behind and Draw Inside. When the toolbar shows two columns, it shows all three buttons, and you can click Draw Inside directly. If the selection is not one path, compound path or type object, Shift+D goes from Draw Behind back to Draw Normal and skips Draw Inside.
- Draw with any drawing tool. Dotted marks at the corners of the shape show which object you are drawing into, while the mode lasts.
- When you are done, press Shift+D to go back to Draw Normal.
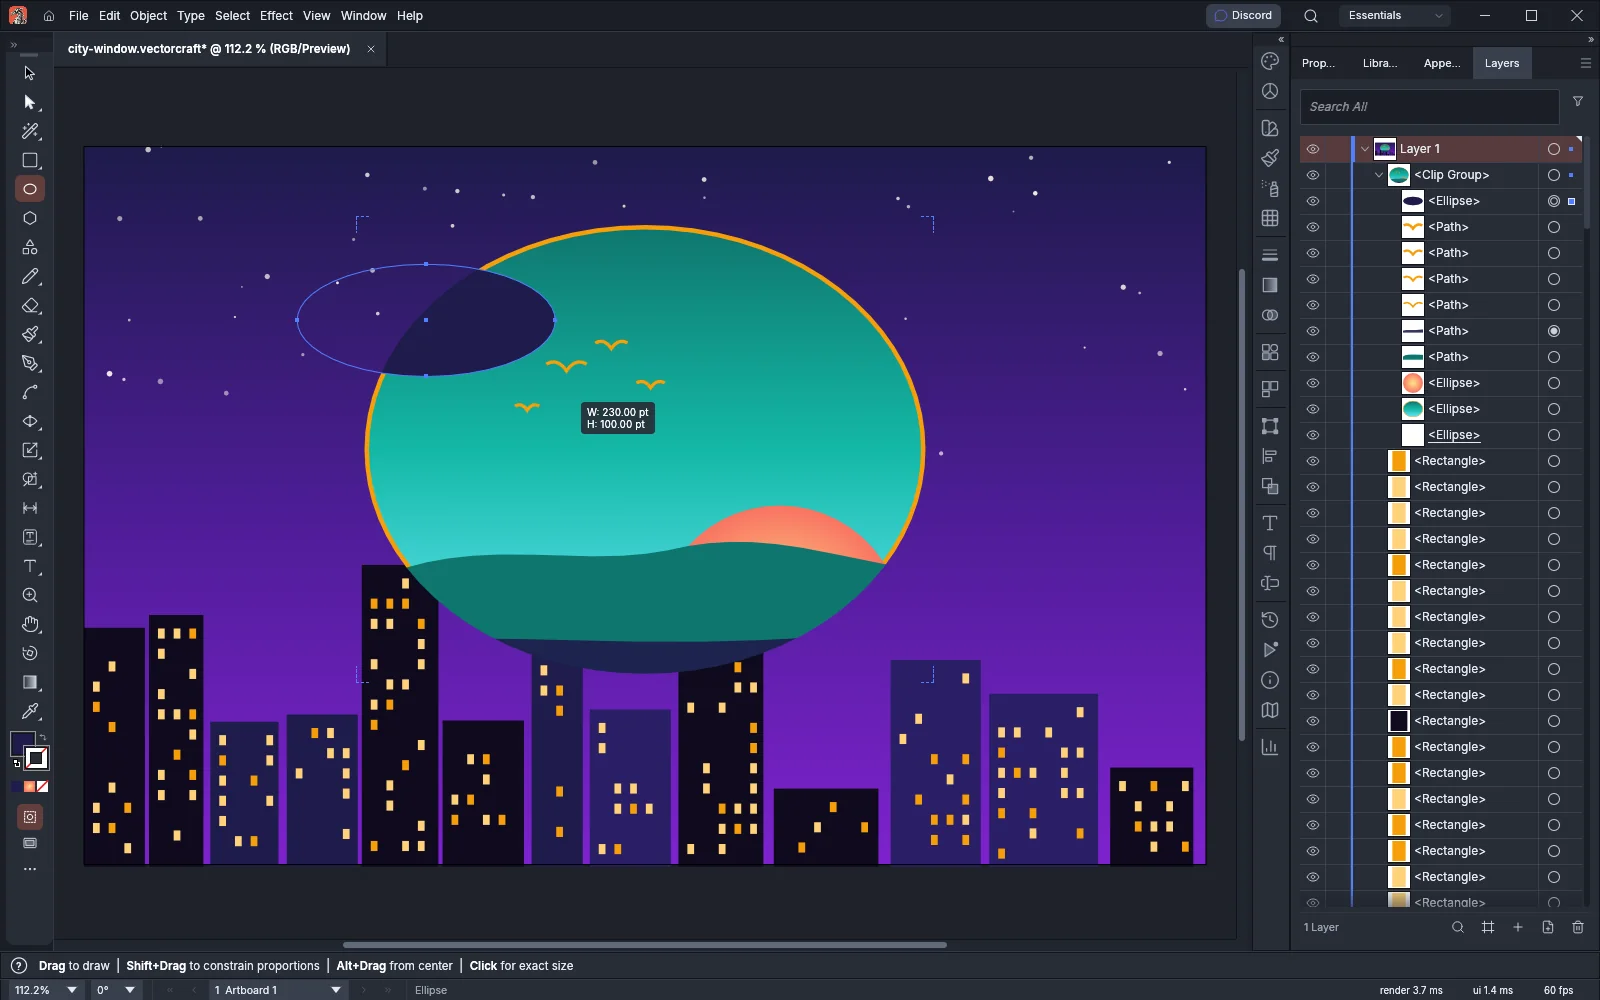
The first object you draw makes a clip group where the shape was. The group holds a copy of the shape with no fill or stroke as the clipping path, then the shape itself with its own fill and stroke, then the new art on top. Everything you draw after that goes into the same group, above the art already in it. If the shape is already the clipped object of a clip group, the art goes into that group.
New art goes into the same shape until you change the mode, even after you select other objects. If the shape is in isolation mode, isolation mode moves to its clip group.
Pasting follows the drawing mode as well:
- In Draw Inside, Edit → Paste (Ctrl+V, or Cmd+V on macOS), Edit → Paste in Place (Ctrl+Shift+V, or Cmd+Shift+V on macOS) and Edit → Paste on All Artboards put the objects inside the shape. Paste Remembers Layers does not apply.
- In Draw Behind, new art goes directly behind the selected objects, or at the bottom of the current layer when nothing is selected, and Paste in Place and Paste on All Artboards put the objects behind them as Paste in Back does.
- Paste in Front and Paste in Back keep their own places in every drawing mode.
Clip a layer or a group from the Layers panel
Section titled “Clip a layer or a group from the Layers panel”The Layers panel can turn the top object of a layer or group into a clipping path for everything else in it. Use it to crop a whole layer of artwork to a frame.
- Open the Layers panel with Window → Layers (F7).
- Put the frame shape at the top of the layer or group. It must be a path, a compound path or type.
- Click the layer’s or group’s row to highlight it.
- Click Make/Release Clipping Mask at the bottom of the panel, or choose it from the panel menu.
The top object loses its fill and stroke, moves to the bottom of the layer, and clips the rest of the layer. Its name in the panel is underlined. Art you add to the layer later goes above the clipping path and is clipped too. A new sublayer also goes above the clipping path.
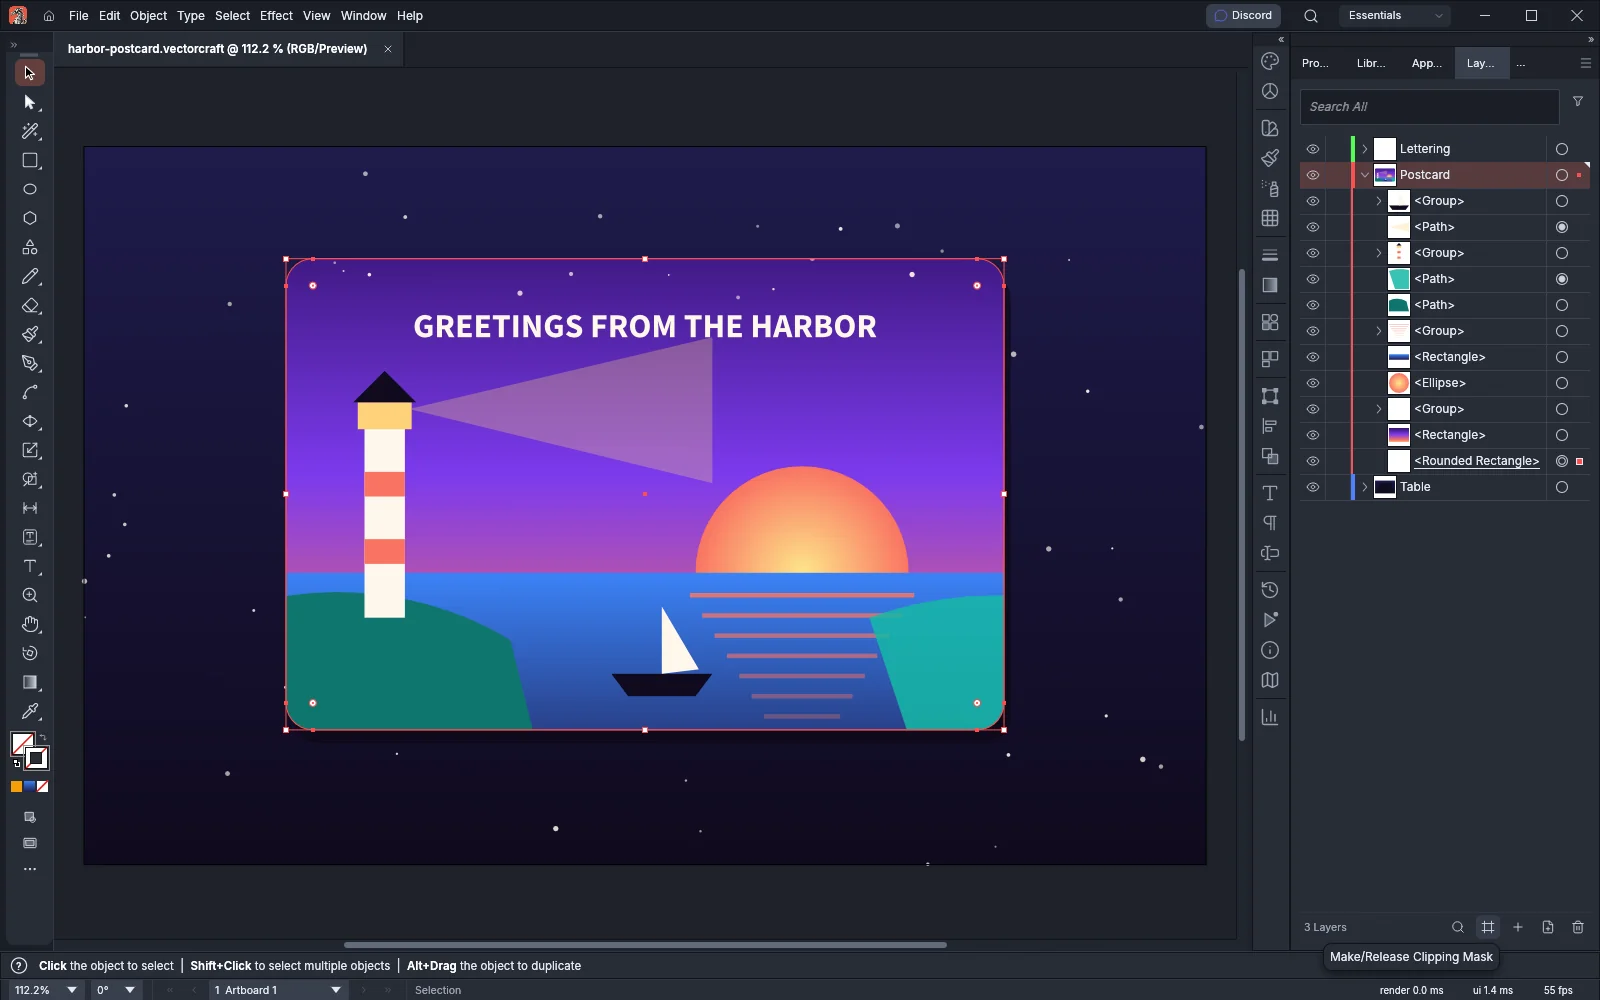
The button works on the one highlighted layer or group row. With no row highlighted, it works on the one selected group, and otherwise on the current layer. Ruler guides at the top of a layer do not count as its top object. A layer with no objects cannot be clipped.
To release the clipping, highlight the row and click Make/Release Clipping Mask again. The clipping path stays at the bottom of the layer, with no fill or stroke.
Edit what a clipping mask shows
Section titled “Edit what a clipping mask shows”A clip group keeps both the clipping path and the art inside it, so you can change either one at any time.
- To move or restyle the art inside the mask, select the clip group and choose Object → Clipping Mask → Edit Contents. It selects the clipped art.
- To reshape the mask, select the clip group and choose Object → Clipping Mask → Edit Clipping Path. It selects the clipping path.
- To work inside the group without touching the rest of the document, double-click the clip group with the Selection tool to enter isolation mode, as described in Edit a group in isolation mode.
- To add more art inside the mask, select the clipped shape and use Draw Inside. The new art goes into the existing clip group.
- To give the mask a visible edge, paint the clipping path after you make the mask. Its fill shows behind the clipped art, and its stroke shows over it.
Object → Clipping Mask → Release (Ctrl+Alt+7, or Cmd+Option+7 on macOS) turns the clip group into an ordinary group. The clipping path stays in the group. It has no fill or stroke unless you painted it after you made the mask.
Edit an opacity mask
Section titled “Edit an opacity mask”The mask art of an opacity mask can be edited in place with every tool and command, like any other artwork.
- Select the masked object.
- In the Transparency panel, click the mask thumbnail, the right-hand thumbnail.
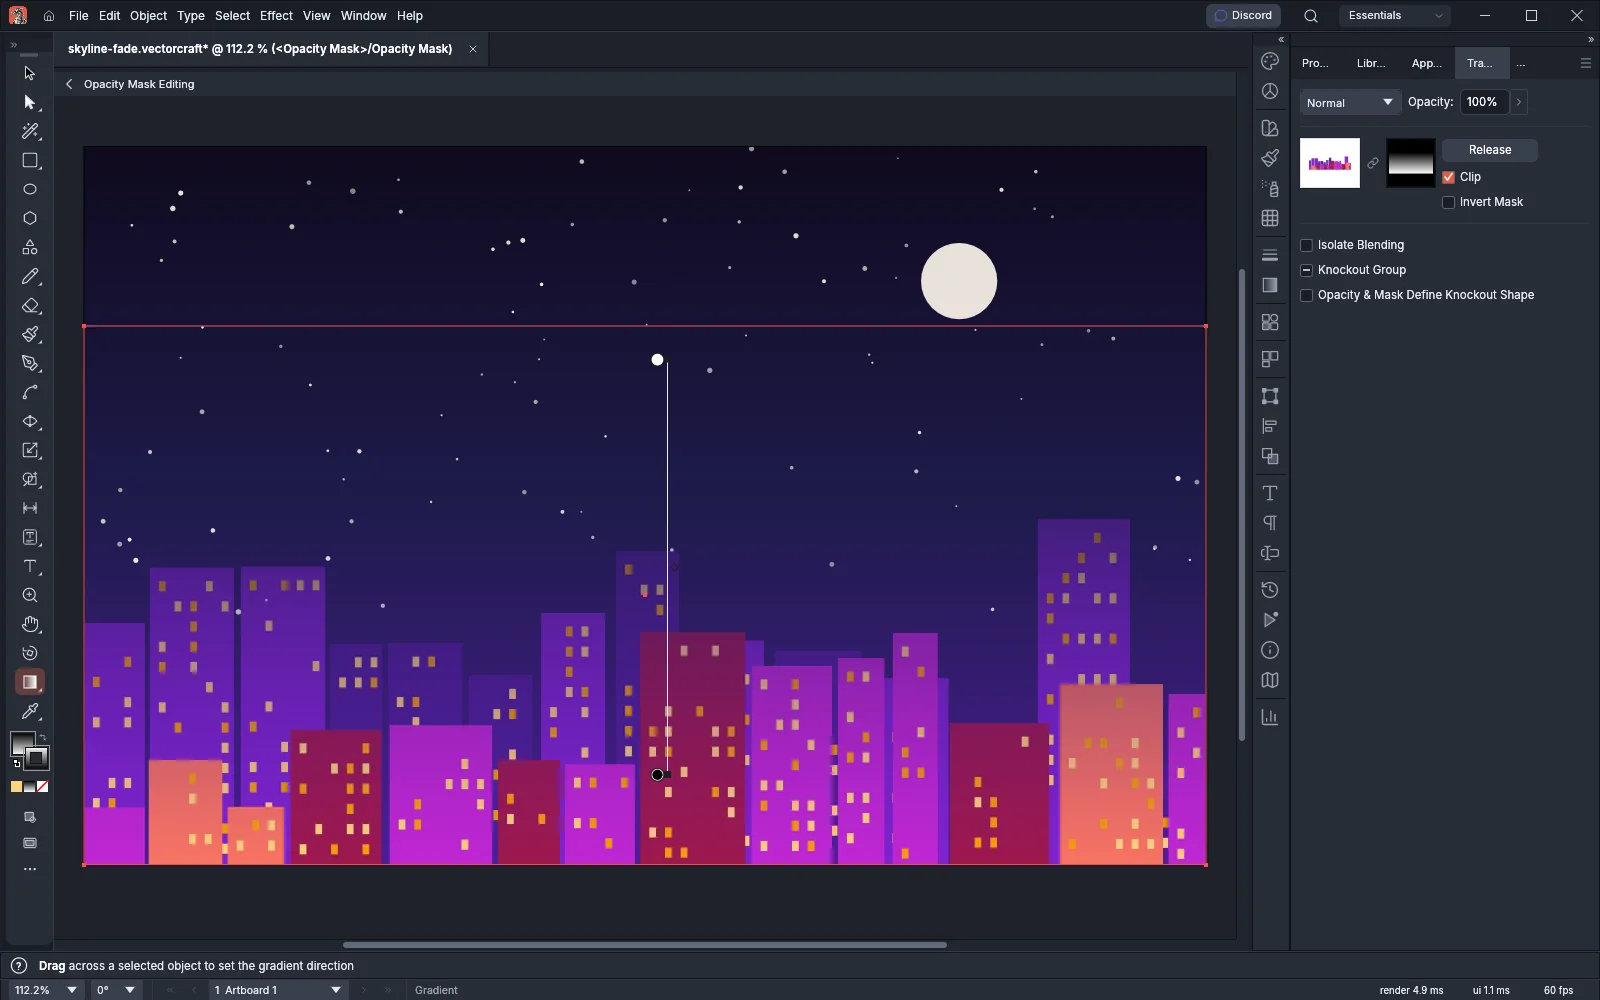
- Edit the mask art. For example, select the mask’s gradient rectangle and drag across it with the Gradient tool to change where the fade starts and ends.
- To stop editing the mask, click the art thumbnail, the left-hand thumbnail.
While you edit the mask:
- The mask thumbnail has the heavier frame, and the document tab ends in (<Opacity Mask>/Opacity Mask).
- The mask art sits on a temporary layer named Opacity Mask Editing, and the Layers panel lists only the mask. You cannot add layers until you stop editing.
- The canvas shows the masked artwork, not the mask art itself. The artwork updates after each change to the mask.
- The Transparency panel’s settings apply to the masked object.
Saving the document never writes the temporary layer. Mask editing does not start while you are in isolation mode or editing a pattern.
To look at the mask alone, Alt-click (Option-click on macOS) the mask thumbnail. The canvas shows the mask in grays, the thumbnail gets a colored frame, and you can still edit the mask. Alt-click the thumbnail again to see the artwork.
If you click Make Mask with only one object selected, the object gets an empty mask and mask editing starts at once, so you can draw the mask.
Turn off, unlink or release an opacity mask
Section titled “Turn off, unlink or release an opacity mask”Select the masked object, then use the mask thumbnail or the Transparency panel menu (the ≡ button at the top right of the panel).
| Action | How | What happens |
|---|---|---|
| Disable Opacity Mask | Shift-click the mask thumbnail, or choose it from the panel menu | The mask stays with the object but stops hiding anything. A red X crosses the thumbnail. Shift-click again, or choose Enable Opacity Mask, to turn it back on. |
| Unlink Opacity Mask | Click the link icon between the thumbnails, or choose it from the panel menu | The object moves without its mask. Click the icon again, or choose Link Opacity Mask, to link them. |
| Release Opacity Mask | Click Release in the panel, or choose it from the panel menu | The mask art goes back above the object as an ordinary object, and the object shows in full. Releasing also ends mask editing. |
Clip and Invert Mask in the panel change the selected mask. Clip hides the art outside the mask art, and Invert Mask swaps light and dark, so black shows the art and white hides it.
Two items in the panel menu set how new masks start. They do not change masks you already made.
| Menu item | Default | What it does |
|---|---|---|
| New Opacity Masks Are Clipping | On | New masks start with Clip on. |
| New Opacity Masks Are Inverted | Off | New masks start with Invert Mask on. |
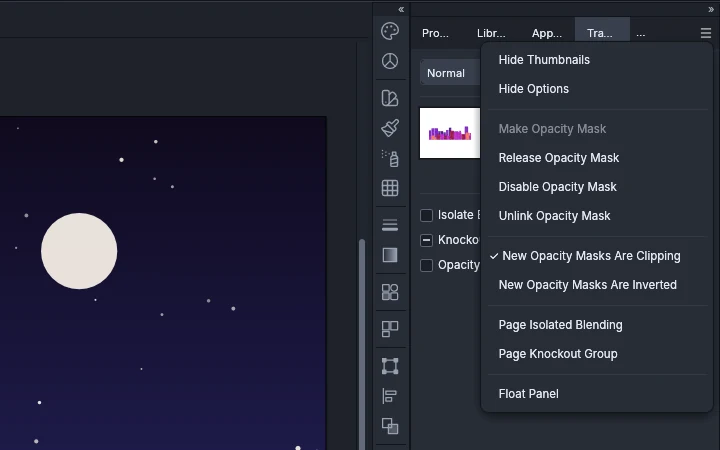
The opacity mask items in the panel menu are not available while a fill or stroke row is active in the Appearance panel.
Find the masks in a document
Section titled “Find the masks in a document”- Choose Select → Object → Clipping Masks to select every clipping path in the document. You can then reshape them together, or paint them to show their outlines.
- In the Layers panel, a clipping path’s name is underlined, and the name of an object with an opacity mask has a dashed underline.
Select objects of one kind lists the other Select → Object commands.
Keyboard shortcuts
Section titled “Keyboard shortcuts”| Action | Windows and Linux | macOS |
|---|---|---|
| Step through Draw Normal, Draw Behind and Draw Inside | Shift+D | Shift+D |
| Make Clipping Mask | Ctrl+7 | Cmd+7 |
| Release Clipping Mask | Ctrl+Alt+7 | Cmd+Option+7 |
| Paste (inside the shape in Draw Inside) | Ctrl+V | Cmd+V |
| Paste in Place (inside the shape in Draw Inside) | Ctrl+Shift+V | Cmd+Shift+V |
| Layers panel | F7 | F7 |
| Transparency panel | Ctrl+Shift+F10 | Cmd+Shift+F10 |
| View only the opacity mask | Alt-click the mask thumbnail | Option-click the mask thumbnail |
| Disable or enable the opacity mask | Shift-click the mask thumbnail | Shift-click the mask thumbnail |