Change paths with effects
This guide covers the effects in VectorCraft that change the path an object draws with: Effect → Path, Effect → Path Effects, Effect → Convert to Shape, Effect → Pathfinder and Effect → Crop Marks. The object keeps its original path. You can change the values or remove the effect later in the Appearance panel, and Object → Expand Appearance writes the result into the path, as described in Make the appearance permanent.
Offset or outline a path as an effect
Section titled “Offset or outline a path as an effect”Effect → Path has three effects:
- Offset Path… draws the path larger or smaller by a distance.
- Outline Object draws type as its letter outlines. The type stays editable, and the effects applied after it reshape those outlines. Paths and images do not change.
- Outline Stroke draws the outline of a stroke, with its caps, joins, dashes, alignment, width profile and arrowheads. On a fill row or on the whole object, it outlines the top stroke.
To put a halo around a word:
- Select the type and open the Appearance panel with Window → Appearance (Shift+F6).
- Click the Add New Fill button at the bottom of the panel, give the new fill a color, and drag its row below the Characters row so that it paints behind the letters.
- Click the new fill row to select it.
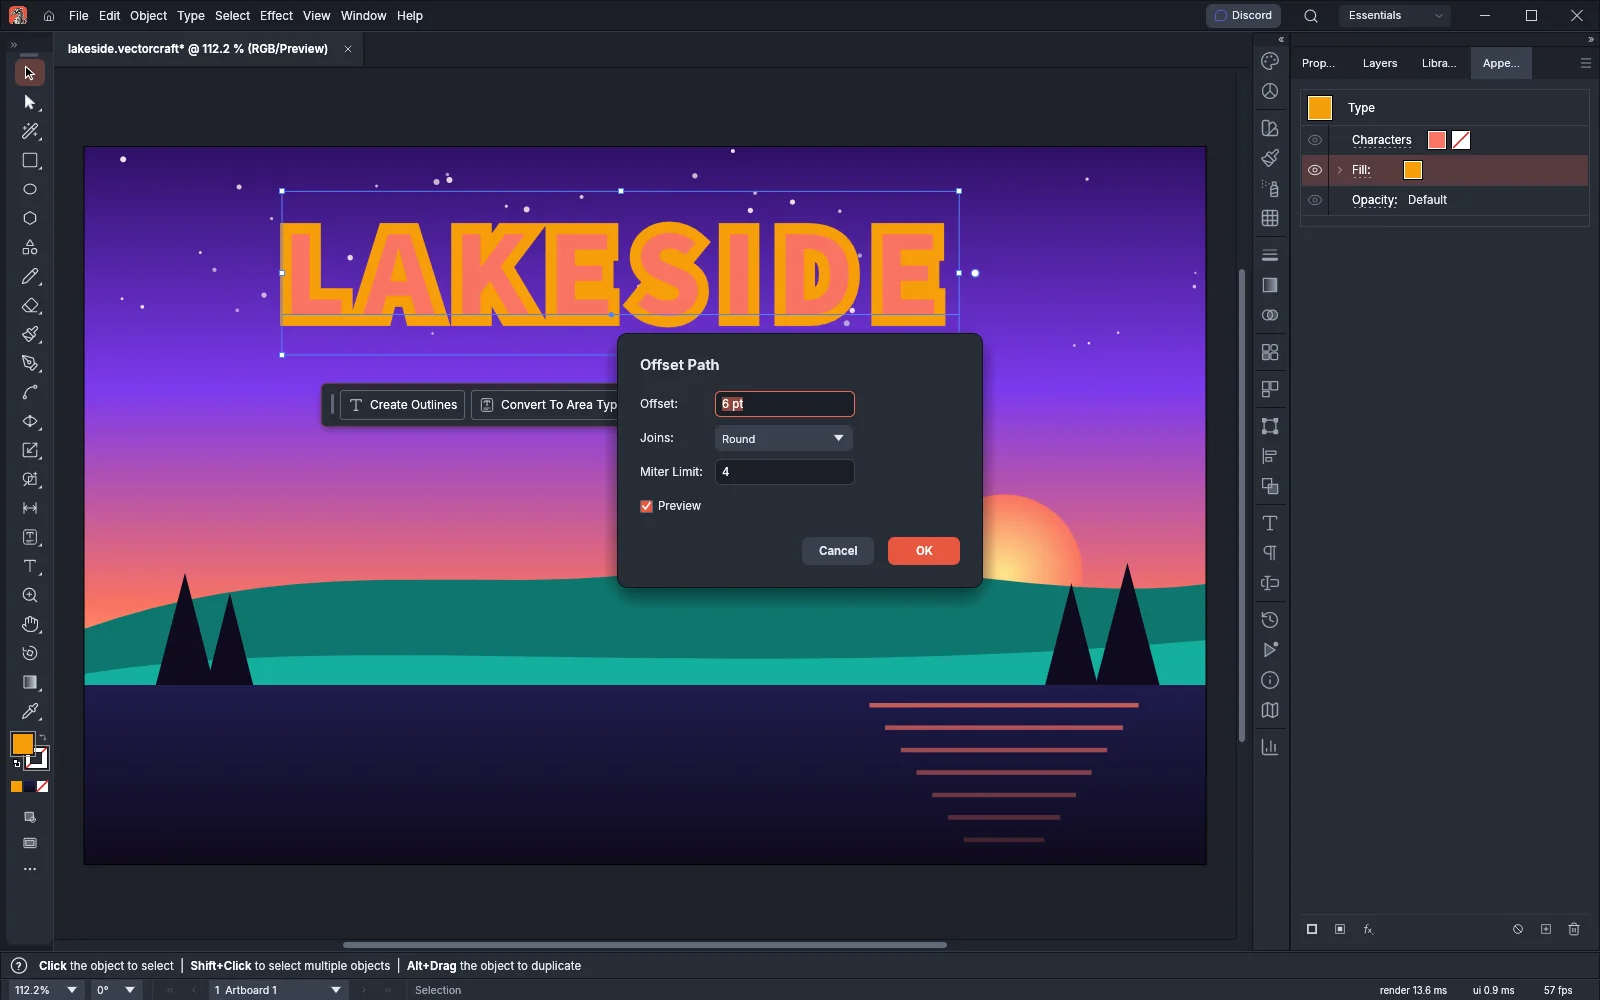
- Choose Effect → Path → Offset Path….
- Set Offset, choose Joins, and click OK. With Preview on, the canvas shows the halo as you type.
| Option | Default | What it does |
|---|---|---|
| Offset | 10 pt | Moves the outline out by this distance. A negative value moves it in. |
| Joins | Miter | Sets the shape of the new corners: Miter, Round or Bevel. |
| Miter Limit | 4 | Sets how far a miter corner can reach before it is beveled. |
Outline Object and Outline Stroke have no options and apply as soon as you choose them.
Effect or Object menu command
Section titled “Effect or Object menu command”Object → Path → Offset Path… and Object → Path → Outline Stroke do the same work, but they change the artwork for good: Offset Path adds new objects above the originals, and Outline Stroke replaces the stroked paths with filled outlines. The effects keep the original path, follow it when you edit it, and can be part of a graphic style. Use the Object menu command when you need to edit the new anchor points by hand.
Cut dashes and edit anchors with Path Effects
Section titled “Cut dashes and edit anchors with Path Effects”Effect → Path Effects rewrites the path’s anchor points and segments as a live effect. VectorCraft draws, measures, exports and expands the result as it does for the other effects that change shapes.
To cut a trail on a map into separate dashes:
- Select the stroked path.
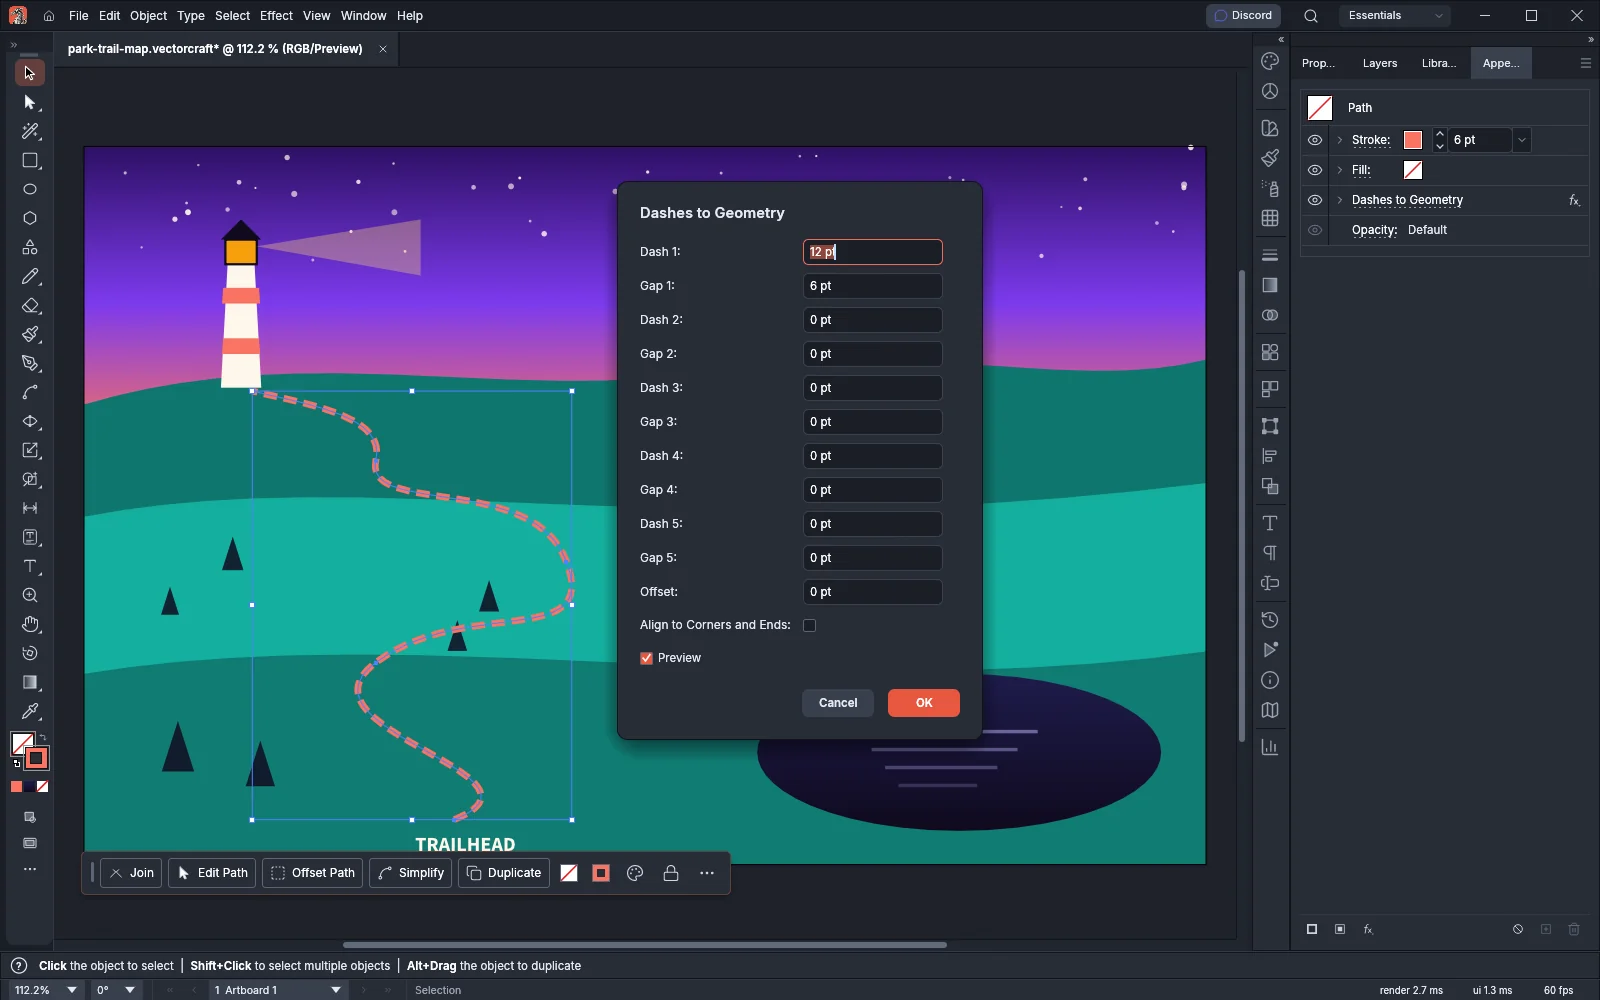
- Choose Effect → Path Effects → Dashes to Geometry….
- Set Dash 1 and Gap 1. For a longer pattern, set Dash 2 and Gap 2 (and up to Dash 5 and Gap 5) to values above 0 pt.
- Click OK. The path now draws as one open piece per dash, and the stroke paints each piece with its caps and joins.
Path Effects options
Section titled “Path Effects options”Reverse Direction has no options and applies as soon as you choose it. The other Path Effects open a dialog with Preview on.
| Effect | Options and defaults |
|---|---|
| Dashes to Geometry… | Dash 1 12 pt and Gap 1 6 pt; Dash 2 to Dash 5 and Gap 2 to Gap 5 0 pt, each from 0 to 10000 pt. A dash and gap pair that are both 0 is left out, and the pattern repeats. Offset (0 pt, from -10000 to 10000 pt) sets how far into the pattern the path starts. Align to Corners and Ends (off) fits whole repeats between corners and ends, stretched or squeezed, with a dash centered on each corner and end. |
| Add Anchors… | Target: All (default), Curved or Straight segments. Spacing: By Count (default) adds Count anchors to each segment (1, from 1 to 1000); By Distance adds one every Distance along each segment (20 pt). Max Count (100) limits the anchors added to one segment. The shape does not change. |
| Extend Path… | Start Length and End Length 10 pt; Start Percent and End Percent 0%, as a share of the path’s length. The length and the percent add up for each end, and a total below 0 shortens that end. Start Shape and End Shape: Straight (default) continues in the end’s direction, and Arc follows the curve of the end, at most half way round. Closed paths do not change. |
| Close Path… | Mode: Straight (default) closes each open path with a straight segment; Smooth closes it with a segment that leaves both ends smoothly. Paths need at least two anchors. |
| Smooth Anchors… | Ratio 0.3905, from 0.01 to 0.5: each handle’s length as a share of the distance to the nearer neighboring anchor. The field rounds the default to 0.391, and the effect applies 0.3905 when you leave the field as it opens. At 0.3905, the corners of a square become a circle. Every anchor becomes smooth. |
| Retract Handles… | Handles: All (default), or Shorter Than Length to retract only the handles shorter than Length (5 pt). An anchor that loses a handle becomes a corner. |
| Reverse Direction | Runs each path the other way. The shape stays the same, and arrowheads, dashes and the effects after it swap ends. |
| Simplify Anchors… | Tolerance 10, from 0 to 200: a higher value removes more anchors and lets the outline move further, up to 0.02 pt per unit of tolerance. Protect Corners (on) keeps the anchors where the path turns by more than 30°. The ends of open paths stay. |
| Split at Anchors… | Anchors: Corner, Smooth or Both (default). Cuts the path into open pieces at those anchors. The shape stays the same. |
Put a shape behind type with Convert to Shape
Section titled “Put a shape behind type with Convert to Shape”Effect → Convert to Shape draws a rectangle, a rounded rectangle or an ellipse in place of the path, sized from the object’s bounds or to a fixed size, centered on the object. On a fill row of type, it makes a label box that grows and shrinks with the text.
- Select the type, open the Appearance panel (Shift+F6), and add a fill below the Characters row, as in the halo steps above.
- Click the new fill row.
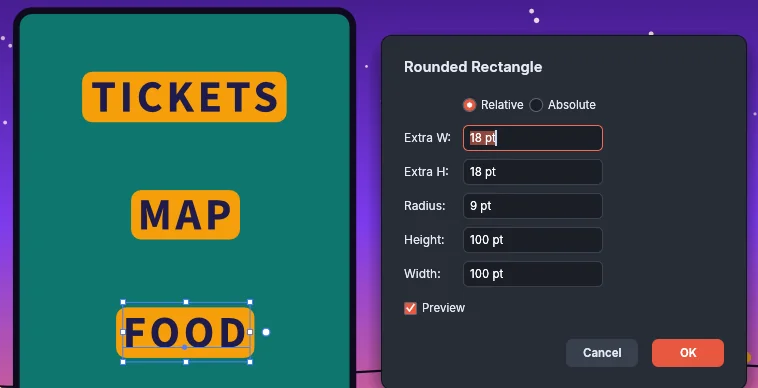
- Choose Effect → Convert to Shape → Rounded Rectangle….
- Leave Relative selected and set Extra W, Extra H and Radius.
- Click OK.
When you edit the text later, the box changes size with it. To give other labels the same box, save the appearance as a graphic style, as described in Apply effects and appearance.
| Option | Default | What it does |
|---|---|---|
| Relative / Absolute | Relative | Relative sizes the shape from the object. Absolute gives it a fixed size. |
| Extra W / Extra H | 18 pt | With Relative, the shape is this much wider and taller than the object in all, half on each side. |
| Width / Height | 100 pt | With Absolute, the size of the shape, centered on the object. |
| Radius | 9 pt | The corner radius. Only Rounded Rectangle… has it. |
Combine a group’s shapes with a Pathfinder effect
Section titled “Combine a group’s shapes with a Pathfinder effect”Effect → Pathfinder runs a Pathfinder operation on the members of a group or layer each time they change. The members stay as they are, so you can still move or edit each one.
- Draw the overlapping shapes and group them with Object → Group (Ctrl+G, or Cmd+G on macOS).
- With the group selected, choose an operation, for example Effect → Pathfinder → Add.
When two or more objects are selected and none of them is a group, VectorCraft groups them first and applies the effect to the new group.
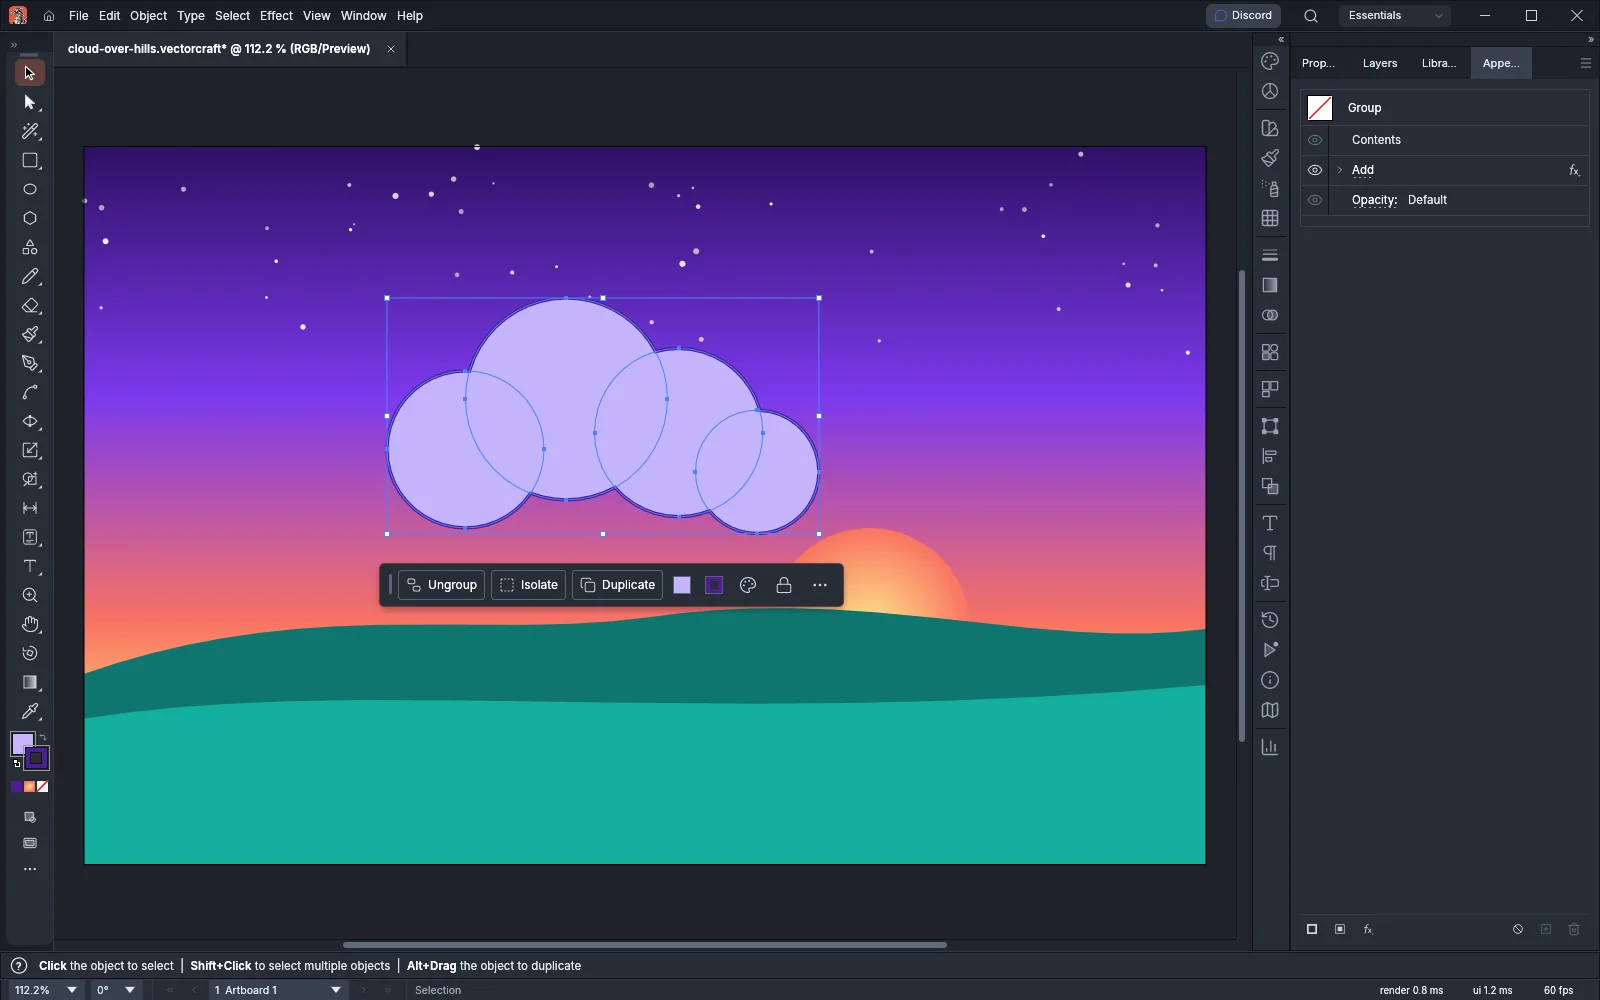
The effect treats the group’s members as a stack from back to front, as the Pathfinder panel does. In Add, Subtract, Intersect, Exclude and Minus Back, a group inside the group counts as one shape. Add is the effect version of Unite, and Subtract is the effect version of Minus Front. Combine and cut shapes describes what each operation does.
The Pathfinder effects apply as soon as you choose them, except these two:
- Soft Mix asks for a Mixing Rate (50%, from 1% to 100%) and blends the colors where the shapes overlap.
- Trap… adds overprinting traps where shapes of different solid colors meet, for printing. Its options are Thickness (0.25 pt), Height/Width (100%), Tint Reduction (40%), Traps with Process Color (off), Reverse Traps (off), Precision (0.01 pt) and Remove Redundant Points (on).
Add crop marks as an effect
Section titled “Add crop marks as an effect”Effect → Crop Marks draws trim marks in the Registration color around the object’s bounds. The marks move and resize with the object.
- Select the object.
- Choose Effect → Crop Marks. The effect applies at once.
The marks use the Japanese style when Use Japanese Crop Marks is on in the General page of Preferences (Edit → Preferences…, or VectorCraft → Settings on macOS) at the time you apply the effect. Otherwise they use the Roman style. Object → Create Trim Marks draws trim marks as a separate group that does not follow the artwork.