Workflows
TextureCraft has three modes, on the Mode menu and at the right of the top bar:
- Painting (F9): layers, masks and the painting tools.
- Bake Mesh Maps (F8): make the mesh maps that smart materials and generators use.
- Rendering (path traced) (F10): a realistic preview of your textures.
On a Mac, use ⌘ in place of Ctrl in the shortcuts below.
Work with texture sets
Section titled “Work with texture sets”Each material in your model is a texture set, listed in the Texture Sets panel. Click one to paint on it. The eye icon shows or hides it.
Open Texture Set Settings (next to Layers) to change the texture size of a set, from 256 to 8192 pixels, or to add and remove channels. This is also where you set the Normal map format (OpenGL or DirectX) for the project.
Build up layers
Section titled “Build up layers”The Layers panel works like the layer stack in an image editor, but every layer holds all the material channels at once: base color, roughness, metallic, height, normal and more.
- Add paint layer for brush strokes, Add fill layer for a material that covers the whole texture set, or add a folder to group layers.
- Each layer has a blend mode and an opacity for each channel. Use the menu at the top of the panel to pick the channel.
- Ctrl+D duplicates the selected layers, Ctrl+G groups them, and Delete removes them. Ctrl+C and Ctrl+V copy and paste layers, also to another texture set.
- Right-click a layer for more, including Flatten layer.
A fill layer’s Properties set its material and how it is projected: UV, tri-planar, planar, spherical, cylindrical or decal. Each channel can take its own image, such as a normal or roughness map.
Link layers with instances
Section titled “Link layers with instances”An instance is a linked copy of a layer. Edit the original and every instance changes with it.
- Copy a layer with Ctrl+C, then right-click a layer in the stack and choose Paste as instance.
- To put a layer on every other texture set at once, right-click it and choose Instantiate across texture sets (Ctrl+Shift+D). Copy to all texture sets makes independent copies instead.
If you delete the original, its instances keep their look as plain layers.
Save your own smart material
Section titled “Save your own smart material”Right-click a layer or folder and choose Create smart material. It appears in the Smart materials tab of the Assets shelf, under My smart materials, ready to drag onto other models.
Use masks
Section titled “Use masks”A mask shows a layer in some places and hides it in others.
- Select a layer and choose Add mask. Pick a white mask (shows everything) or a black mask (hides everything).
- Add effects to the mask: paint on it, or add a generator such as edge wear or dirt, which uses the baked mesh maps. Filters, fills and levels work on masks too.
- Alt+click a mask to see it on its own in the viewport.
Drag an effect to change its order in the stack. Right-click it to duplicate it or copy it to another layer.
The Smart masks tab of the shelf has ready-made masks. Drag one onto a layer.
Quick mask
Section titled “Quick mask”A quick mask protects part of the model while you paint. Press Y to turn it on, U to paint the mask itself (press U again to finish), and Ctrl+Shift+I to invert it.
Painting tools
Section titled “Painting tools”| Tool | Key | Notes |
|---|---|---|
| Paint | 1 | Shift+click draws a straight line from the last stroke |
| Eraser | 2 | |
| Projection | 3 | Paints through an image stencil. Hold S and drag to move, turn or scale the stencil |
| Polygon fill | 4 | Fills a triangle, a UV island or the whole mesh |
| Smudge | 5 | |
| Clone | 6 | Hold V and click to set the source |
| Path | 7 | Draw a path, then press Enter to paint along it, or fill it once it is closed |
| Geometry mask | 8 | Click mesh parts to show or hide the selected layer on them |
| Color picker | P |
Brush settings (size, flow, stroke opacity, spacing) are in the bar at the top. Shift and the mouse wheel change the brush size over the model. The bar also has symmetry, lazy mouse and a particle brush button: with it on, paint slides down the surface.
Pen pressure works with Windows Ink pens, and with touch pens in the browser. On macOS and Linux, a pen works as a mouse for now.
The Brushes and Alphas tabs of the shelf have brush presets and brush shapes. Save your own brush there with Save current brush.
Change the view
Section titled “Change the view”| To | Do this |
|---|---|
| Show the 3D and 2D views side by side | F1 |
| Show the 3D view only | F2 |
| Show the 2D view only | F3 |
| Show the full material | M |
| Show the next channel | C (Shift+C for the previous one) |
| Show the next mesh map | B (Shift+B for the previous one) |
| Fit the model in the view | F |
| Hide the panels | Tab |
Viewport › UV checker shows a checker pattern, to spot stretched UVs.
To keep a camera angle, open the camera menu at the top of the 3D view and choose Save view as camera. Ctrl+1 to Ctrl+9 jump to the first nine saved cameras.
Display and shader settings
Section titled “Display and shader settings”Open Window › Views › Display Settings to change how the model is lit and shown. Edit › Project Configuration… jumps to the same panel. Most of these are saved with the project. They change the viewport and Rendering mode, not your textures.
- Environment map: pick one of the built-in studio and outdoor lights, or choose Import HDR… to use your own equirectangular .hdr or .exr image. Opacity, exposure, blur and rotation adjust it.
- Key light: turn it on for a light that casts shadows.
- Field of view and Orthographic: change the camera lens.
- Tone mapping: Linear or ACES filmic.
- Depth of field: turn it on, set the Focus distance and Aperture, or choose Pick focus in the viewport and click the model.
- Show wireframe in the 3D view and Show UV wireframe in the 2D view, and Temporal anti-aliasing, which refines the 3D view while it is still.
Window › Views › Shader Settings changes how the textures are turned into light:
- Pick TextureCraft PBR - Metallic Roughness or TextureCraft PBR - Specular Glossiness. Specular Glossiness needs the Specular and Glossiness channels, which you add in Texture Set Settings.
- Parallax occlusion (height channel) and Displacement (height channel) use the height channel to make the surface look deeper. Displacement moves a finer copy of the mesh, in the viewport and in Rendering mode. Painting still follows the base surface.
- Height to normal strength, in Texture Set Settings, sets how strong the height channel reads.
Bake mesh maps
Section titled “Bake mesh maps”Choose Mode › Bake Mesh Maps (F8). Select the texture sets on the left, then select the maps you want under Mesh Map Bakers: normal, world space normal, ID, ambient occlusion, curvature, position, thickness, height, bent normals, opacity, color map and world space direction. Click a baker to see its settings.
To bake detail from a high-poly model, choose Add High-Poly Meshes in the common parameters. Choose Bake Selected Textures to start, and Return to Painting Mode when it’s done.
Baking uses your graphics card when it can, and your processor otherwise. You can also use mesh maps you baked in another app: drop the image from the Assets panel onto a slot in Texture Set Settings.
Export textures
Section titled “Export textures”Choose File › Export Textures… (Ctrl+Shift+E).
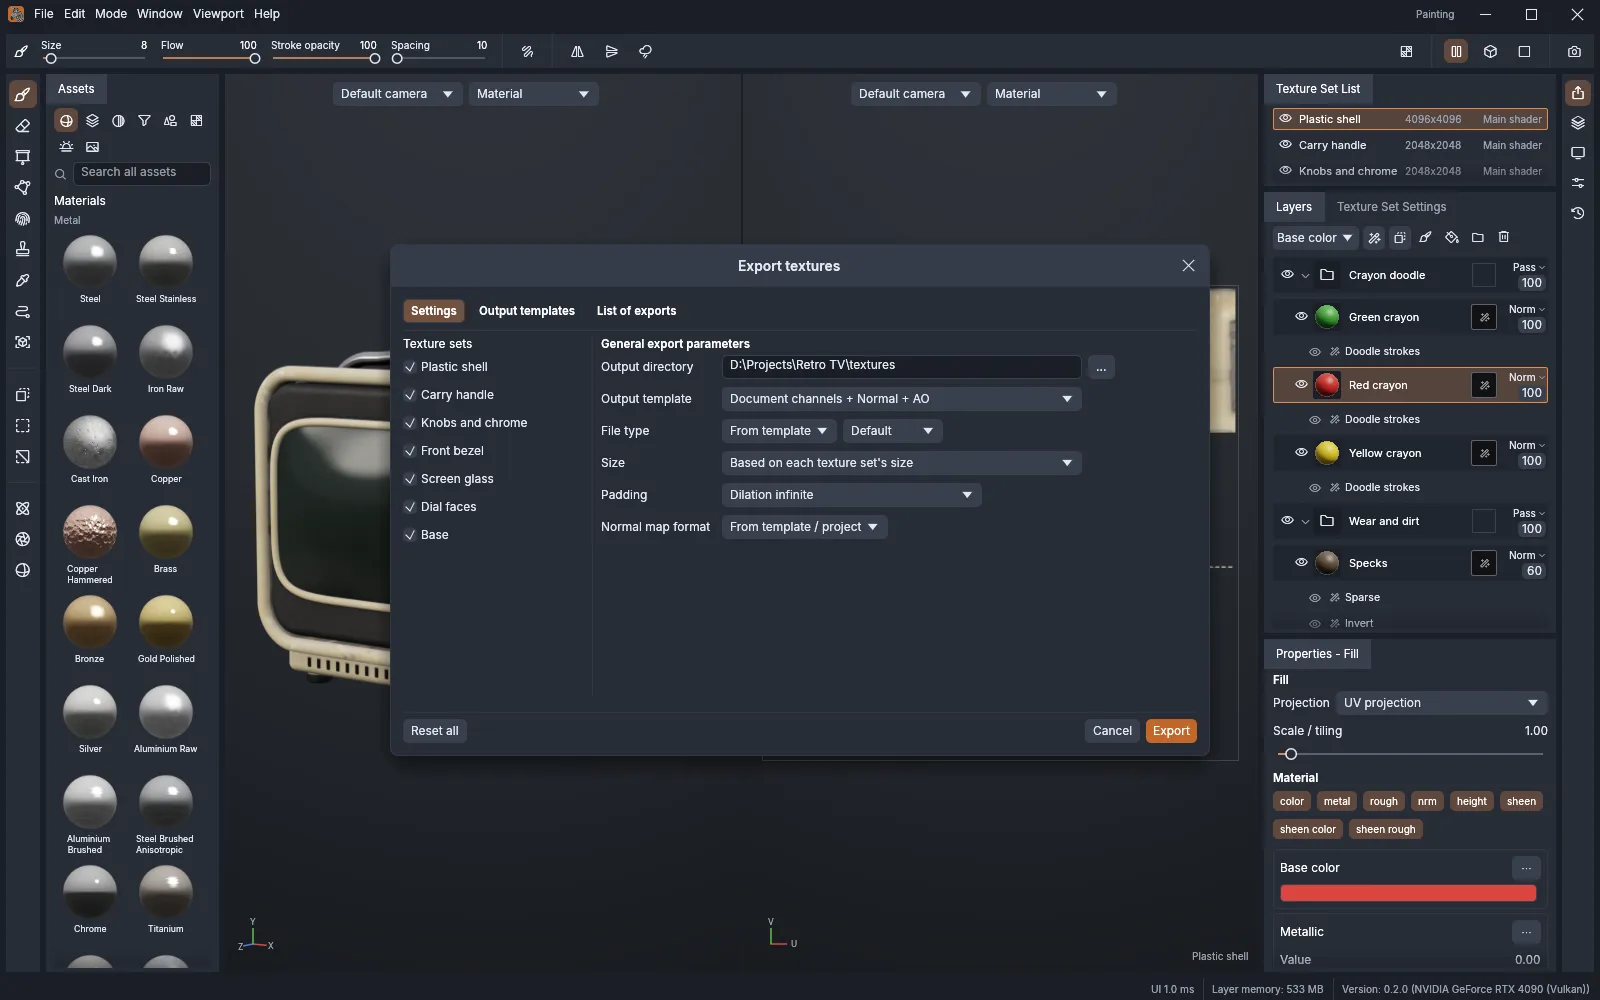
- Settings: pick the texture sets, the Output directory, the Output template, the File type, the Size, the Padding and the Normal map format.
- Output templates: the built-in presets, and your own. A template says which channels go into which image, so you can pack, for example, roughness, metallic and ambient occlusion into one file.
- List of exports: the files that will be written.
The built-in presets include Unreal Engine (Packed), Unity HDRP (Mask Map), Unity Standard (Metallic Smoothness), Godot 4 (ORM), Blender (Principled BSDF) and OpenPBR (separate maps).
To export the model itself with its textures, choose File › Export Mesh…. It writes OBJ (with an MTL file), GLB or USD.
Make your own output template
Section titled “Make your own output template”Built-in templates are read-only. To make your own:
- In Output templates, select a built-in template and choose Duplicate the selected template, or choose New template.
- Beside Add output, choose the image’s layout: RGB, RGBA, Gray or Gray + A. Then drag input maps onto its channels. Move up, Move down and Remove this output change the list.
- Rename the template by double-clicking it.
Export the selected template (.json) saves a template as a file you can share. Import a template (.json) adds one someone gave you.
A new project can start from a saved setup too. In the New project window, type a Template name and choose Save current project as template. It then appears in the Project template list.
UV tiles
Section titled “UV tiles”If a texture set uses UDIM tiles, the export writes one file per tile, with the tile number in the file name. The $udim variable puts the number where you want it in a template. Without it, the number is added to the end of the name.
Render a preview
Section titled “Render a preview”Choose Mode › Rendering (path traced) (F10). TextureCraft traces light through the scene, so the image gets cleaner the longer you wait.
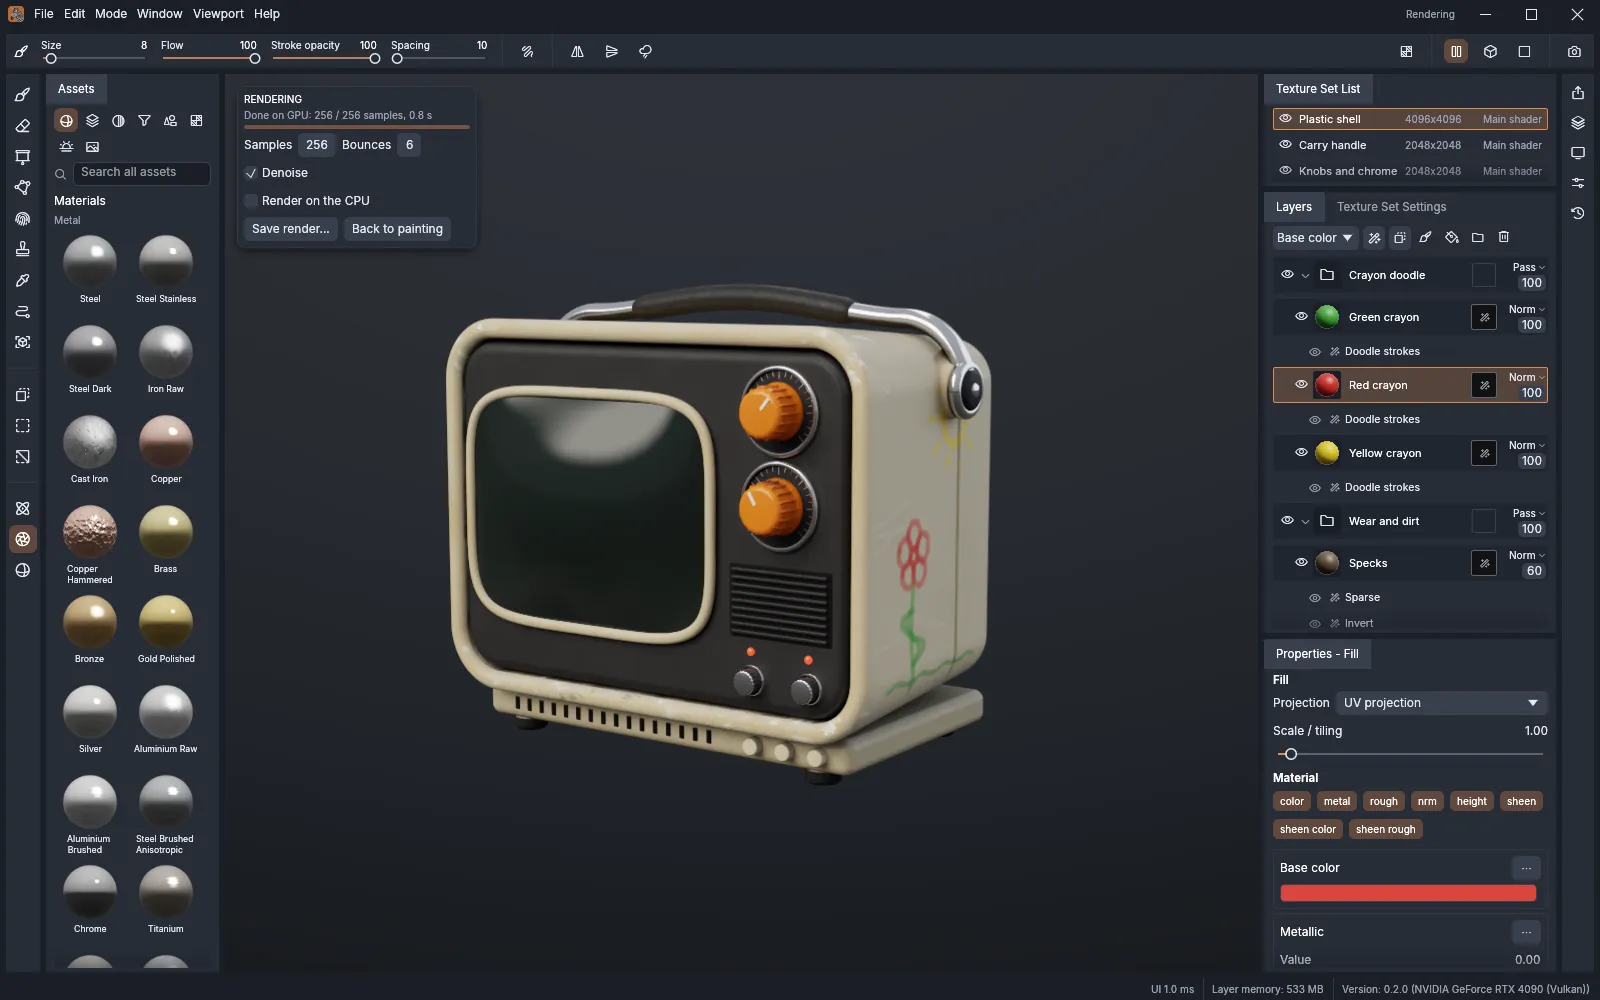
Set Samples and Bounces, select Denoise for a cleaner image, or select Render on the CPU if your graphics card can’t do it. Save render… saves the image as PNG. Back to painting returns to Painting mode.
Files and projects
Section titled “Files and projects”The File menu has more than open and save:
- Save a copy…: saves a copy and keeps working on the original.
- Remove unused resources…: drops imported images that no layer uses, which makes the project file smaller.
- Import resources…: adds images to the project, to use in fills and masks.
- Import MaterialX material…: reads a .mtlx file into one new fill layer, with its textures and values.
- Close (Ctrl+F4) closes the project. Quit (Ctrl+Q) closes TextureCraft.
Bring in a changed model
Section titled “Bring in a changed model”If you change the model in your 3D app, choose Edit › Reimport mesh (Ctrl+Shift+R). Your painted strokes stay on the surface.
Settings
Section titled “Settings”Choose Edit › Settings…:
- Interface: language, interface scale, brightness (four levels from dark to light), accent color, the title bar and the start window.
- Viewport: the texture resolution of the viewport.
- Project: how often to autosave.
- Folders: the data folder for autosaves, smart materials, presets, templates and UI layouts. It’s
Documents/TextureCraftby default. - Keyboard: Edit keyboard shortcuts… to change any shortcut.
The interface is in English, French, German, Spanish, Portuguese, Italian, Japanese, Chinese, Korean and Arabic.
Window › Save UI Layout › Save current layout… and Window › Load UI Layout keep your panel layout. Window › Reset UI puts everything back.
Keyboard shortcuts
Section titled “Keyboard shortcuts”Help › Shortcuts list… shows them all. The most used:
| Shortcut | What it does |
|---|---|
| Ctrl+N | New project |
| Ctrl+O | Open |
| Ctrl+S | Save |
| Ctrl+Shift+S | Save as |
| Ctrl+Z | Undo |
| Ctrl+Y | Redo |
| Ctrl+Shift+E | Export textures |
| F8, F9, F10 | Bake, Painting and Rendering modes |
| 1 to 8, P | Painting tools |
| Y | Quick mask |
| Tab | Hide the panels |