
Workflows
SoundCraft has two main windows. The Edit window shows your tracks on a timeline, for arranging and editing. The Mix window shows them as channel strips, for balancing. Press ⌘= to switch between them, or select Mix in Separate Window in the Window menu to see both at once, for example one on each monitor.
On a Mac, the shortcuts on this page use ⌘. On Windows and Linux, use Ctrl in its place. Setup › Keyboard Shortcuts lists every shortcut.
Edit audio
Section titled “Edit audio”Choose an edit mode with F1 to F4, or with the buttons at the top left:
| Key | Mode | What it does |
|---|---|---|
| F1 | Shuffle | Clips snap against each other; removing one closes the gap |
| F2 | Slip | Clips move freely |
| F3 | Spot | Clicking a clip asks where to put it |
| F4 | Grid | Clips and selections snap to the grid |
Choose a tool with F5 to F10: Zoom, Trim, Selector, Grabber, Scrubber and Pencil.
The Edit menu has the everyday editing commands: Separate (⌘E) splits clips at the selection, on the grid or at transients; Duplicate (⌘D), Heal Separation, Consolidate and Strip Silence. Edit › Fades creates fades and crossfades. ⌘Z undoes, and ⇧⌘Z redoes.
Clip gain and locks
Section titled “Clip gain and locks”- Clip › Clip Gain sets a clip’s level apart from the track fader. Nudge it up or down with Ctrl+Shift+Up and Ctrl+Shift+Down. Bypass switches the gain off, and Render writes it into the audio.
- Clip › Edit Lock/Unlock (⌘L) locks a clip against edits. Time Lock/Unlock locks its position (Control+Option+L, on a Mac only).
- Clip › Group (⌥⌘G) ties selected clips together so they move as one. Ungroup (⌥⌘U) undoes it.
Locks aren’t fully enforced yet: trim, separate and cut can still change a locked clip (#1430).
Copy and clear special
Section titled “Copy and clear special”Edit › Copy Special, Cut Special and Clear Special work on one kind of data under the selection instead of the clips themselves. Each has Clip Gain, Clip Effects, All Automation, Pan Automation and Plugin Automation. Copy Special also has Audio as MIDI, which turns the pitch of a single-note melody into MIDI notes you can paste on a MIDI or instrument track. Edit › Paste Special › Repeat to Fill Selection repeats what you copied across the selection.
Edit › Automation › Thin (⌥⌘T) removes automation breakpoints that barely change the line. Thin All does it for every track.
Shift, repeat and trim
Section titled “Shift, repeat and trim”- Edit › Shift… (⌥H) moves the selected clips later by the number of seconds you enter.
- Edit › Repeat… (⌥R) repeats the selection a number of times in a row.
- Edit › Insert Silence (⇧⌘E) adds silence for the length of the selection.
- Edit › Trim cuts clips back: To Selection (⌘T), Start to Insertion, End to Insertion and To File Boundaries.
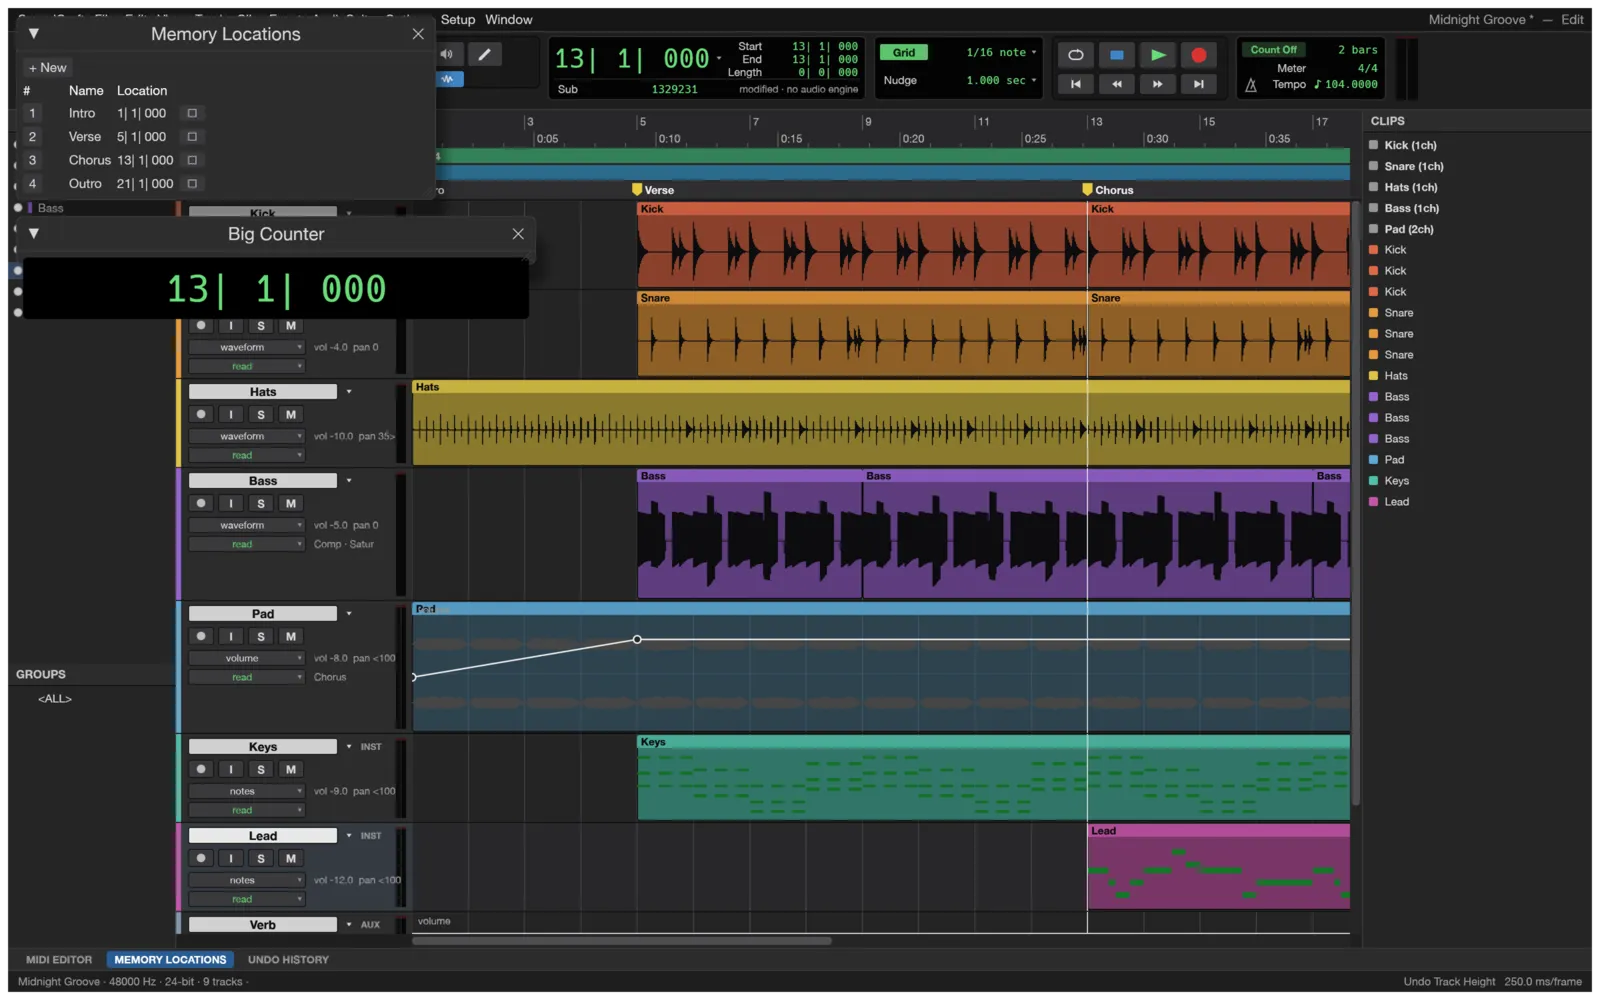
Press Enter to drop a marker at the playhead. Window › Memory Locations (⌘5) lists them.
Record
Section titled “Record”- Make sure your input is chosen in Setup › Playback Engine (see Getting started).
- Turn on the record button in the header of each track you want to record on (⇧R for the selected tracks). The input button next to it lets you hear the input through the track.
- Press F12, or ⌘Space, or the record button in the transport. Space stops.
The Options menu turns on Loop Record (⌥L), Pre/Post-Roll (⌘K) and QuickPunch. Each take of a loop recording goes onto its own playlist.
In the Mix window, each track has a fader, a pan control, inserts for plugins, sends, input and output, and mute, solo, record and input buttons.
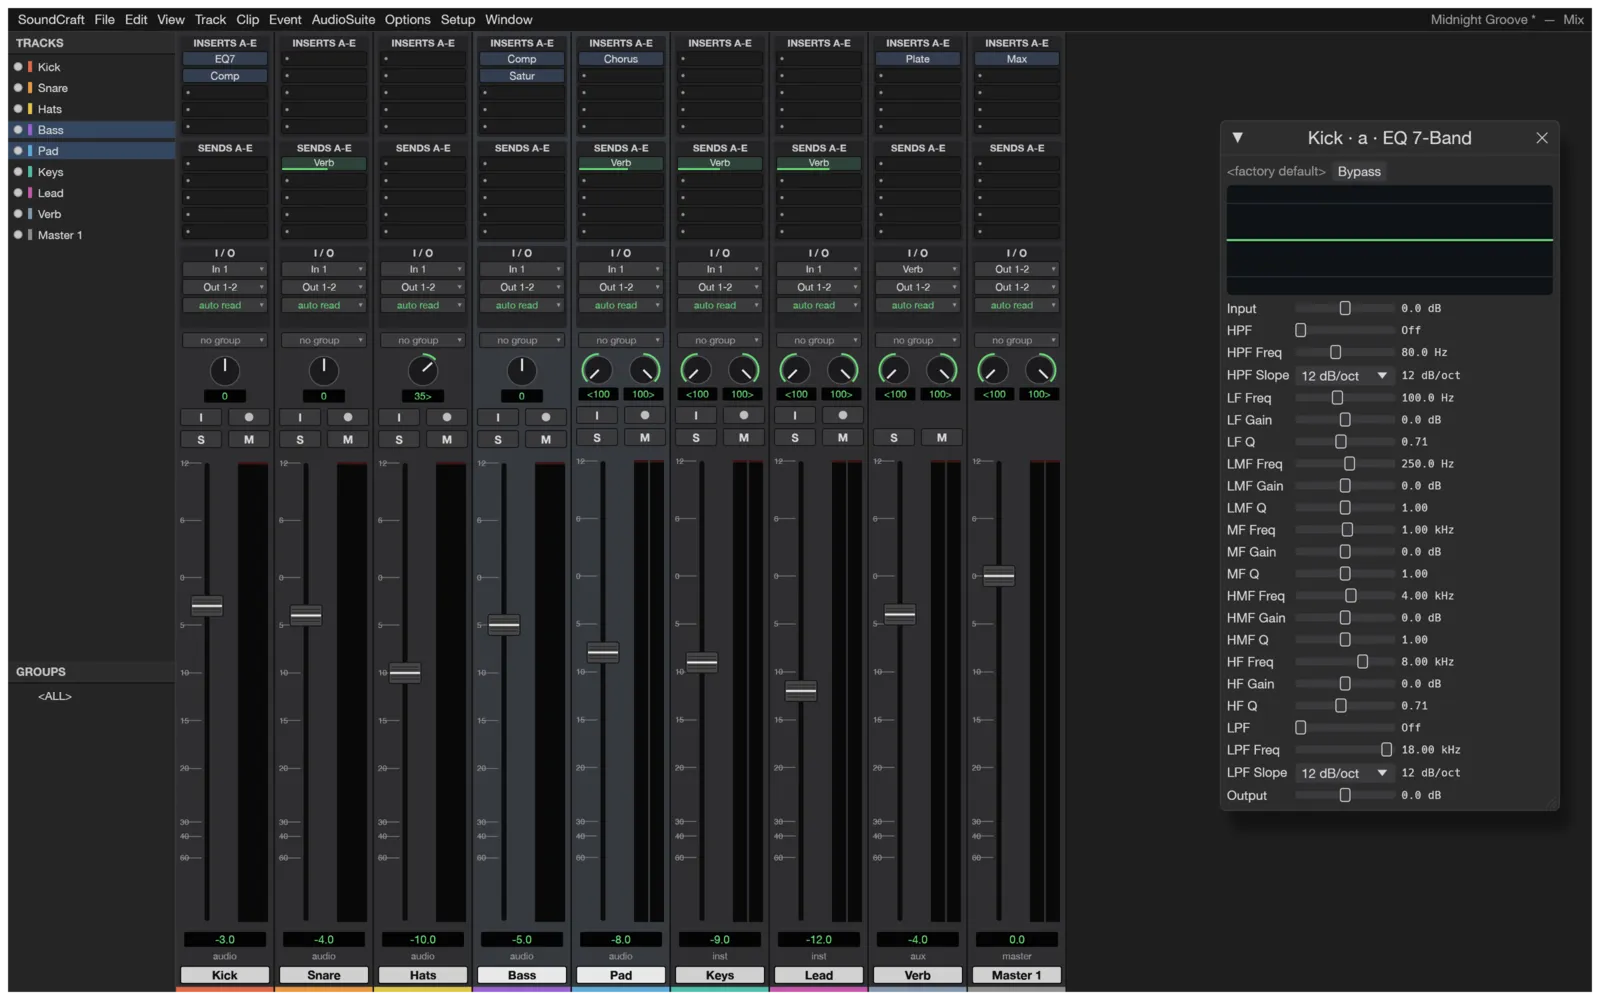
- Plugins: click an empty insert slot to choose a plugin. Click a used slot to open the plugin’s window, ⌘-click it to bypass it, or right-click it to change it.
- Sends feed an aux input, for example a shared reverb.
- Groups, VCA masters and routing folders control several tracks at once. Create them from the Track menu.
SoundCraft compensates for plugin delay automatically. You can turn this off with Delay compensation in Setup › Playback Engine.
Manage tracks
Section titled “Manage tracks”- Playlists: the small arrow beside a track’s name opens its playlist menu. New… starts an empty playlist, Duplicate… copies the current clips into a new one, and Delete Unused… removes all but the active playlist. Pick a playlist in the list below to switch to it. Each loop-recording take lands on its own playlist.
- Track › Split into Mono turns a stereo or multichannel track into one mono track per channel.
- Track › Make Inactive switches a track off without deleting it. In a tall track header, the dyn and off menu does the same.
- Track › Commit… (⌥⇧C) renders the selected track, plugins included, into a new audio track named like Kick.cm right below it. It adds two seconds at the end so reverb tails aren’t cut. The original track becomes inactive and hidden. Track › Bounce… does the same.
- Track › Freeze and the freeze button in the track header only mark the track. They don’t render anything yet. Use Commit… instead.
Use plugins
Section titled “Use plugins”The plugin menu has every built-in plugin under Built-in: EQs, a channel strip, a compressor and limiter, expander and gate, de-esser, maximizer, room and plate reverbs, delay, chorus, flanger, phaser, auto pan, saturation and more. Each plugin’s window lets you save your own presets.
It also lists your own plugins under CLAP and VST3, and Audio Units on a Mac, grouped by maker. SoundCraft looks for them in the standard plugin folders the first time you open each list.
The AudioSuite menu runs a built-in plugin on the selected clips, offline.
Automate
Section titled “Automate”Each track header has a view menu (it starts on waveform for audio, notes for MIDI) and an automation mode menu (it starts on read).
- In the view menu, choose what to automate: volume, pan, mute, or a parameter of a built-in plugin on the track.
- Pick the Pencil tool (F10) and click on the line to add breakpoints. Alt-click (⌥-click on a Mac) a breakpoint to delete it.
- To record moves from the faders instead, set the automation mode to write, touch, latch, touch/latch or trim, then play and move the control. Set it back to read to play the automation, or off to ignore it.
Window › Automation (⌘4) has more controls.
Work with MIDI
Section titled “Work with MIDI”- Create an Instrument Track with Track › New. Choose its instrument with Track › Instrument: a subtractive synth, a drum synth, a sampler, or one of your own instrument plugins.
- Choose Clip › New MIDI Clip, or click on the track with the Pencil tool, to make an empty clip.
- Open Window › MIDI Editor, or the MIDI Editor tab at the bottom of the Edit window. Click to add a note, drag to move it, drag its edge to resize it, and press Delete to remove it. The lane below sets each note’s velocity.
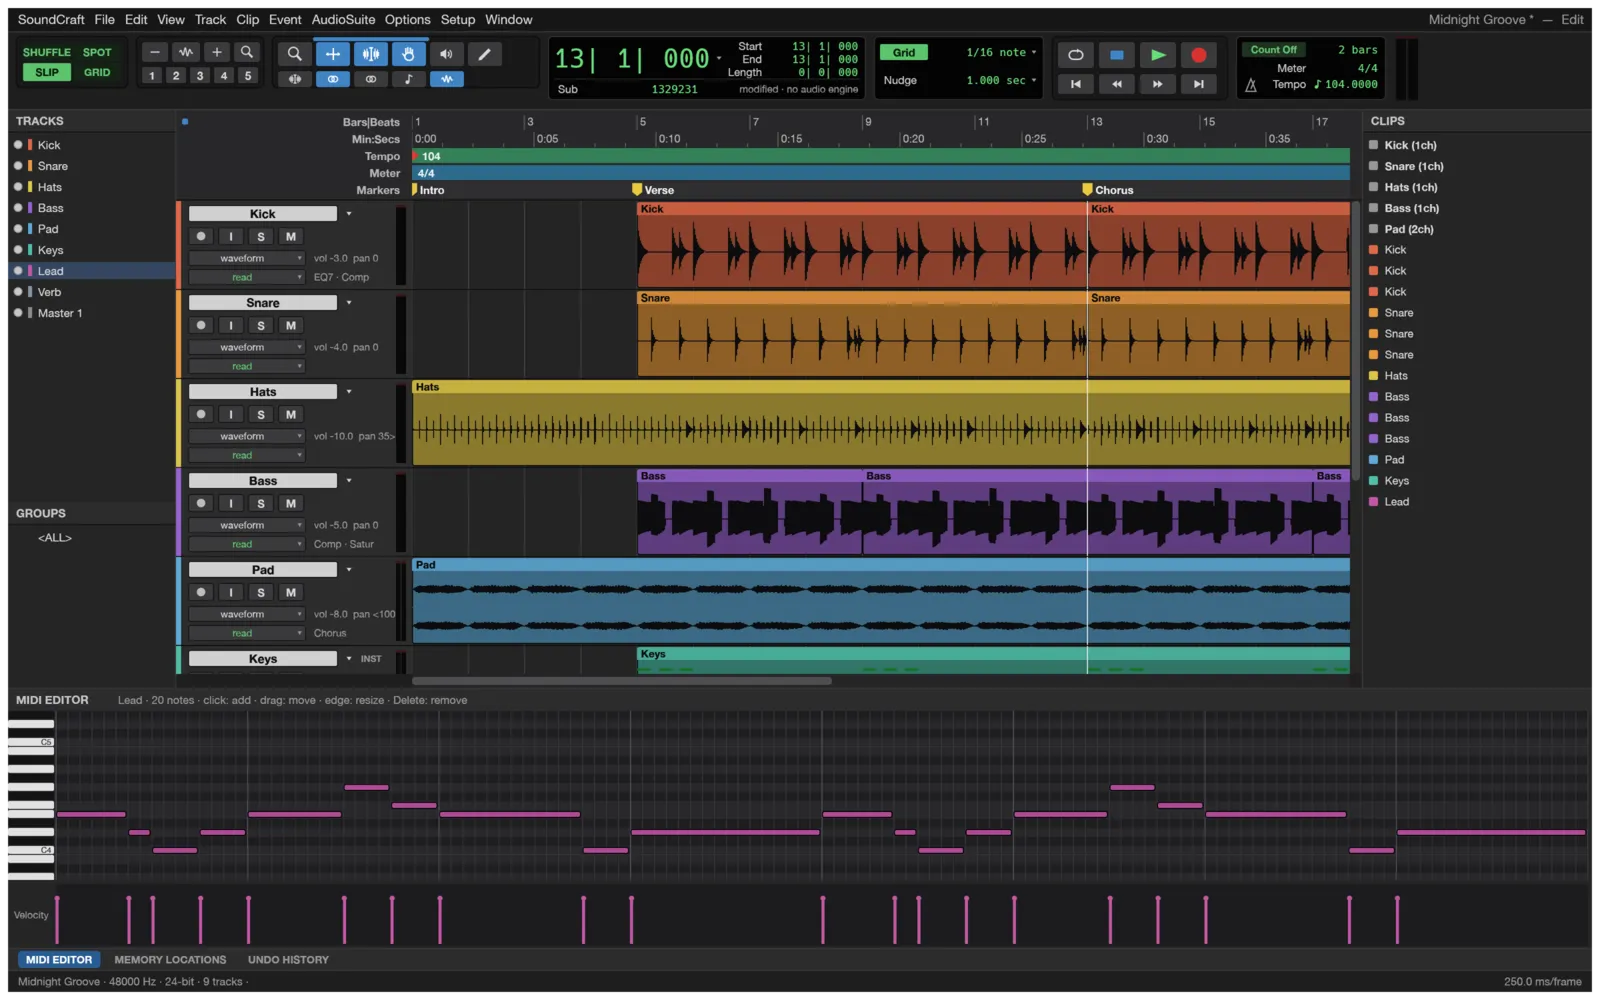
Event › MIDI Operations has Quantize and Transpose (⌥T). Window › Score Editor shows a MIDI clip as notation.
To bring MIDI in or out, use File › Import › MIDI and File › Export › MIDI. File › Export › Sibelius saves the MIDI tracks as MusicXML, which most notation programs open.
Tempo and meter
Section titled “Tempo and meter”Grid mode snaps to the session’s tempo and meter. Change them from two windows on the Event menu. Open the windows themselves: the single items in those submenus, such as Constant… and Change Meter…, don’t ask for a value.
- Event › Tempo Operations › Tempo Operations Window: pick a Curve, set the tempos, and click Apply. constant sets the start bpm across the selection, or from the insertion point if nothing is selected. scale multiplies every tempo change by end bpm divided by start bpm.
- Event › Time Operations › Time Operations Window: under Operation, choose change meter, set the time signature, and click Apply. The new meter takes effect at the start of the selection.
Find the tempo of a recording
Section titled “Find the tempo of a recording”Event › Beat Detective opens a window that listens for beats in your audio.
- Select the audio tracks and a range with the Selector tool. It analyzes at most 20 minutes at a time.
- In Beat Detective, set Sensitivity and click Analyze. The beat count and the tempo it found appear under the buttons.
- To act on the result, check Separate clips at detected beats, Set the session tempo from the beats, or both, then click Apply.
If you already know how long the selection is, use Identify Beat in the same window. Select exactly the bars you want, set the number beside Identify Beat: selection is, and click Set Tempo. SoundCraft sets the tempo so that selection lasts that many bars. It needs a selection (#1384).
Sessions and templates
Section titled “Sessions and templates”- File › Save Session Copy In… saves the session, with its audio, to a new folder.
- File › Save As Template… saves the tracks, mixer and routing without any clips, as a starting point for new sessions.
- File › Import › Session Data… (⌥⇧I) brings tracks from another session into the open one, with their clips, playlists, mixer settings, automation and audio.
- File › Export › Selected Tracks as New Session… saves the selected tracks as their own session.
Add video
Section titled “Add video”Choose File › Import › Video to add a movie on a video track, with thumbnails along the timeline. Window › Video (⌘9) shows the picture, following the playhead. SoundCraft shows H.264, ProRes and Motion JPEG movies in MP4 and MOV files.
Bounce
Section titled “Bounce”File › Bounce Mix (⌥⌘B) renders the mix to WAV, AIFF or FLAC. See Getting started for the options. SoundCraft can’t export MP3 or AAC yet (#648).
Check a session’s audio
Section titled “Check a session’s audio”SoundCraft › Session Audio Health lists audio that isn’t loaded, sample-rate mismatches and clips that run past the end of their audio, across every playlist. It suggests how to fix each problem. It checks the audio loaded in the session, not files on disk, levels, plugins or routing.
Other windows
Section titled “Other windows”The Window menu opens more than the main windows:
- Undo History lists your edits. Clip List lists the clips and audio files in the session.
- Metadata Inspector shows the sample rate, bit depth, timecode rate and counts of tracks, clips and markers. You can write session comments there too.
- Disk Usage and System Usage show how much memory the session’s audio takes, the audio device, the number of plugins and how many undo steps you have.
- Task Manager (⌥’) shows a running bounce and its progress.
- Color Palette colors the selected tracks, or the selected clips with Shift held.
- MIDI Event List (⌥=) lists the notes of the selected MIDI clip. You can change a note’s velocity or delete it.
- MIDI Keyboard (⇧K) is an on-screen keyboard. Click a key to enter a note into the selected MIDI clip at the insertion point.
Preferences
Section titled “Preferences”Choose Setup › Preferences. Only three settings work yet:
- UI Theme on the Display page: System, Light or Dark.
- Reduce Visual Effects on the Display page: Never, Only During Playback or Always.
- Levels of Undo on the Editing page.
The rest are grayed out. That includes Language: the interface is in English only. Russian and Catalan translations have been asked for (#1419, #1422).
Command line
Section titled “Command line”soundcraft-cli works without a window. Get it as described in AI agents. These subcommands are the useful ones:
infoprints an audio file’s format, or a summary of a.scraftsession.convertchanges an audio file’s sample rate or bit depth, or normalizes it:soundcraft-cli convert in.wav out.flac --bit-depth 16 --rate 44100.runruns commands on a new, demo or saved session, then can bounce or save it.scriptruns a text file with one command per line.commandslists every command, anddescribeexplains one.
soundcraft-cli <subcommand> --help lists the options. A command that fails exits with 1, and a mistake in the options exits with 2.
Keyboard shortcuts
Section titled “Keyboard shortcuts”| Shortcut | What it does |
|---|---|
| Space | Play or stop |
| F12 or ⌘Space | Record |
| ⌘= | Switch between Edit and Mix |
| F1 to F4 | Shuffle, Slip, Spot, Grid |
| F5 to F10 | Zoom, Trim, Selector, Grabber, Scrubber, Pencil |
| ⌘E | Separate at the selection |
| ⌘D | Duplicate |
| ⌘Z / ⇧⌘Z | Undo / redo |
| Enter | Add a marker |
| ⇧⌘N | New tracks |
| ⇧⌘I | Import audio |
| ⌘S | Save |
| ⌥⌘B | Bounce mix |
| ⇧⌘L | Loop playback |
| Home / End | Go to the start / end |