Workflows
PhotoCraft’s menus are File, Edit, Image, Layer, Type, Select, Filter, View, Window and Help. If you can’t find a command, choose Edit › Search… (Ctrl+F, or ⌘F on a Mac) and type its name.
In this guide, Ctrl is ⌘ on a Mac, and Alt is Option.
Adjust colors without changing your pixels
Section titled “Adjust colors without changing your pixels”An adjustment layer sits above your image and changes how it looks. Your original pixels stay as they were, so you can change or remove the adjustment at any time.
- In the Layers panel, click the layer the adjustment should sit above.
- Choose Layer › New Adjustment Layer, then an adjustment such as Levels…, Curves…, Vibrance… or Hue/Saturation….
- Change its settings in the Properties panel.
The same list is behind the Create new fill or adjustment layer button at the bottom of the Layers panel.
The adjustments are Brightness/Contrast, Levels, Curves, Exposure, Vibrance, Hue/Saturation, Color Balance, Black & White, Photo Filter, Channel Mixer, Color Lookup, Invert, Posterize, Threshold, Gradient Map and Selective Color.
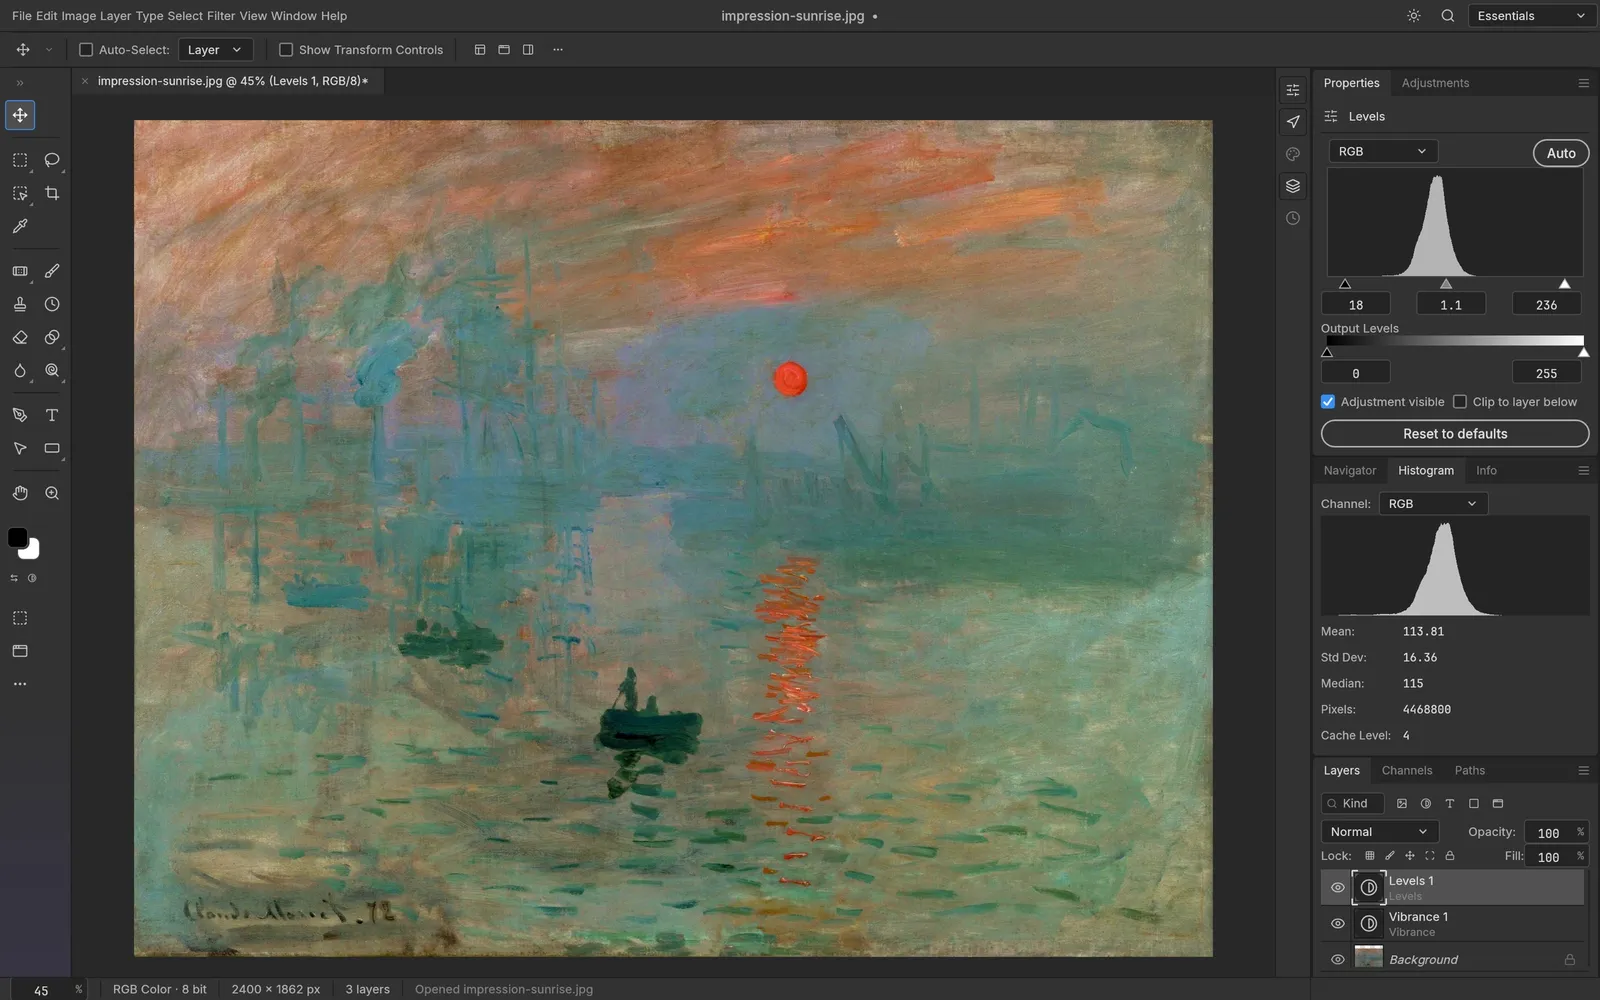
If you don’t need to change it later, use Image › Adjustments instead, for example Image › Adjustments › Curves… (Ctrl+M). This changes the layer’s pixels directly.
Select part of an image
Section titled “Select part of an image”Use one of these:
- Rectangular Marquee Tool or Elliptical Marquee Tool (M) for simple shapes.
- Lasso Tool (L) to draw around something by hand.
- Quick Selection Tool, Object Selection Tool or Magic Wand Tool (W) to follow the edges of an object.
- Select › Subject to let PhotoCraft find the main subject. If it finds nothing, try the Object Selection Tool or the Lasso Tool.
Smart selection runs on your computer. It needs no account and no internet connection.
Then refine the selection:
- Select › Inverse (Ctrl+Shift+I) swaps what is and isn’t selected.
- Select › Modify has Border…, Smooth…, Expand…, Contract… and Feather…. Feather softens the edge.
- Select › Select and Mask… refines a difficult edge, such as hair.
- Select › Deselect (Ctrl+D) removes the selection. Select › Reselect brings it back.
Mask a layer
Section titled “Mask a layer”A mask hides part of a layer without erasing it.
- Make a selection.
- Click the layer in the Layers panel.
- Choose Layer › Layer Mask › Reveal Selection to show only the selected area, or Hide Selection to hide it.
This works on adjustment layers too, so you can limit an adjustment to one area.
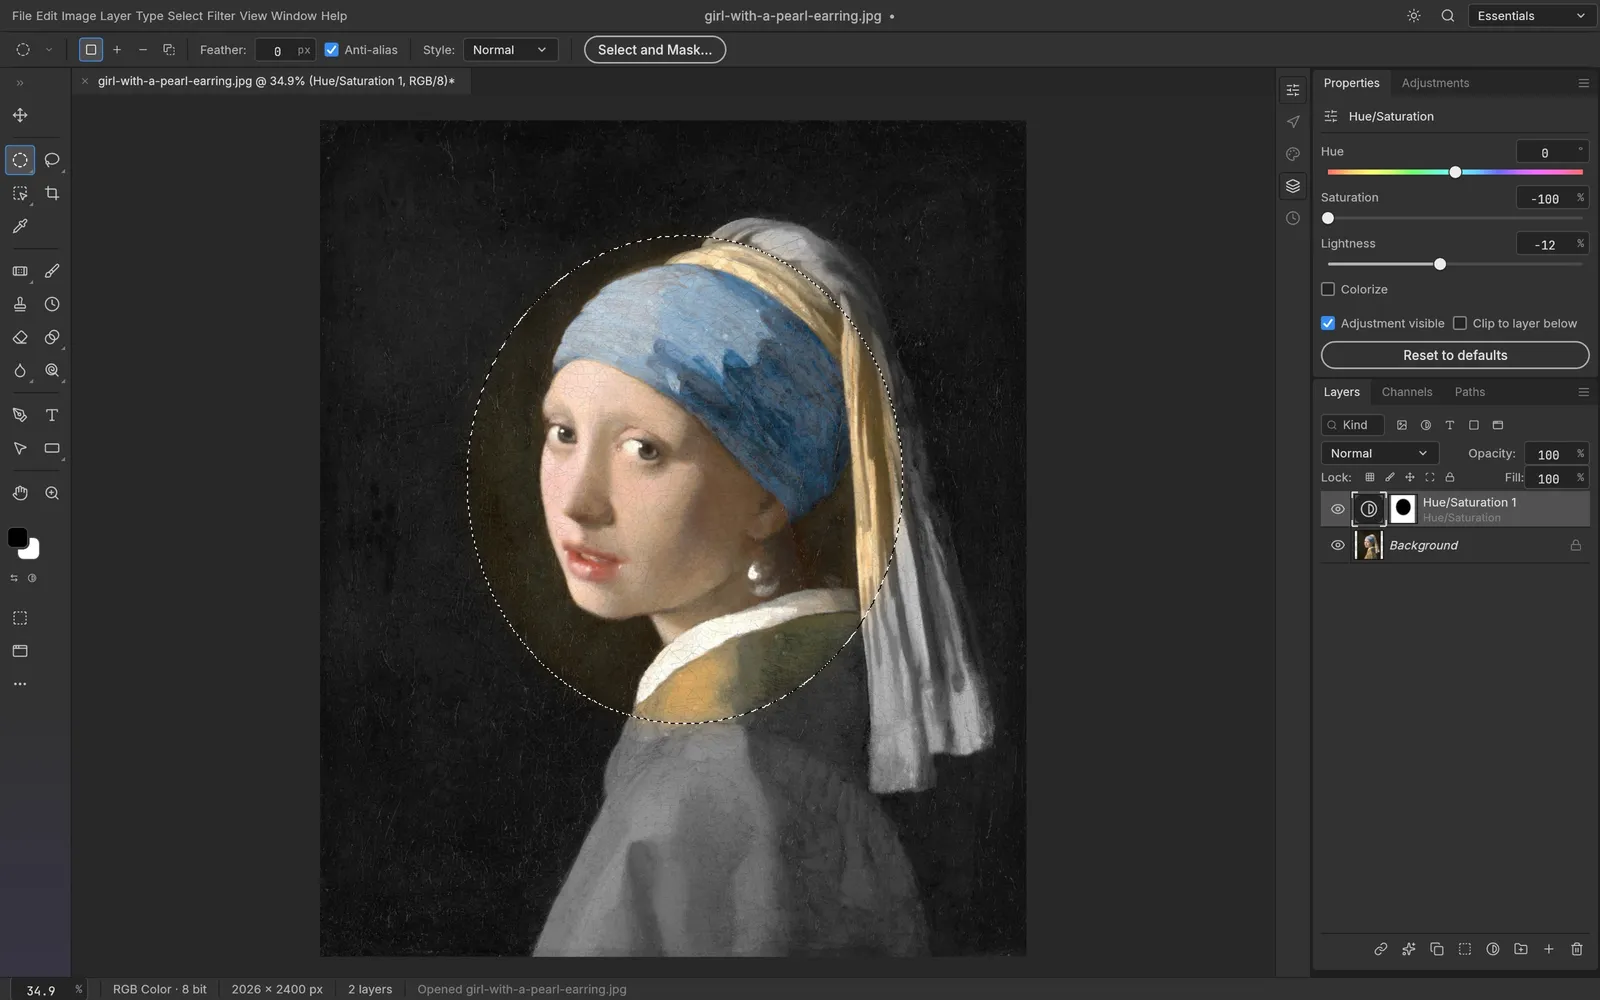
Layer › Layer Mask also has Reveal All and Hide All (to paint the mask yourself), Delete, Apply, and Disable Layer Mask (Enable Layer Mask while it is off) to switch the mask on and off.
Add and edit text
Section titled “Add and edit text”- Pick the Horizontal Type Tool (T).
- Click on the canvas for a single line of text, or drag a box for a paragraph.
- Type. Set the font, size, leading, tracking, alignment and color in the options bar or the Properties panel.
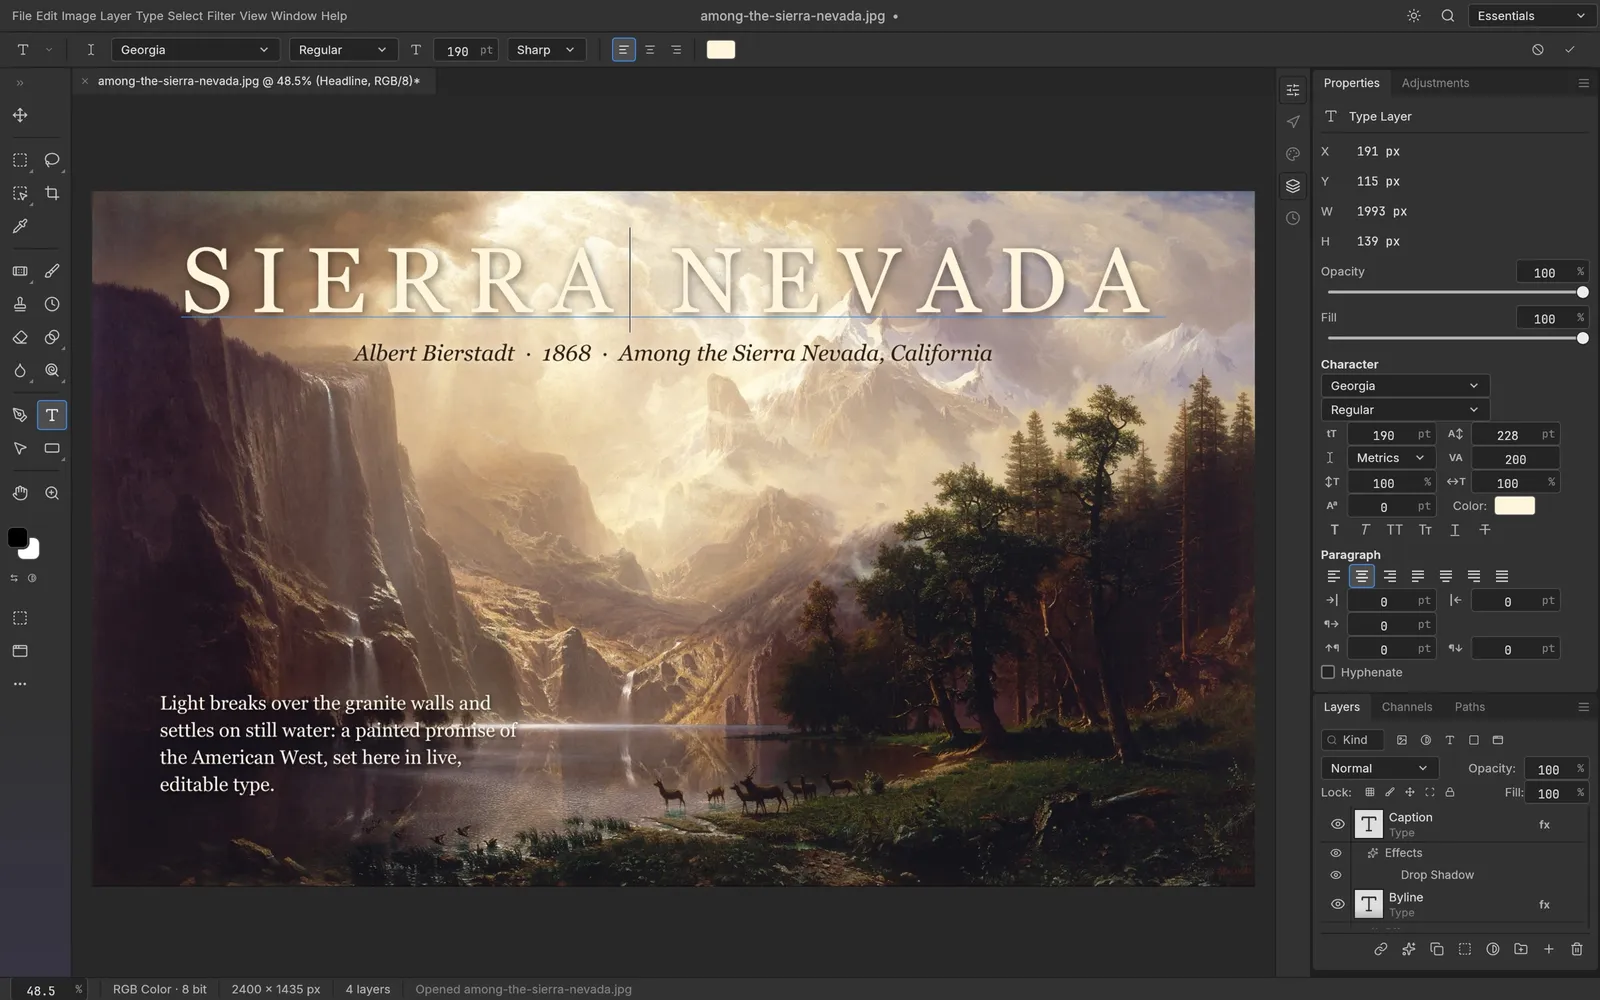
Text stays editable: click it with the Type tool to change it. Text layers from PSD files stay editable too. To start new text on top of an existing text layer, hold Shift as you click.
The Type menu has Convert to Paragraph Text and Convert to Point Text, Warp Text…, Convert to Shape (turn the letters into vector shapes) and Rasterize Type Layer (turn them into pixels; you can’t edit the words after that).
Add a layer style
Section titled “Add a layer style”- Click the layer in the Layers panel.
- Choose Layer › Layer Style, then an effect: Bevel & Emboss…, Stroke…, Inner Shadow…, Inner Glow…, Satin…, Color Overlay…, Gradient Overlay…, Pattern Overlay…, Outer Glow… or Drop Shadow….
- Adjust it in the Layer Style dialog and click OK. Select more effects in the list on the left to combine them.
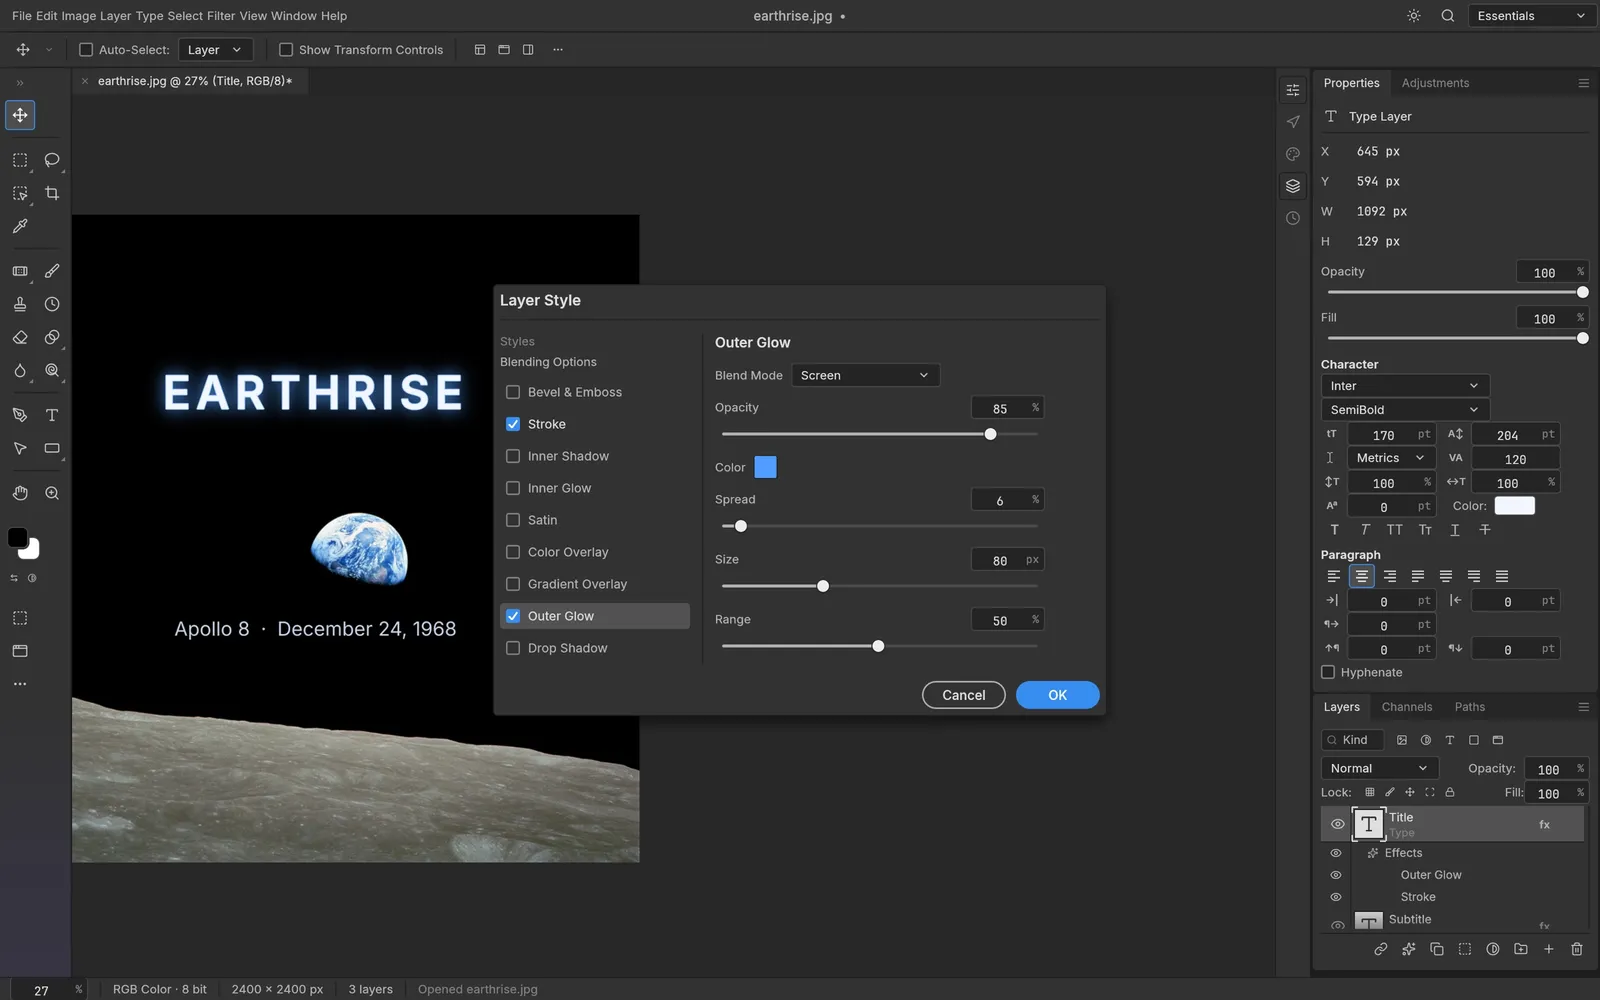
Effects are listed under the layer in the Layers panel. Layer › Layer Style also has Copy Layer Style, Paste Layer Style, Clear Layer Style and Hide All Effects.
Use filters
Section titled “Use filters”The Filter menu has blurs, sharpening, noise, distortions such as Twirl and Wave, pixelate, stylize and render filters. Filter dialogs preview on the canvas as you change them. If there is a selection, the filter only changes the selected area.
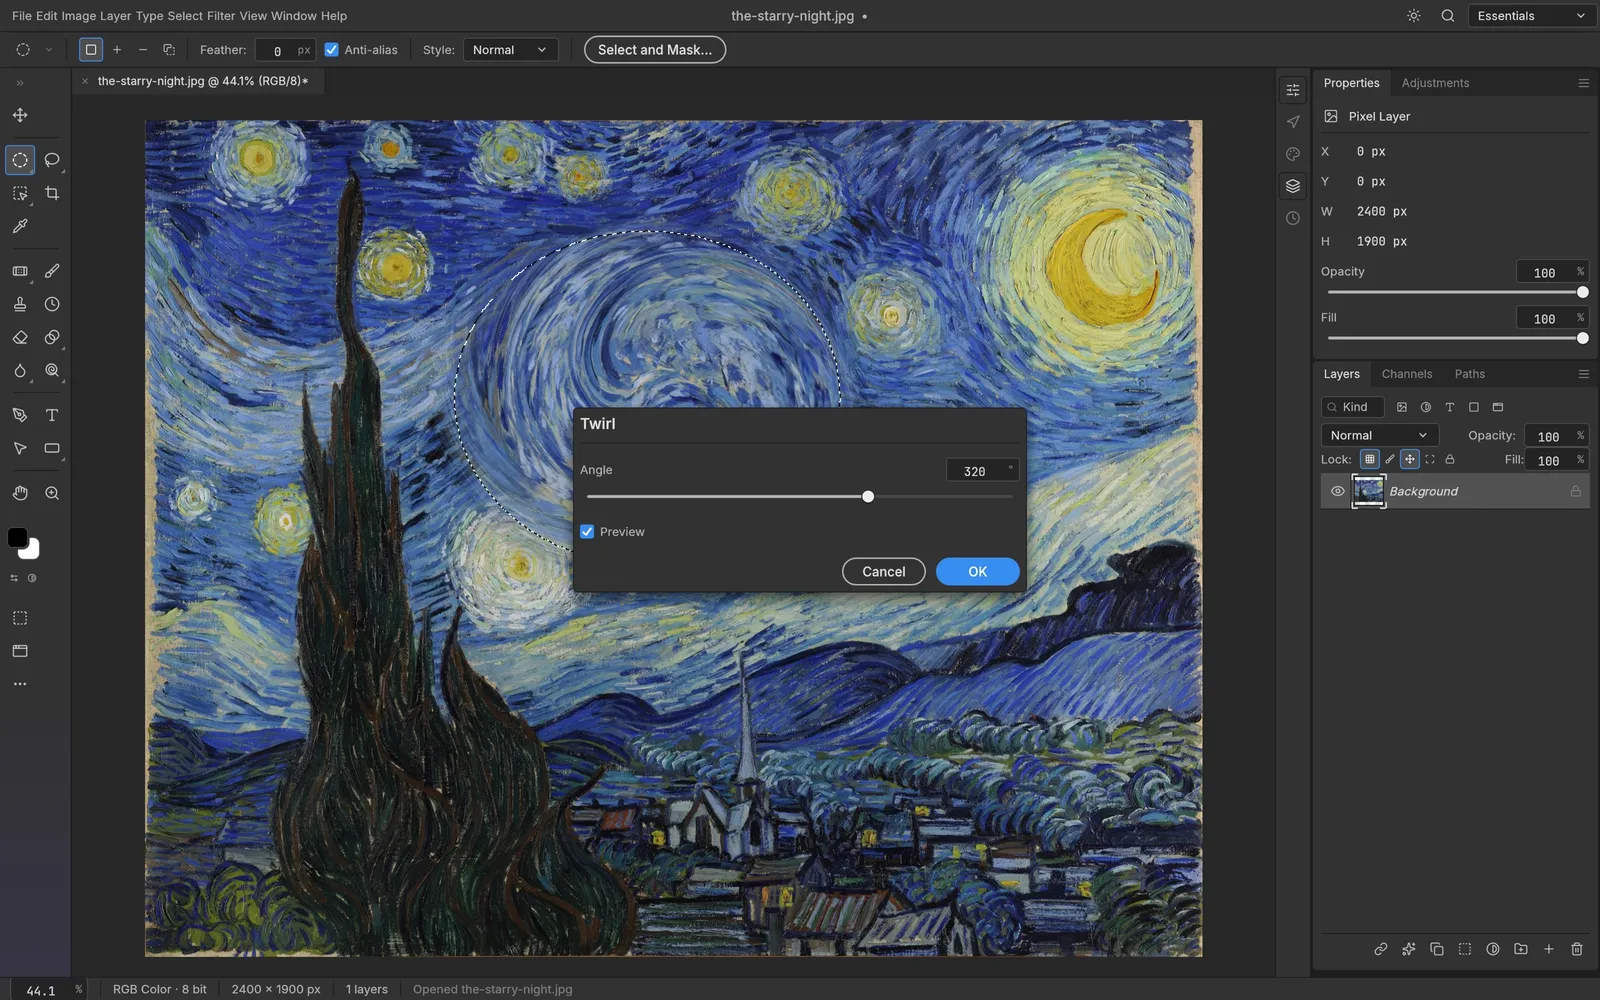
To keep a filter editable, run it on a smart object. You can then change, hide or remove it later.
Transform
Section titled “Transform”Edit › Free Transform (Ctrl+T) scales, rotates and moves the active layer. Edit › Transform has Scale, Rotate, Skew, Distort, Perspective and Warp, exact rotations, and Flip Horizontal and Flip Vertical. Edit › Transform › Again repeats the last transform.
To change the size of the whole image, use Image › Image Size…. To add space around it without scaling, use Image › Canvas Size….
Export an image
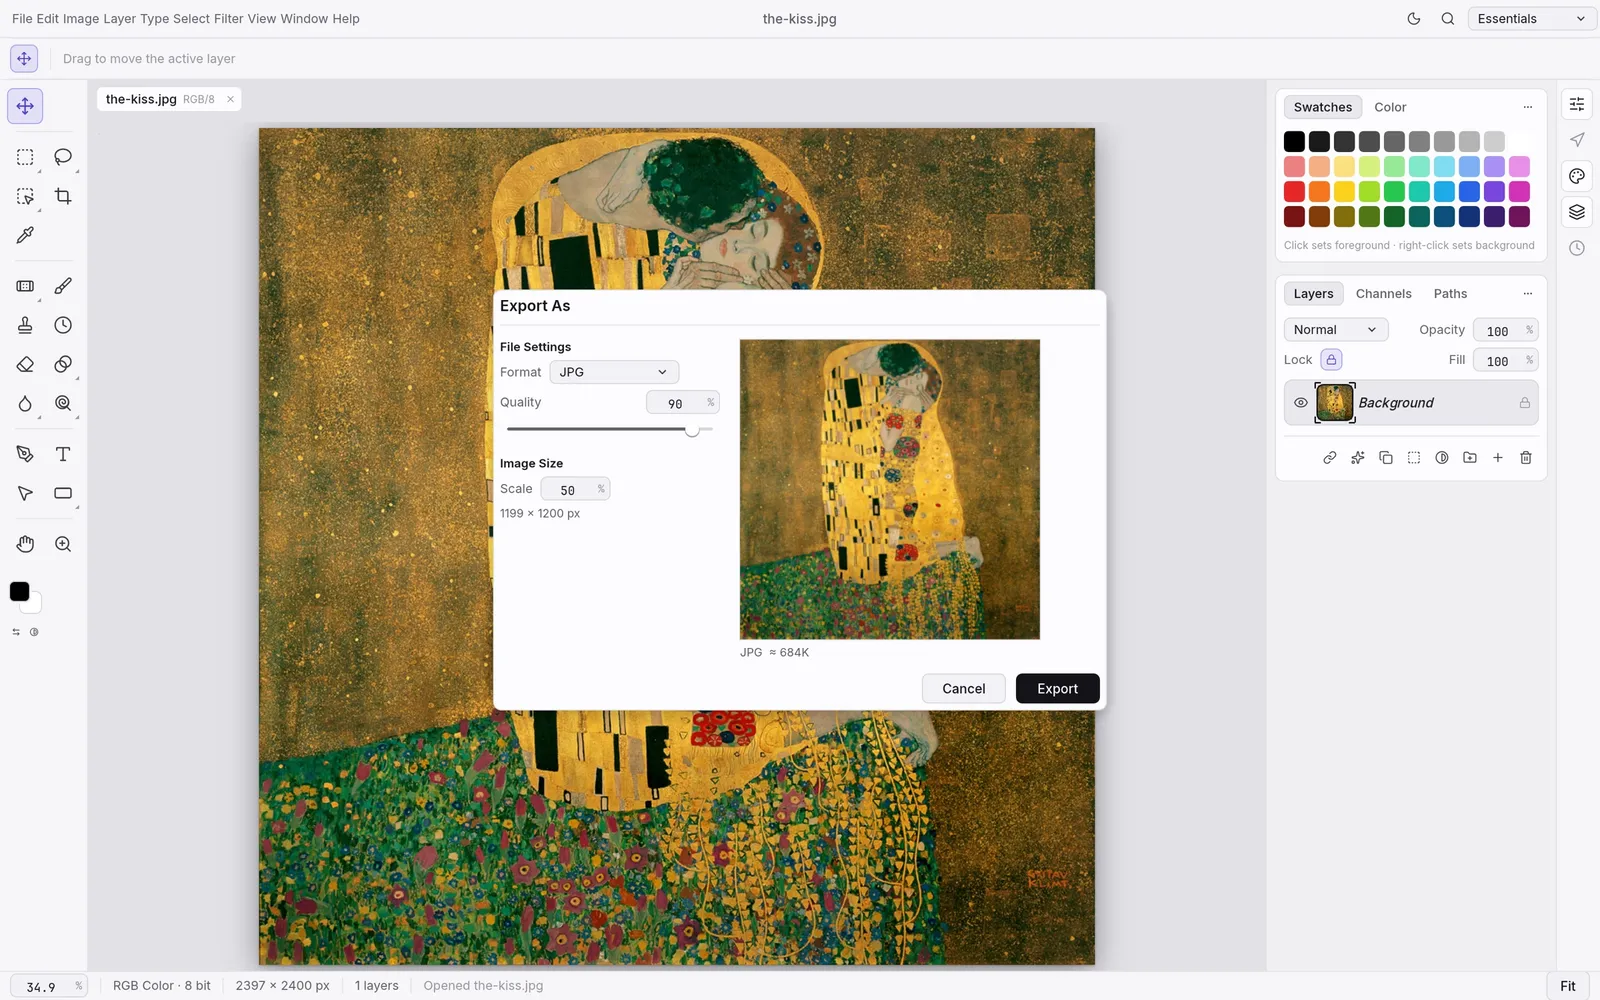
Section titled “Export an image”File › Export › Export As… makes a flat copy of your image for sharing. Your layered document isn’t changed.
- Under File Settings, pick a Format: PNG, JPG, WebP, TIFF, TGA, ICO or JPEG XL.
- Set the options for that format. JPG and lossy WebP have a Quality slider. WebP has a Lossless checkbox. Transparency keeps transparent areas (JPG has none). Metadata is None, EXIF or All.
- Under Image Size, set Scale in percent. The size in pixels shows below.
- Check the preview and the estimated file size, then click Export.
File › Export › Quick Export as PNG exports right away, using the settings in File › Export › Export Preferences….
To export one layer, use Layer › Export As… or Layer › Quick Export as PNG. With several layers or artboards selected, each one is exported as its own file.
- Choose File › Print… (Ctrl+P).
- Pick a printer under Printer and set Copies.
- Choose the Paper and Orientation, then position and size the image. Scale to Fit Media fills the page.
- Under Color Management, choose who handles color: Printer Manages Colors, PhotoCraft Manages Colors or No Color Management. If you choose PhotoCraft Manages Colors on Windows, turn off the printer’s own color management in Print Settings….
- Check the preview, then click Print.
When the job is sent, the status bar says Sent to and the printer’s name. File › Print One Copy (Ctrl+Alt+Shift+P) prints one copy with the settings of your last print. If you haven’t printed yet, it opens the dialog.
You can also drag the image on the preview to move it. Printing Marks adds crop and registration marks. To make a PDF instead of printing, use the Save as PDF box at the bottom of the dialog.
On Linux, PhotoCraft prints through CUPS. If it can’t find a printer there, it opens your system’s print dialog instead. The Flatpak uses your computer’s CUPS service.
Colors, modes and profiles
Section titled “Colors, modes and profiles”Image › Mode changes how the image stores color: Grayscale, RGB Color, CMYK Color, Lab Color, Indexed Color, Duotone, Bitmap or Multichannel. Below those, 8 Bits/Channel, 16 Bits/Channel and 32 Bits/Channel set the depth. Converting to a smaller mode, such as CMYK or Indexed Color, can change colors. Keep a copy of your RGB original.
Color profiles tell PhotoCraft what the numbers in a file mean:
- Edit › Color Settings… (Ctrl+Shift+K) sets your working color spaces and what PhotoCraft does when a file’s profile differs from them.
- Edit › Assign Profile… labels the document with a different profile without changing its pixels. Only profiles that fit the document’s mode are offered.
- Edit › Convert to Profile… changes the pixels so the picture looks the same in the new profile.
To preview how the image will look in another color space, choose View › Proof Setup, pick a profile, then turn on View › Proof Colors (Ctrl+Y). View › Gamut Warning (Ctrl+Shift+Y) marks colors the proof profile can’t reproduce. Edit › Preferences › Transparency & Gamut… sets how the warning looks.
Open camera raw files
Section titled “Open camera raw files”When you open a camera raw file with File › Open…, a RAW Develop window opens first. Adjust the photo there and click Open, or click Cancel to close the file again. To change this, open Edit › Preferences › RAW Defaults….
You can also run the same controls on any layer with Filter › RAW Develop Filter… (Ctrl+Shift+A).
Record and replay actions
Section titled “Record and replay actions”The Actions panel (Window › Actions, or Alt+F9) records a sequence of steps and plays it back. Its menu loads and saves action sets in Photoshop’s .atn format.
Batch processing
Section titled “Batch processing”- Record the steps you want as an action.
- Select the action in the Actions panel, then choose File › Automate › Batch….
- Choose the source folder, or the documents you have open. Turn on Include All Subfolders if you want the images inside folders too.
- Set where the results go. In File Naming, use tokens such as
{name}and{serial}to name them. Leave it empty to keep the original names. - Run it. Stop on error ends the batch at the first file that fails. Error log writes a text file of the files that failed.
For example, {name}_{serial}{ext} writes photo_001.png, photo_002.png and so on. Add {ext} yourself: a template without it writes names with no extension.
Other tools in the same area:
- File › Automate › Create Droplet… saves the selected action as a droplet file. Record an action first. To run a droplet from a script, see Automation and AI agents.
- File › Scripts › Image Processor… converts a folder of images to JPEG, PNG, PSD or TIFF, and can resize them, without recording an action.
- File › Automate › Fit Image… fits the image inside a width and height you set.
- File › Automate › Contact Sheet II… places a folder of images as thumbnails on one sheet.
- File › Export › Layers to Files… and File › Export › Artboards to Files… save each layer or artboard as its own file.
A recorded Image Size step doesn’t resize batches correctly yet. See Known problems, not fixed yet.
File menu at a glance
Section titled “File menu at a glance”| Command | What it does |
|---|---|
| Save a Copy… | Save a copy and keep working in the current file |
| Revert (F12) | Go back to the last saved version |
| Place Embedded…, Place Linked… | Add a file to the document as a layer. Embedded keeps a copy inside the document; linked points to the original file |
| Export › Save for Web (Legacy)… | The older export dialog |
| Package… | Copy the document and the files it links to into one folder |
| File Info… | Title, author, copyright and camera details |
| Close All, Close Others | Close all documents, or all but this one |
Tools at a glance
Section titled “Tools at a glance”Press a tool’s key to select it. Several tools share a key. Press Shift with the key to cycle through them.
| Key | Tools |
|---|---|
| V | Move, Artboard |
| M | Rectangular Marquee, Elliptical Marquee |
| L | Lasso, Polygonal Lasso, Magnetic Lasso |
| W | Quick Selection, Object Selection, Magic Wand |
| C | Crop, Perspective Crop, Slice, Slice Select |
| K | Frame |
| I | Eyedropper, Color Sampler, Ruler, Note, Count |
| J | Remove, Spot Healing Brush, Healing Brush, Patch, Content-Aware Move, Red Eye |
| B | Brush, Pencil, Color Replacement, Mixer Brush |
| S | Clone Stamp, Pattern Stamp |
| Y | History Brush, Art History Brush |
| E | Eraser, Background Eraser, Magic Eraser |
| G | Gradient, Paint Bucket |
| O | Dodge, Burn, Sponge |
| P | Pen, Freeform Pen, Curvature Pen |
| T | Horizontal Type, Vertical Type, and the two Type Mask tools |
| A | Path Selection, Direct Selection |
| U | Rectangle, Ellipse, Triangle, Polygon, Star, Line, Custom Shape |
| H, R, Z | Hand, Rotate View, Zoom |
Blur, Sharpen and Smudge, the Single Row and Single Column Marquee tools, and the Add Anchor Point, Delete Anchor Point and Convert Point tools have no key. Pick them from the toolbox. Filter › Liquify… (Ctrl+Shift+X) pushes pixels around.
Plug-ins
Section titled “Plug-ins”PhotoCraft doesn’t run Photoshop plug-ins, and it has no Extensions menu. It runs filters written as WebAssembly (.wasm) files, which work the same on every system. Installed plug-ins appear in Filter › Plug-ins; Install Plug-in… is in the same menu. To load a whole folder of them each time PhotoCraft starts, use Edit › Preferences › Plugins….
Where to find a setting
Section titled “Where to find a setting”Edit › Preferences (on a Mac, PhotoCraft › Settings) has one page per area. Pages you may look for:
| Page | What it holds |
|---|---|
| General… | General options, including update checks |
| AI Integrations… | Allow agent control |
| Interface… | Language, font size, scaling and the system title bar |
| File Handling… | Recovery saves and PSD options |
| Performance… | Rendering Mode, memory use and the Linux display server |
| Scratch Disks… | Where PhotoCraft puts the part of a big file that doesn’t fit in memory |
| RAW Defaults… | How raw files open |
| Plugins… | The folder of extra plug-ins |
Others are Workspace…, Tools…, History Log…, Export…, Cursors…, Transparency & Gamut…, Units & Rulers…, Guides, Grid & Slices… and Type….
Change how PhotoCraft looks
Section titled “Change how PhotoCraft looks”- Window › Theme has dark and light themes, and Sync with system to follow your computer’s setting.
- Window › Workspace switches between panel layouts: Essentials, Photography, Painting, Pixel Art, Graphic and Web and Motion. Reset Workspace puts the panels back.
- Tab hides and shows all panels. Shift+Tab hides and shows only the panels on the right.
To change the interface language, open Edit › Preferences › Interface… (on a Mac, also PhotoCraft › Language). By default, PhotoCraft follows your system’s language.
Keyboard shortcuts
Section titled “Keyboard shortcuts”PhotoCraft uses the shortcuts most image editors use. To see or change them, choose Edit › Keyboard Shortcuts… (Ctrl+Alt+Shift+K).
| Shortcut | What it does |
|---|---|
| Ctrl+N, Ctrl+O | New, Open |
| Ctrl+S, Ctrl+Shift+S | Save, Save As |
| Ctrl+Z, Ctrl+Shift+Z | Undo, Redo |
| Ctrl+Alt+Z | Toggle Last State |
| Ctrl+T | Free Transform |
| Ctrl+J | Layer via Copy: copy the selection, or the whole layer, to a new layer |
| Ctrl+Shift+N | New layer |
| Ctrl+E | Merge layers |
| Ctrl+D | Deselect |
| Ctrl+L, Ctrl+M, Ctrl+U | Levels, Curves, Hue/Saturation |
| Ctrl+=, Ctrl+- | Zoom in, zoom out |
| Ctrl+0, Ctrl+1 | Fit on screen, 100% |
| Ctrl+F | Search for a command |
| V, M, L, W, C | Move, Marquee, Lasso, selection tools, Crop |
| B, E, G, T | Brush, Eraser, Gradient, Type |
| H, Z | Hand, Zoom |